How Long Does It Take To Dehydrate Chicken Feet In Oven
Dehydrating chicken feet in the oven typically takes 4 to 8 hours at 200°F to 250°F. The exact time depends on your oven type, chicken foot size, and desired texture. This guide covers every step from preparation to storage so you can make delicious dehydrated chicken feet safely and easily.
Have you ever wondered how long to dehydrate chicken feet in oven? Maybe you have seen those crispy, crunchy chicken feet snacks at an Asian market and wanted to make them at home. Or perhaps you are looking for a budget-friendly way to preserve chicken feet for your pets. Whatever your reason is, this guide has everything you need.
Dehydrating chicken feet in the oven is simpler than most people think. You do not need a fancy food dehydrator. A regular home oven works just fine. The key is knowing the right temperature, timing, and preparation steps. In this article, we will walk you through the entire process from start to finish.
By the end of this guide, you will know exactly how to dehydrate chicken feet in oven like a pro. We will cover preparation, oven settings, timing, and storage. You will also learn common mistakes to avoid. Let us dive in.
Key Takeaways
- Typical Dehydration Time: Most chicken feet take 4 to 8 hours in a standard oven at 200°F to 250°F.
- Low and Slow Is Key: Keeping the temperature between 200°F and 250°F ensures even drying without burning.
- Proper Prep Matters: Cleaning, blanching, and patting dry before dehydrating improves both safety and texture.
- Check Regularly: Flip and inspect the chicken feet every 1 to 2 hours for consistent results.
- Storage Affects Shelf Life: Properly stored dehydrated chicken feet can last 2 to 4 weeks at room temperature.
- Oven Type Varies: Convection ovens dry faster than standard ovens, so adjust your timing accordingly.
- Multiple Uses: Dehydrated chicken feet make great snacks, pet treats, and broth bases.
📑 Table of Contents
- Why Dehydrate Chicken Feet in the Oven?
- How to Prepare Chicken Feet for Dehydration
- Ideal Oven Temperature and Settings
- Step-by-Step Dehydration Process
- How to Know When Chicken Feet Are Done
- Storing and Using Dehydrated Chicken Feet
- Common Mistakes to Avoid When Dehydrating Chicken Feet
- Expert Tips for Perfect Dehydrated Chicken Feet
- Frequently Asked Questions
- Conclusion
Why Dehydrate Chicken Feet in the Oven?
Dehydration is one of the oldest food preservation methods. It removes moisture from food, which prevents bacteria from growing. This makes your food last much longer without refrigeration. Chicken feet are an excellent candidate for dehydration because they are full of collagen and protein.
There are several great reasons to dry chicken feet in your oven. First, it is cost-effective. Chicken feet are very cheap to buy, especially at Asian grocery stores or butcher shops. Second, oven dehydration requires no special equipment. Third, the result is a crispy, flavorful snack that kids and adults both enjoy.
Many people use dehydrated chicken feet as training treats for dogs. The crunchy texture dogs love, and the high protein content makes them nutritious. Some people also grind dried chicken feet into powder for bone broth or cooking stock. The possibilities are genuinely endless.
Health and Nutritional Benefits
Chicken feet are surprisingly nutritious. They are rich in collagen, which supports joint health and skin elasticity. They also contain protein, calcium, and other essential minerals. When you dehydrate them, you preserve most of these nutrients. The drying process removes water but keeps the nutrition intact.
Because dehydration removes moisture, the final product is lightweight and shelf-stable. This makes oven dried chicken feet perfect for hiking trips, camping, or just a quick snack at home. You can carry them anywhere without worrying about refrigeration.
How to Prepare Chicken Feet for Dehydration
Proper preparation is the most important step in the entire process. Skipping this step can lead to uneven drying or food safety issues. Take your time here, and the rest of the process will go smoothly.
Cleaning the Chicken Feet
Start by rinsing the chicken feet under cold running water. Remove any loose feathers or debris. Use your fingers to pull off any remaining small quills. Next, trim off the nails at the tips of each toe. The nails can be quite tough and may not dry evenly, so removing them helps create a better final product.
Some people prefer to leave the nails on, especially if they are making treats for dogs. Dogs can chew through chicken nails easily. But for human snacking, trimming the nails gives a more pleasant eating experience.
Blanching for Food Safety
Blanching is a quick boiling step that kills surface bacteria. Bring a large pot of water to a rolling boil. Drop the cleaned chicken feet into the water and let them boil for 3 to 5 minutes. This step also helps remove any impurities or scum from the surface.
After blanching, transfer the chicken feet to a bowl of ice water. Let them cool completely. Then pat them dry with paper towels. Removing as much surface moisture as possible before placing them in the oven speeds up the dehydration process significantly.
Cutting and Sizing
Consider cutting the chicken feet in half before dehydrating them. Smaller pieces dry faster and more evenly. You can also separate the toes from the foot if you prefer bite-sized pieces. The size you choose depends on your preference and how you plan to use the final product.
For dog treats, leaving them whole or in halves works well. For human snacking, smaller pieces are easier to eat and more enjoyable. Whatever size you choose, try to keep the pieces uniform. This ensures everything dries at the same rate.
Ideal Oven Temperature and Settings
Getting the temperature right is critical for successful dehydrate chicken feet in oven results. Too hot and the outside will burn before the inside dries. Too cool and the chicken feet may not dry properly, creating a food safety risk.
Recommended Temperature Range
The ideal temperature range for dehydrating chicken feet is between 200°F and 250°F. Most experts recommend starting at 225°F for the best balance of speed and quality. This temperature is hot enough to drive out moisture efficiently but cool enough to prevent burning.
If your oven runs hot, set it slightly lower at 200°F. If your oven tends to run cool, you can go up to 250°F. Every oven is different, so knowing your oven’s personality helps you adjust accordingly.
Convection vs. Standard Ovens
Convection ovens circulate hot air around the food, which speeds up dehydration significantly. If you have a convection oven, your chicken feet will likely dry faster than in a standard oven. You may need to reduce the time by 1 to 2 hours.
For standard ovens without a fan, the drying process takes longer. The lack of air circulation means hot spots can form. To combat this, rotate the baking sheets halfway through the process. This ensures all pieces dry evenly.
Using the Lowest Heat Setting
If your oven does not go below 200°F, you can still use it successfully. Some ovens have a “warm” setting that sits around 170°F. This works too, but expect the dehydration time to extend to 8 to 10 hours. The slower approach can actually produce a better texture because the moisture has more time to escape evenly.
Never go above 275°F when dehydrating chicken feet. Higher temperatures will cook the feet instead of drying them. You want a low, steady heat that pulls moisture out without cooking the meat.
Step-by-Step Dehydration Process
Now that you have prepared your chicken feet and set your oven, it is time to start the actual dehydration. Follow these steps carefully for the best results.
Step 1: Arrange the Chicken Feet on the Baking Sheet
Line a baking sheet with parchment paper or a silicone baking mat. Place the chicken feet on the sheet with space between each piece. Do not overlap them. Air needs to flow around every piece for even drying.
If you are using multiple baking sheets, place them on separate oven racks. This allows hot air to circulate around all the sheets. Avoid stacking more than two sheets at a time, as this can block airflow.
Step 2: Set Your Oven and Timer
Preheat your oven to 225°F. Once it reaches the target temperature, place the baking sheets inside. Set a timer for 2 hours. At this point, the chicken feet will still feel soft and pliable. This is normal. The drying process takes time.
During the first 2 hours, your oven is working to remove surface moisture. After this initial phase, the real drying begins. Keep the oven door slightly cracked if possible. This allows moisture to escape and prevents condensation from building up inside the oven.
Step 3: Flip and Rotate Every 1 to 2 Hours
After the first 2 hours, open the oven and check the chicken feet. Use tongs to flip each piece over. This exposes the other side to direct heat. Rotate the baking sheets as well, moving the front sheets to the back and vice versa.
Continue this process every 1 to 2 hours. Flipping and rotating ensures even drying on all sides. It also helps you monitor the progress. The chicken feet should start feeling firmer and drier with each check.
Step 4: Check for Doneness
Most chicken feet are done between 4 and 8 hours. The exact time depends on the size of the pieces, your oven, and the humidity in your kitchen. The best way to check is to bite into a piece. It should be dry, crunchy, and break apart easily.
If the center still feels soft or rubbery, return the pieces to the oven for another 1 to 2 hours. Check again until the texture is consistent throughout. Remember, under-dried chicken feet can spoil quickly, so do not rush this step.
Step 5: Cool Completely Before Storing
Remove the chicken feet from the oven and let them cool on the baking sheet. Cooling takes about 30 minutes to 1 hour. The pieces will become even crispier as they cool. Do not store them while they are still warm, as trapped heat can create condensation and lead to spoilage.
Once fully cooled, your crispy chicken feet are ready to enjoy or store. You can eat them right away, store them for later, or process them further for different uses.
How to Know When Chicken Feet Are Done
Knowing when dehydrated chicken feet are fully dry is essential for both quality and safety. Under-dried chicken feet can grow mold or bacteria, while over-dried ones become too hard to enjoy.
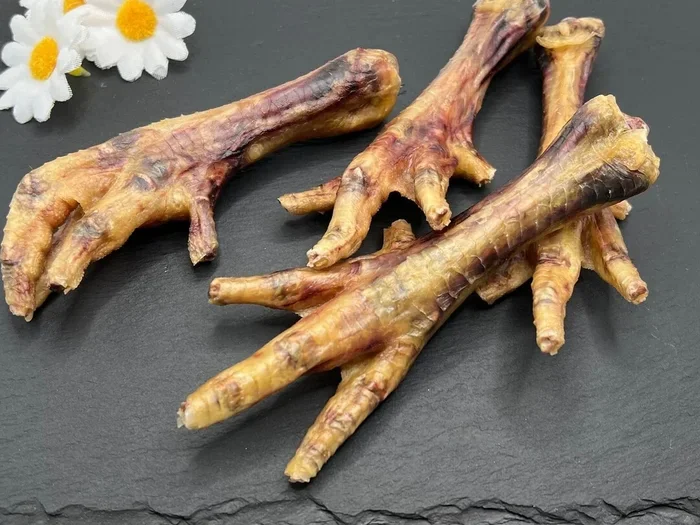
Look for these signs that your chicken feet are ready. The color should be dark golden brown or slightly darker. The texture should be firm and crunchy throughout. When you bend a piece, it should snap cleanly rather than bend or flex.
Another test is the bend test. Pick up a chicken foot piece and bend it. If it cracks and breaks, it is fully dry. If it bends without breaking, it needs more time. Trust your senses here. Dry chicken feet have a slightly smoky, savory aroma. If they smell wet or raw, they need more drying time.
Keep in mind that pieces on the edges of the baking sheet may dry faster than those in the center. This is normal. Just remove the done pieces and let the rest continue drying. This prevents over-drying some pieces while others are still unfinished.
Storing and Using Dehydrated Chicken Feet
Proper storage is just as important as the dehydration process itself. Even perfectly dried chicken feet can spoil if stored incorrectly. Follow these guidelines to maximize shelf life and maintain quality.
Best Storage Methods
Store your dehydrated chicken feet in an airtight container. Glass jars with tight lids work great. So do vacuum-sealed bags or heavy-duty zip-lock bags with the air pressed out. The goal is to keep moisture out, as moisture is the enemy of dried food.
Keep the container in a cool, dark, and dry place. A pantry or cupboard away from the stove and sunlight is ideal. Avoid storing them near heat sources or in humid areas like near the dishwasher or sink.
At room temperature, properly stored dehydrated chicken feet last about 2 to 4 weeks. For longer storage, keep them in the refrigerator for up to 3 months. You can also freeze them for up to 6 months. Label your containers with the date so you always know how old your batch is.
Creative Uses for Dehydrated Chicken Feet
Dehydrated chicken feet are incredibly versatile. Here are some popular ways to use them:
- Snacking: Enjoy them as a crunchy, protein-rich snack on their own. Add your favorite seasoning for extra flavor.
- Dog Treats: Dogs love the crunchy texture. They make excellent all-natural chews for dental health.
- Broth Base: Grind dried chicken feet into a fine powder and use it to make rich, collagen-packed bone broth.
- Cooking Ingredient: Add dried chicken feet to soups, stews, or curries for extra body and nutrition.
- Gift Baskets: Package them in decorative bags for a unique homemade gift.
Rehydrating Dried Chicken Feet
If you ever need to rehydrate your dried chicken feet, it is easy to do. Simply soak them in warm water for 30 minutes to 1 hour. They will soften and become pliable again. Rehydrated chicken feet work well in soups and stews, where they add gelatinous texture and rich flavor.
Common Mistakes to Avoid When Dehydrating Chicken Feet
Even experienced cooks make mistakes when dehydrating chicken feet for the first time. Learning from common errors saves time, food, and frustration. Here are the pitfalls to watch out for.
Skipping the blanching step is one of the biggest mistakes. Blanching removes surface bacteria and ensures food safety. Without it, you risk consuming harmful pathogens. Always blanch before drying, even if the recipe does not explicitly call for it.
Overcrowding the baking sheet is another common error. Chicken feet need space for air to circulate. When pieces touch or overlap, they steam instead of dry. This leads to uneven results and potential spoilage. Give each piece plenty of room on the tray.
Setting the oven too high is a mistake that ruins many batches. High temperatures cook the chicken feet rather than drying them. The outside may look done while the inside remains moist. Stick to the 200°F to 250°F range for the best results.
Not checking frequently enough can also cause problems. Ovens vary, and drying times change based on humidity and piece size. Check your chicken feet every 1 to 2 hours. This lets you catch any issues early and adjust as needed.
Storing while still warm is a subtle mistake that many people make. Warm chicken feet trapped in an airtight container create condensation. This moisture can lead to mold growth and spoilage. Always cool completely before sealing and storing.
Expert Tips for Perfect Dehydrated Chicken Feet
Want to take your dehydrated chicken feet to the next level? These expert tips will help you achieve the best possible results every single time.
Season before drying. Toss the blanched and dried chicken feet with your favorite spices before placing them in the oven. Garlic powder, onion powder, smoked paprika, and a touch of salt work beautifully. The seasoning infuses the meat as it dries, creating a more flavorful snack.
Use a wire rack over the baking sheet. Elevating the chicken feet on a wire rack allows air to flow underneath. This promotes even drying on all sides and reduces the need to flip as often.
Keep a food diary. Write down your oven temperature, drying time, and results each time you make a batch. Over time, you will learn exactly how your oven performs and can fine-tune your process for perfect results.
Experiment with different recipes. Try different seasoning blends, cut sizes, and drying times to find your personal favorite. Dehydration is both an art and a science, and part of the fun is discovering what works best for you.
Frequently Asked Questions
Can I use a regular oven to dehydrate chicken feet?
Yes, a regular home oven works perfectly for dehydrating chicken feet. You do not need a specialized food dehydrator. Simply set your oven to 200°F to 250°F and follow the preparation and timing steps outlined in this guide. The key is maintaining a low, steady temperature over several hours.
How long does it take to dehydrate chicken feet in oven at 200°F?
At 200°F, chicken feet typically take 6 to 8 hours to fully dehydrate. The lower temperature means slower drying, but it also produces a more even result. Check the pieces every 2 hours and look for a dry, crunchy texture throughout.
Is it safe to eat dehydrated chicken feet?
Yes, dehydrated chicken feet are safe to eat as long as they are properly prepared and fully dried. Always blanch the chicken feet before dehydrating to kill surface bacteria. Make sure the final product is completely dry and snaps when bent. Store them properly to prevent contamination.
Can I dehydrate chicken feet for my dog?
Absolutely. Dehydrated chicken feet make excellent natural treats for dogs. The crunchy texture helps clean teeth, and the high protein content is nutritious. You can leave the nails on for dogs, as they can chew through them easily. Just make sure the pieces are fully dry before giving them to your pet.
How do I store dehydrated chicken feet?
Store dehydrated chicken feet in an airtight container in a cool, dark, and dry place. Glass jars, vacuum-sealed bags, or heavy-duty zip-lock bags all work well. At room temperature, they last 2 to 4 weeks. In the refrigerator, they last up to 3 months. For the longest storage, freeze them for up to 6 months.
What is the best way to know if chicken feet are fully dehydrated?
The best test is the bend test. Pick up a piece and try to bend it. Fully dehydrated chicken feet should snap cleanly when bent. They should also feel firm and dry throughout, with no soft or rubbery spots. The color should be dark golden brown, and they should have a slightly smoky, savory aroma.
Conclusion
Dehydrating chicken feet in the oven is a simple, rewarding process that anyone can master. The key is patience, proper preparation, and the right temperature settings. As we have covered throughout this guide, dehydrate chicken feet in oven typically takes between 4 and 8 hours at 200°F to 250°F. The exact time depends on your oven, the size of your pieces, and your desired texture.
Remember to clean and blanch your chicken feet thoroughly before drying. Arrange them with space on the baking sheet, and flip them regularly for even results. Once fully dried, store them properly to enjoy them for weeks to come. Whether you are making snacks for yourself, treats for your dog, or ingredients for cooking, oven-dried chicken feet are a versatile and nutritious addition to your kitchen.
Now that you have all the knowledge and steps, it is time to put them into practice. Start with a small batch to get comfortable with the process. Once you see how easy and satisfying it is, you will wonder why you did not try it sooner. Happy dehydrating!