How To Cook Beef Chuck In Oven And Get Perfect Results
Learning how to cook beef chuck in oven is easier than you think. This guide walks you through every step, from choosing the right cut to pulling a perfectly tender roast from your oven. You will discover the best temperatures, timing, and pro tips that guarantee juicy beef chuck results every single time.
There is something deeply satisfying about cooking beef chuck in oven. It fills your kitchen with a rich, savory aroma that makes the whole house smell incredible. Whether you are planning a Sunday dinner or prepping meals for the week ahead, this cut of beef delivers big flavor with very little effort.
Beef chuck comes from the shoulder area of the cow, and that is exactly what makes it so perfect for oven cooking. The shoulder works hard, which means it has lots of connective tissue and intramuscular fat. When you apply gentle, slow heat in the oven, all that tough tissue melts away and leaves you with fork-tender, juicy beef that practically falls apart.
In this guide, we will cover everything you need to know about how to cook beef chuck in oven. You will learn the best temperatures, timing, preparation steps, and easy recipes that anyone can follow. By the end, you will feel confident enough to make oven-braised beef chuck like a pro.
Key Takeaways
- Low and slow is the way to go: Cooking beef chuck at 300-325°F for 3-4 hours delivers the most tender, flavorful results.
- Searing first matters: A good sear on all sides locks in juices and builds a rich, deep flavor foundation before the roast goes in the oven.
- Internal temperature is key: Aim for 190-200°F for shredded-style beef chuck and 145°F for sliceable roast. A meat thermometer takes the guesswork out.
- Add liquid and aromatics: Beef broth, red wine, onions, garlic, and herbs create a braising liquid that keeps the meat moist and adds incredible flavor.
- Rest your roast: Letting beef chuck rest for 15-20 minutes after cooking redistributes the juices for a better eating experience.
- Leftovers are delicious: Cooked beef chuck stores well for up to 4 days and tastes even better the next day in sandwiches, tacos, or stews.
📑 Table of Contents
- Why Beef Chuck Is the Best Cut for Oven Cooking
- How To Prepare Beef Chuck Before It Goes In The Oven
- The Best Oven Temperature For Beef Chuck
- Step-by-Step: How To Cook Beef Chuck In Oven
- Tips For Getting Fork-Tender Beef Chuck Every Time
- Serving Ideas And How To Store Leftovers
- Common Mistakes To Avoid When Cooking Beef Chuck
- Expert Insights On Oven-Braised Beef Chuck
- Key Takeaways
- Conclusion
Why Beef Chuck Is the Best Cut for Oven Cooking
Not every cut of beef works well in the oven. Some cuts dry out quickly under prolonged heat. But beef chuck is a different story entirely. It is one of the most forgiving and flavorful cuts you can choose for slow oven cooking.
The Science Behind Slow Cooking Beef Chuck
When you cook beef low and slow, something magical happens. The collagen in the connective tissue breaks down and turns into gelatin. This gelatin gives the meat a silky, tender texture and makes the braising liquid thick and rich. Oven braised beef works so well because the enclosed environment traps moisture and surrounds the meat with gentle, even heat.
This is why beef chuck roast has been a favorite for home cooks for generations. It is affordable, widely available, and practically impossible to ruin if you follow a few basic principles.
Beef Chuck vs Other Cuts for Oven Cooking
You might wonder how beef chuck compares to other popular oven roasts. Here is a quick look at the differences.
- Beef chuck roast: Very tender when slow-cooked, rich flavor, affordable price point, great for shredding or slicing.
- Beef round roast: Leaner and drier, needs more careful cooking, less forgiving with timing.
- Beef brisket: Amazing flavor but requires much longer cooking times and more attention.
- Pork shoulder: Similar slow-cooking approach but a different flavor profile and texture.
For most home cooks who want easy oven pot roast results, beef chuck is the clear winner. It gives you maximum flavor and tenderness with minimum stress.
How To Prepare Beef Chuck Before It Goes In The Oven
Proper preparation is the secret to great oven-braised beef. You do not need a lot of steps, but each one makes a big difference in the final result.
Choosing the Right Beef Chuck
Start at your local grocery store or butcher and look for a boneless beef chuck roast that weighs between 3 and 5 pounds. This size is ideal for most ovens and feeds a family comfortably. Look for meat that has good marbling, which means thin streaks of fat running through the muscle. That fat is what keeps the meat moist during long cooking.
Avoid chuck roasts that look dry or have a grayish color. You want bright red meat with visible white fat streaks. If you buy a larger roast, you can always cut it in half to fit your Dutch oven or baking dish better.
Trimming and Seasoning the Roast
Once you have your beef chuck roast, take it out of the refrigerator about 30 minutes before cooking. Letting it come to room temperature helps it cook more evenly. Use a sharp knife to trim off any large, thick chunks of external fat, but leave a thin layer for flavor.
Now it is time to season. Keep it simple for the best results:
- Coat all sides with kosher salt and freshly ground black pepper.
- Add garlic powder and onion powder for extra depth.
- Sprinkle smoked paprika if you want a subtle smoky flavor.
- Lightly dust with flour if you plan to thicken the braising liquid.
Seasoning beef chuck at least 30 minutes before cooking, or even the night before in the fridge, allows the salt to penetrate the meat and enhance the natural flavor.
Searing the Roast for Maximum Flavor
Do not skip this step. Searing beef chuck in a hot pan before it goes in the oven creates a beautiful brown crust through the Maillard reaction. This is a chemical process that develops hundreds of complex flavor compounds. The sear adds a rich, caramelized depth that you simply cannot get any other way.
Heat a tablespoon of oil in a Dutch oven or heavy oven-safe pot over medium-high heat. Pat the roast dry with paper towels, then place it in the hot pan. Sear each side for about 3 to 4 minutes until you get a deep brown crust. Work in batches if needed, and do not crowd the pan.
After searing, remove the roast and set it aside. You will use the brown bits stuck to the bottom of the pot, called the fond, to build your braising liquid. This is pure flavor gold.
The Best Oven Temperature For Beef Chuck
Getting the temperature right is one of the most important parts of how to cook beef chuck in oven. Too hot and the meat will be tough and dry. Too cool and it will take forever to become tender.
Recommended Temperature Range
The sweet spot for oven braised beef chuck is between 300°F and 325°F. This low temperature allows the collagen to break down slowly without drying out the meat. Most expert cooks agree that 325°F is the best all-around choice. It is hot enough to cook the meat in a reasonable time but low enough to keep it moist.
If you have more time, you can drop the temperature to 300°F. This extends the cooking time but produces even more tender results. The choice depends on your schedule and how much patience you have.
Why Low and Slow Works So Well
The reason low and slow cooking works so well for beef chuck comes down to food science. Connective tissue in beef starts to break down at around 160°F, but it takes several hours for it to fully convert into gelatin. At 325°F, a 4-pound roast will reach this breakdown point gently and evenly.
Higher temperatures cause the muscle fibers to contract tightly and squeeze out moisture. That is why a fast-cooked roast can be tough and dry, while a slow-cooked one is juicy and tender. Patience is your best tool when cooking beef chuck in the oven.
Temperature Chart for Different Sizes
Here is a quick reference for cooking times based on the size of your beef chuck roast.
- 2-3 pound roast: 300°F for about 2.5 to 3 hours.
- 3-4 pound roast: 325°F for about 3 to 3.5 hours.
- 4-5 pound roast: 325°F for about 3.5 to 4.5 hours.
- 5-6 pound roast: 300°F for about 4.5 to 5.5 hours.
These are guidelines, not strict rules. Always use a meat thermometer to check the internal temperature for the most accurate results.
Step-by-Step: How To Cook Beef Chuck In Oven
Now that you understand the why, let us get into the how. Here is a complete walkthrough for making perfect oven-braised beef chuck every time.
Step 1: Gather Your Ingredients and Tools
For a basic beef chuck roast recipe, you will need:
- 3-4 pound beef chuck roast
- 2 tablespoons olive oil or vegetable oil
- 1 large onion, chopped
- 4 cloves garlic, minced
- 2 cups beef broth
- 1 cup red wine (optional but recommended)
- 2 tablespoons tomato paste
- 2 bay leaves
- Fresh thyme and rosemary
- Salt and pepper to taste
- A Dutch oven or heavy oven-safe pot with a lid
You do not need fancy equipment. A heavy-bottomed Dutch oven is the gold standard for oven braising because it distributes heat evenly and traps moisture well.
Step 2: Sear the Roast
Preheat your oven to 325°F. Heat the oil in your Dutch oven over medium-high heat on the stovetop. Season the roast generously with salt and pepper, then place it in the hot pot. Sear for 3-4 minutes per side until you get a deep brown crust. Remove the roast and set it on a plate.
Step 3: Build the Braising Liquid
Reduce the heat to medium. Add the chopped onion to the pot and cook for about 5 minutes until softened. Add the garlic and cook for another minute until fragrant. Stir in the tomato paste and cook for 30 seconds to deepen its flavor. Pour in the beef broth and red wine, scraping up all the brown bits from the bottom of the pot. These browned bits are packed with flavor.
Step 4: Braise in the Oven
Place the seared roast back into the pot. Add the bay leaves, thyme, and rosemary. The liquid should come about halfway up the sides of the roast, not cover it completely. Cover the pot with its lid and place it in the preheated oven.
Cook for 3 to 4 hours, checking occasionally. The beef chuck internal temperature should reach 190-200°F for a shredded-style roast or 145°F for a sliceable roast. The meat is done when a fork slides in easily and the meat pulls apart with gentle pressure.
Step 5: Rest and Serve
Remove the pot from the oven and let the roast rest for at least 15 minutes before cutting. This resting period allows the juices to redistribute throughout the meat, making every bite more flavorful. Strain the braising liquid and serve it alongside the meat, or use it to make a quick gravy.
Tips For Getting Fork-Tender Beef Chuck Every Time
Even with a great recipe, small mistakes can affect your results. Here are some expert tips that will help you get the best oven-braised beef chuck possible.
Do Not Skip the Sear
Some people want to save time by skipping the searing step. Do not do it. The sear adds a layer of flavor that makes a noticeable difference in the final dish. It takes only about 10 minutes and elevates the entire roast.
Use Enough Liquid
Your braising liquid should come about halfway up the roast. If the liquid evaporates too much during cooking, the meat can dry out. Check the pot occasionally and add a splash of broth or water if needed. Keeping the moisture level consistent is one of the secrets to tender beef.
Do Not Rush the Cooking Time
It can be tempting to turn up the heat to speed things along. Resist that urge. Cooking beef chuck at too high a temperature will tighten the muscle fibers and make the meat tough. Trust the process and let the low heat do its work.
Let the Meat Rest After Cooking
Resting is not just for grilled steaks. Resting beef chuck after oven cooking allows the juices to settle back into the muscle fibers. If you cut into it right away, those juices will run out onto the cutting board instead of staying in the meat. Give it at least 15 minutes, loosely covered with foil.
Add Vegetables in the Last Hour
If you want to cook vegetables with your roast, add them during the last hour of cooking. Potatoes, carrots, and celery hold up well to braising and will soak up all those wonderful juices. Adding them too early can cause them to turn mushy.
Use a Meat Thermometer
This is the single most important tool for consistent results. A digital meat thermometer takes all the guesswork out of cooking. For shredded-style beef chuck, aim for 190-200°F. For a sliceable roast, 145°F gives you a perfect medium result.
Serving Ideas And How To Store Leftovers
Once you have mastered how to cook beef chuck in oven, you will want to know what to do with all that delicious meat. The good news is that beef chuck is incredibly versatile.
Serving Suggestions
Here are some easy and delicious ways to serve your oven-braised beef chuck:
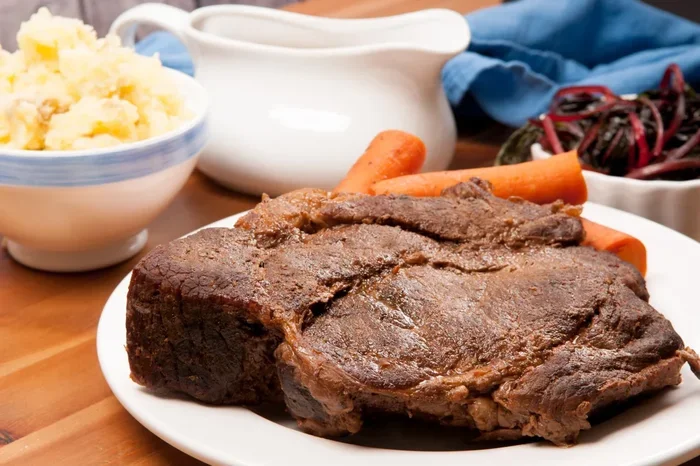
- Classic pot roast style: Slice the meat and serve with the braising liquid, roasted potatoes, and green beans.
- Beef sandwiches: Shred the meat and pile it onto crusty rolls with the braising liquid as a dipping sauce.
- Tacos or burritos: Season the shredded beef with a little cumin and chili powder for a quick weeknight meal.
- Beef stew: Cube the leftover roast, add vegetables and broth, and simmer for a hearty stew.
- Over mashed potatoes: Serve the tender beef over creamy mashed potatoes with a ladle of the rich braising sauce.
Storing and Reheating Leftovers
Cooked beef chuck stores very well in the refrigerator. Let the meat cool to room temperature, then place it in an airtight container. It will keep for up to 4 days in the fridge. The braising liquid can be stored separately and reheated as a sauce or gravy.
To reheat, place the meat in a covered dish with a splash of broth and warm it in the oven at 300°F for about 20 minutes. This keeps the meat moist and prevents it from drying out in the microwave. You can also freeze cooked beef chuck for up to 3 months. Thaw it overnight in the refrigerator before reheating.
Why Leftovers Taste Even Better
Here is a fun fact: beef chuck roast leftovers often taste better the next day. As the meat sits in the braising liquid, the flavors continue to meld and deepen. The collagen from the meat thickens the liquid overnight, creating a richer sauce. This is why many cooks say that pot roast is best on day two.
Common Mistakes To Avoid When Cooking Beef Chuck
Cooking at Too High a Temperature
This is the most common mistake people make. High heat turns beef chuck from tender to tough very quickly. The collagen needs time to break down, and that only happens at low temperatures over several hours.
Not Browning the Meat Enough
A quick, pale sear does not do the job. You want a deep, dark brown crust on all sides of the roast. Take your time with this step and do not move the meat around too much while it sears. Let it sit undisturbed until it releases naturally from the pot.
Overcrowding the Pot
If you are cooking a large roast or adding vegetables, make sure there is enough room in the pot. Overcrowding traps steam and prevents proper browning. Use a pot that gives the roast plenty of space, with at least a few inches of room around it.
Opening the Lid Too Often
Every time you open the oven door, you lose heat and moisture. Try to resist the urge to check on the roast too frequently. Trust the process and only open the lid to check the temperature or add liquid if absolutely necessary.
Cutting the Meat Too Soon
We have mentioned this before, but it bears repeating. Cutting into beef chuck roast right after cooking releases all those precious juices. Be patient and let the meat rest. Your taste buds will thank you.
Expert Insights On Oven-Braised Beef Chuck
Professional chefs and experienced home cooks agree on a few key principles when it comes to braised beef chuck in oven. These insights can take your cooking to the next level.
Chef Michael Ruhlman once said that braising is the ultimate low-effort, high-reward cooking method. The same applies perfectly to oven beef chuck. You do not need to be a skilled cook to get restaurant-quality results. You just need patience, good ingredients, and the right temperature.
Another expert tip is to make the braising liquid the night before and let it sit in the refrigerator. This allows the flavors to meld and develop, which means your roast will taste even more complex and rich when it comes out of the oven.
Food scientist Harold McGee explains that the collagen-to-gelatin conversion is what makes tough cuts like beef chuck transform into something extraordinary. Understanding this process helps you appreciate why time and low heat are so important. It is not just a tradition, it is food science working in your favor.
Key Takeaways
- Low and slow is the way to go: Cooking beef chuck at 300-325°F for 3-4 hours delivers the most tender, flavorful results.
- Searing first matters: A good sear on all sides locks in juices and builds a rich, deep flavor foundation before the roast goes in the oven.
- Internal temperature is key: Aim for 190-200°F for shredded-style beef chuck and 145°F for sliceable roast. A meat thermometer takes the guesswork out.
- Add liquid and aromatics: Beef broth, red wine, onions, garlic, and herbs create a braising liquid that keeps the meat moist and adds incredible flavor.
- Rest your roast: Letting beef chuck rest for 15-20 minutes after cooking redistributes the juices for a better eating experience.
- Leftovers are delicious: Cooked beef chuck stores well for up to 4 days and tastes even better the next day in sandwiches, tacos, or stews.
Conclusion
How to cook beef chuck in oven is a skill that anyone can learn. It does not require fancy equipment or years of experience. All you need is a good cut of meat, a heavy pot, some basic seasonings, and a little patience. The oven does the hard work for you while you go about your day.
Remember to sear your roast, keep the temperature low, and give the meat enough time to become tender. Use a meat thermometer to check doneness, and always let the roast rest before cutting. Follow these steps and you will be making perfect oven-braised beef chuck that rivals any restaurant dish.
The beauty of beef chuck is that it is forgiving and generous. Even if you are a beginner, this cut will reward your effort with incredibly tender, flavorful meat. So the next time you are planning a comforting meal, give beef chuck roast in oven a try. Your family, your kitchen, and your dinner guests will all thank you.
Start with the basic recipe in this guide, experiment with different herbs and liquids, and make it your own. Before long, cooking beef chuck in oven will be one of the easiest and most satisfying things you do in the kitchen. Enjoy the process, savor the results, and share the delicious food with the people you love.
Frequently Asked Questions
How long does it take to cook beef chuck in the oven?
A 3-4 pound beef chuck roast typically takes 3 to 4 hours at 325°F. Smaller roasts may be done in 2.5 hours, while larger ones can take up to 5 hours. Always use a meat thermometer to check the internal temperature rather than relying solely on time.
What is the best internal temperature for beef chuck roast?
For a shredded-style beef chuck, aim for 190-200°F, which allows the collagen to fully break down. For a sliceable roast, 145°F gives you a perfect medium result. The higher temperature for shredded beef ensures the meat is tender and easy to pull apart.
Can I cook beef chuck in a regular baking dish instead of a Dutch oven?
Yes, you can use a regular baking dish, but a Dutch oven works best because it retains heat and moisture more effectively. If you use a baking dish, cover it tightly with aluminum foil to trap steam and keep the meat moist during the long cooking process.
Do I need to add wine to the braising liquid?
No, wine is optional. You can use additional beef broth instead, or substitute with a mix of broth and a splash of balsamic vinegar for similar depth of flavor. The wine adds richness, but the most important thing is having enough liquid to come halfway up the roast.
Can I cook beef chuck the day before and reheat it?
Absolutely. In fact, many cooks say that beef chuck tastes even better the next day. Cook it as directed, let it cool, and store it in the refrigerator. Reheat gently in the oven at 300°F with a splash of broth to keep the meat moist and tender.
What vegetables pair well with oven-braised beef chuck?
Classic pairings include potatoes, carrots, celery, onions, and garlic. Add root vegetables like carrots and potatoes during the last hour of cooking so they do not turn mushy. Onions and garlic should be added at the beginning to build the flavor base of the braising liquid.