How To Cook Chicken Lollipop In Oven For Crispy Results
Learning how to cook chicken lollipop in the oven is easier than you think. This guide walks you through a simple, foolproof method for making crispy baked chicken lollipops that taste restaurant-quality. You will learn the right marinade, oven temperature, and timing to get perfectly golden chicken drumettes every single time.
There is something magical about a plate of golden, crispy chicken lollipops sitting on the table. They look fun, they taste amazing, and they are surprisingly easy to make at home. If you have been wondering how to cook chicken lollipop in the oven, you are in the right place.
This guide covers everything from the basic chicken lollipop recipe to pro tips that take your results from good to incredible. Whether you are preparing a party appetizer or a weeknight snack, these oven baked chicken lollipops will become a go-to favorite in your kitchen.
Key Takeaways
- Simple Ingredients: You only need a few pantry staples to make delicious homemade chicken lollipop.
- Perfect Oven Temperature: Baking at the right heat ensures crispy skin and juicy meat inside.
- Marinating Matters: A good marinade adds flavor and tenderness to every bite of your chicken lollipop recipe.
- Easy to Customize: You can adjust spices, sauces, and coatings to suit your taste preferences.
- Great for Parties: Chicken lollipop is a crowd-pleasing appetizer that is easy to make in large batches.
- Healthier Alternative: Baking in the oven is a lighter option compared to deep frying.
- Quick Prep Time: Most of the work is hands-off while the oven does the cooking for you.
📑 Table of Contents
- What Are Chicken Lollipops and Why Are They So Popular
- Ingredients You Need for Perfect Chicken Lollipops
- Step-by-Step Chicken Lollipop Recipe for the Oven
- Best Oven Temperature and Cooking Time for Chicken Lollipops
- Tips for Getting Extra Crispy Chicken Lollipop
- Serving Suggestions and Dipping Sauces
- Common Mistakes to Avoid When Baking Chicken Lollipops
- Why Oven-Baked Chicken Lollipops Are a Great Choice
- How to Store and Reheat Leftover Chicken Lollipops
- Variations to Try With Your Chicken Lollipop Recipe
- Conclusion
What Are Chicken Lollipops and Why Are They So Popular
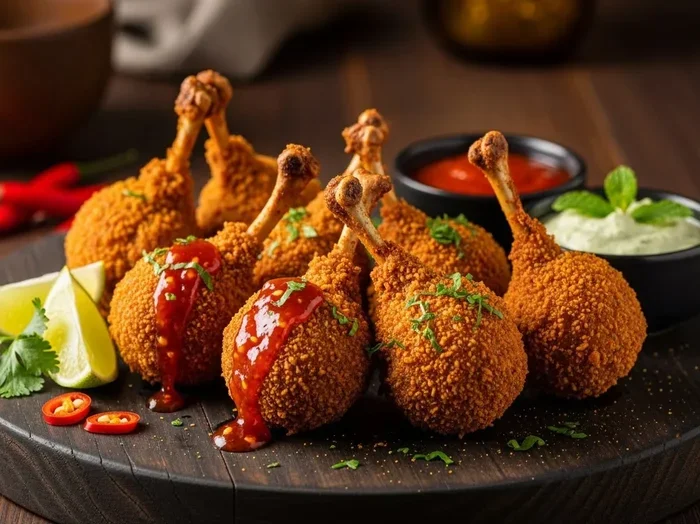
A chicken lollipop is a clever way to prepare a chicken drumette, which is the meaty top part of a chicken wing. You cut the meat down toward the narrow end, then push it up to create a shape that looks like a tiny lollipop. The result is a fun, easy-to-hold piece of chicken that is perfect for dipping and snacking.
These little treats have exploded in popularity at parties, weddings, and family gatherings. Here is why people love them so much:
- Fun Shape: They look playful and are easy for guests to grab and eat.
- Crispy Texture: When baked or fried properly, the outside gets wonderfully crunchy.
- Juicy Inside: The meat stays tender and flavorful thanks to the bone-in cooking method.
- Versatile: You can serve them with dozens of different sauces and seasonings.
- Crowd-Pleaser: Both kids and adults love the taste and presentation.
Unlike traditional wings, chicken lollipops offer a cleaner eating experience. No messy bones sticking out, just a neat little stick of juicy chicken. That makes them ideal for buffet-style serving and finger food tables.
Ingredients You Need for Perfect Chicken Lollipops
One of the best things about a homemade chicken lollipop recipe is how few ingredients you need. You probably already have most of these in your kitchen right now. Here is what you will need to make a batch of about 12 to 15 pieces.
For the Chicken
- 12 to 15 chicken drumettes (also called chicken wings)
- Salt and black pepper
- Garlic powder
- Onion powder
- Smoked paprika
- Chili flakes (optional for a little heat)
For the Marinade
- Yogurt or buttermilk (for tenderizing)
- Lemon juice
- Ginger-garlic paste
- Soy sauce
- Honey or brown sugar
- Olive oil
For the Coating
- Corn flour or all-purpose flour
- Breadcrumbs (for extra crunch)
- Cornstarch (for an ultra-crispy finish)
The chicken lollipop marinade is the heart of this recipe. Yogurt or buttermilk works wonders because the acidity breaks down the proteins and makes the meat incredibly tender. The soy sauce adds depth, while honey gives a subtle sweetness that balances the savory spices.
Pro Tip: Do not skip the marinating step. Even 30 minutes makes a noticeable difference, but overnight is best for maximum flavor penetration.
Step-by-Step Chicken Lollipop Recipe for the Oven
Now let us get into the fun part. Here is a clear, easy-to-follow method for making baked chicken lollipops in your oven. Follow these steps and you will have amazing results.
Step 1: Prepare the Chicken Drumettes
Start by rinsing the chicken drumettes and patting them completely dry with paper towels. Dry skin is the secret to getting crispy results in the oven. Use a sharp knife to cut the meat at the narrow end of the drumette. Carefully push the meat upward, creating a “lollipop” shape. Tuck any excess meat back toward the bone.
Step 2: Make the Marinade
In a large bowl, combine the yogurt, lemon juice, ginger-garlic paste, soy sauce, honey, olive oil, salt, and pepper. Mix everything together until it forms a smooth paste. Add the chicken drumettes and toss them until every piece is fully coated.
Step 3: Marinate the Chicken
Cover the bowl with cling wrap or a lid and place it in the refrigerator. Let the chicken marinate for at least 1 hour. If you have time, leave it overnight. The longer it marinates, the more flavorful and tender the meat becomes.
Step 4: Preheat the Oven
About 30 minutes before you are ready to bake, preheat your oven to 200°C (400°F). Allowing the oven to heat fully before the chicken goes in is essential for even cooking and crispy skin.
Step 5: Coat the Chicken
Set up a breading station with three shallow dishes. Put flour in the first, beaten egg in the second, and a mix of breadcrumbs and cornstarch in the third. Remove each drumette from the marinade, dredge it in flour, dip it in egg, and then press it into the breadcrumb mixture. Make sure the coating is even all around.
Step 6: Bake the Chicken Lollipops
Place the coated drumettes on a wire rack set over a baking tray. Leave space between each piece so the hot air can circulate freely. Bake for 25 to 30 minutes, flipping them halfway through. The chicken is done when the outside is golden brown and the internal temperature reaches 75°C (165°F).
Step 7: Rest and Serve
Remove the oven baked chicken lollipops from the oven and let them rest for 5 minutes. This helps the juices redistribute inside the meat. Serve them hot with your favorite dipping sauce.
Best Oven Temperature and Cooking Time for Chicken Lollipops
Getting the chicken lollipop oven temperature right is one of the most important factors in your final result. Too low and the skin will not crisp up. Too high and the outside will burn before the inside is cooked through.
The sweet spot for how to cook chicken lollipop in the oven is 200°C (400°F). At this temperature, the skin renders its fat and becomes beautifully crispy while the meat stays moist and juicy. Here is a quick reference guide:
- 200°C (400°F): The ideal temperature for crispy skin and evenly cooked meat. Bake for 25 to 30 minutes.
- 180°C (350°F): A lower option that works well if you are using a thicker coating. Bake for 30 to 35 minutes.
- 220°C (425°F): For extra crunch, but watch carefully to prevent burning. Bake for 20 to 25 minutes.
Always use a meat thermometer to check that the thickest part of the chicken has reached 75°C (165°F). This is the only way to be 100% sure your chicken drumettes recipe is safely cooked through.
Quick Tip: If you are baking a large batch, cook them in two separate trays rather than overcrowding one tray. Overlapping pieces will steam instead of crisp, and you will lose that satisfying crunch.
Tips for Getting Extra Crispy Chicken Lollipop
Let us be honest. The whole point of making crispy chicken lollipop in the oven is that satisfying crunch. Here are some tried-and-true tricks that separate good results from absolutely incredible ones.
Use a Wire Rack
Never place your chicken directly on a flat baking tray. A wire rack allows hot air to flow all around each piece, which means crispy skin on every side. It also prevents the bottom from getting soggy from sitting in any excess oil or marinade.
Double Coat for Maximum Crunch
For an extra thick and crunchy crust, repeat the flour-egg-breadcrumb process twice. Dip the chicken in flour and egg again after the first coating, then press into breadcrumbs once more. This creates a thick outer layer that turns golden and shatteringly crisp in the oven.
Add Cornstarch to the Breading
Mixing cornstarch into your breadcrumbs is a game-changer. Cornstarch creates a lighter, airier crust that crisps up faster and stays crunchy longer than breadcrumbs alone. A 50-50 ratio of breadcrumbs and cornstarch works perfectly.
Let the Coated Chicken Rest Before Baking
After breading, place the chicken on a wire rack and let it sit for 10 to 15 minutes before baking. This allows the coating to set and adhere to the chicken, which prevents it from falling off during cooking.
Brush with Oil Before Baking
A light brush of oil or melted butter on the outside of each drumette before it goes in the oven helps the coating brown faster and more evenly. It also adds a subtle richness to the crust.
Flip Halfway Through
Do not forget to flip the chicken lollipops at the halfway mark. This single step ensures both sides get equal exposure to the heat and turn an even golden color.
Expert Insight: Professional cooks often use a combination of cornstarch and rice flour in their breading. Rice flour creates an even lighter, more delicate crunch that is hard to achieve with regular flour alone. It is a small change that makes a big difference.
Serving Suggestions and Dipping Sauces
Chicken lollipop is incredibly versatile when it comes to serving. Here are some ideas to make your dish even more exciting.
Classic Dipping Sauces
- Honey Mustard: Mix equal parts honey and Dijon mustard with a splash of lemon juice. Sweet and tangy, it pairs perfectly with crispy chicken.
- Sriracha Mayo: Combine mayonnaise with sriracha sauce and a squeeze of lime. Creamy with a spicy kick.
- Garlic Aioli: Mayonnaise, minced garlic, lemon zest, and a pinch of salt. Simple and irresistible.
- Sweet Chili Sauce: A store-bought option that works beautifully as a sweet, slightly spicy dip.
- Blue Cheese Dressing: For those who love bold flavors, this creamy and tangy sauce is a fantastic choice.
Side Dishes That Pair Well
- Crispy fries or sweet potato wedges
- A fresh coleslaw for contrast
- Corn on the cob or grilled corn salad
- Rice or a light grain bowl
- Vegetable sticks like carrots, celery, and cucumber
Chicken lollipop works beautifully as a party appetizer, a game-day snack, or even a main course with the right sides. They are especially popular at kids’ birthday parties because the fun shape makes them exciting to eat.
Common Mistakes to Avoid When Baking Chicken Lollipops
Even with a great recipe, small mistakes can affect your final result. Here are some pitfalls to watch out for.
- Skipping the Dry Step: If you do not pat the chicken dry before marinating and breading, the coating will not stick properly and the skin will not crisp.
- Overcrowding the Pan: Placing too many pieces on one tray blocks airflow and leads to soggy skin instead of crispy skin.
- Under-Marinating: Rushing the marination process means less flavor and tougher meat. Give it at least 30 minutes, but overnight is ideal.
- Not Preheating the Oven: Putting chicken into a cold oven throws off the cooking time and results in uneven browning.
- Using Cold Chicken: Always take the marinated chicken out of the fridge 15 to 20 minutes before baking. Cold chicken in a hot oven cooks unevenly.
- Cutting Too Early: Let the chicken rest for a few minutes after baking. Cutting into it right away releases all the juices, and the meat becomes dry.
Avoiding these mistakes will help you achieve consistently great results every time you make baked chicken lollipops. Once you know what to watch for, the process becomes second nature.
Why Oven-Baked Chicken Lollipops Are a Great Choice
You might be thinking, “Why bake them instead of deep frying?” There are several very good reasons to choose the oven method for your chicken lollipop recipe.
First, baking uses significantly less oil than deep frying. This means fewer calories and less grease, making it a healthier option for everyday eating. Second, the oven does most of the work for you. You can prep the chicken, pop it in the oven, and focus on other things while it cooks. Third, cleanup is much easier. No splattered oil, no greasy stovetop, just one baking tray and a wire rack to wash.
Many people also prefer the taste of oven-baked chicken lollipops because the flavor is cleaner and lets the seasoning shine through. Deep frying can sometimes mask the taste of the spices, but baking preserves the true flavor of the marinade and coating.
From a practical standpoint, oven-baked chicken lollipops are also easier to scale up. You can bake multiple trays at once for a big gathering, and the results remain consistent across all pieces. Deep frying in batches can lead to uneven results, but the oven treats every tray the same way.
How to Store and Reheat Leftover Chicken Lollipops
If you have leftovers (and let us be honest, that rarely happens), storing them properly keeps them tasting great.
- Refrigerator: Store cooked chicken lollipops in an airtight container for up to 3 days.
- Freezer: Place uncooked, breaded lollipops on a tray, freeze until solid, then transfer to a zip-lock bag. They keep for up to 3 months.
- Reheating: Use the oven or an air fryer at 180°C (350°F) for 8 to 10 minutes. Avoid the microwave, as it will make the coating soft and soggy.
Reheating in the oven or air fryer is the key to maintaining that crispy texture. The microwave might be fast, but it will undo all the hard work you put into getting that perfect crunch.
Variations to Try With Your Chicken Lollipop Recipe
Once you have mastered the basic chicken lollipop recipe oven method, you can get creative with different flavors and styles.
- Buffalo Style: Toss the baked lollipops in hot sauce and melted butter for a classic buffalo wing twist.
- Korean Style: Glaze with a sweet and spicy gochujang sauce after baking for an Asian-inspired flavor.
- Italian Style: Use Italian herbs like oregano, basil, and thyme in the breading for a Mediterranean twist.
- Honey BBQ: Brush with your favorite barbecue sauce during the last 5 minutes of baking.
- Lemon Herb: Add fresh rosemary, thyme, and lemon zest to the marinade for a bright, herby flavor.
Each variation gives your chicken lollipops a completely different personality while using the same basic method. This is what makes the recipe so endlessly adaptable to different tastes and occasions.
Conclusion
How to cook chicken lollipop in the oven is a skill that anyone can learn with a little practice. The combination of a flavorful marinade, a crispy coating, and the right oven temperature creates a dish that looks impressive and tastes even better. Whether you are hosting a party, preparing a family dinner, or just craving a delicious snack, oven baked chicken lollipops deliver every time.
Remember to marinate your chicken well, use a wire rack for even cooking, and flip the pieces halfway through baking. These small steps make a huge difference in the final texture and flavor. Start with the basic recipe, experiment with different sauces and seasonings, and soon you will have your own signature chicken lollipop that everyone will ask for.
The beauty of this recipe is its simplicity. You do not need fancy equipment or hard-to-find ingredients. Just chicken drumettes, a few spices, some flour and breadcrumbs, and a hot oven. That is all it takes to create something truly special. So preheat your oven, gather your ingredients, and get ready to make the best crispy chicken lollipops you have ever tasted.
Frequently Asked Questions
Can I use frozen chicken drumettes for this recipe?
Yes, you can, but make sure to thaw them completely in the refrigerator before marinating and baking. Cooking frozen chicken in the oven leads to uneven results, with the outside overcooking before the inside is fully done. Always pat the thawed chicken dry before proceeding with the recipe.
How do I know when chicken lollipops are fully cooked?
The best way to check is by using a meat thermometer. Insert it into the thickest part of the meat, and make sure it reads 75°C (165°F). The outside should be golden brown and the juices should run clear when you cut into one. Never rely on color alone, as undercooked chicken can still look slightly pink inside.
Can I make chicken lollipops without breadcrumbs?
Absolutely. You can use just flour for a lighter coating or crushed cornflakes for a different type of crunch. Some recipes even use crushed corn tortillas or panko breadcrumbs for a unique texture. The key is to ensure the coating adheres well and bakes at a high enough temperature to crisp up.
What is the difference between chicken lollipops and regular chicken wings?
A chicken lollipop is made from the drumette portion of the wing, but the meat is pushed up to create a handle-like shape. Regular wings are left whole or cut into flats and drumettes without shaping. Chicken lollipops are easier to eat with your hands and have a more fun presentation, making them ideal for parties and appetizers.
How long can I marinate chicken lollipops before baking?
You can marinate them for as little as 30 minutes or as long as overnight. The yogurt-based marinade works especially well for longer marination times because the acid gently tenderizes the meat without making it mushy. For the best flavor, aim for at least 2 hours of marination time.
Can I use an air fryer instead of an oven for this recipe?
Yes, an air fryer works wonderfully for chicken lollipops. Cook them at 190°C (375°F) for about 12 to 15 minutes, flipping halfway through. The air fryer produces an even crispier result because the circulating hot air removes moisture from the coating more efficiently. It is a great alternative if you do not want to heat up your oven for a smaller batch.
=== CONCLUSION ===
Learning how to cook chicken lollipop in the oven opens the door to a world of crispy, flavorful, and crowd-pleasing appetizers. With the right chicken lollipop recipe, a little patience with the marinade, and attention to oven temperature, you can create bakery-quality results in your own kitchen. The process is straightforward, the ingredients are simple, and the outcomes are always impressive.
Start with the basic method outlined in this guide, then experiment with different marinades, coatings, and dipping sauces to make the recipe your own. Whether you serve them at your next gathering or enjoy them as a cozy weekend snack, these crispy baked chicken lollipops are sure to become a favorite. So roll up your sleeves, gather your ingredients, and get baking. Your taste buds will thank you.