Hiw To Cook Ribs In The Oven For Juicy Tender Results
Discover how to cook ribs in the oven with this simple, foolproof method that delivers juicy, fall-off-the-bone tender ribs every single time. Whether you prefer baby back ribs or spare ribs, this guide covers everything from prep to plating. You will learn the best oven temperature, timing, and pro tips for restaurant-quality ribs in your own kitchen.
There is nothing quite like pulling a rack of ribs out of the oven and seeing that perfect blush of smoke and sweetness. How to cook ribs in the oven is a question many home cooks ask, and the answer is simpler than you might think.
Oven-baked ribs offer a hands-off approach that frees you up to spend time with family or prep sides while the meat does all the work. Unlike grilling, which requires constant attention and weather luck, baked ribs in the oven give you consistent, predictable results. You get that same tender, smoky flavor without needing a backyard smoker or charcoal grill.
In this guide, we walk you through every step of the process. From choosing the right rack to nailing the perfect oven temperature, you will have everything you need. By the end, you will feel confident making oven ribs recipe staples that impress everyone at the table.
Key Takeaways
- Low and slow cooking is the secret: Baking ribs at 275°F for 2.5 to 3 hours ensures tender, juicy meat that pulls away from the bone easily.
- Remove the membrane first: Peeling off the thin membrane on the back of the rack allows better flavor penetration and a more enjoyable texture.
- Use a two-step method: Wrap ribs in foil during cooking, then unwrap them for the final 30 minutes to build a beautiful bark and glaze.
- homemade rib rub makes a difference: A simple blend of brown sugar, paprika, garlic powder, and salt creates a flavorful crust without expensive store-bought options.
- Rest your ribs before slicing: Letting ribs rest for 10 to 15 minutes after cooking keeps the juices locked in and makes cutting easier.
- Use a meat thermometer: An internal temperature of 195°F to 203°F indicates perfectly done ribs with the best texture.
- Glaze at the end: Applying barbecue sauce in the last 15 minutes prevents burning and gives ribs a glossy, sticky finish.
📑 Table of Contents
- Choosing the Right Ribs for Oven Cooking
- Preparing Your Ribs: The Steps That Make or Break the Dish
- The Perfect Oven Temperature and Cooking Time
- The Foil Method: Your Secret Weapon for Moist Ribs
- Glazing and Finishing Your Ribs
- Common Mistakes to Avoid When Cooking Ribs in the Oven
- Serving Suggestions and Side Pairings
- Expert Tips for Next-Level Oven Ribs
- Storing and Reheating Leftover Ribs
- Conclusion
Choosing the Right Ribs for Oven Cooking
Not all ribs are created equal, and picking the right type sets the foundation for your entire cook. The two most popular options for oven-baked ribs are baby back ribs and spare ribs. Each brings something different to the plate.
Baby Back Ribs vs Spare Ribs
Baby back ribs come from the top of the pig’s rib cage, near the spine. They are smaller, leaner, and cook faster than their counterparts. Most people find them more tender and slightly sweeter in flavor. They are the go-to choice for beginners learning how to cook ribs in the oven.
Spare ribs come from the lower belly area. They are meatier, fattier, and have more connective tissue. This extra fat means they need a longer cooking time but reward you with rich, deep flavor. Spare ribs are excellent for those who love a hearty, bold bite.
Here is a quick comparison to help you decide:
- Baby back ribs: Leaner, smaller, faster cook time, milder flavor, great for beginners
- Spare ribs: Meatier, fattier, longer cook time, richer flavor, ideal for experienced cooks
- St. Louis-style ribs: Spare ribs trimmed into a neat rectangular shape for even cooking
When shopping, look for ribs with a good layer of fat but not excessive. The meat should be pink and firm, not gray or slimy. A well-chosen rack makes all the difference in your final result.
Preparing Your Ribs: The Steps That Make or Break the Dish
Preparation is where most people rush, but it is the most important phase. Taking your time here sets you up for tender ribs in the oven that taste like they came from a competition pit.
Removing the Membrane
The thin, translucent membrane on the back of the rib rack is the number one mistake home cooks make. Leaving the membrane on blocks seasoning from reaching the meat and creates a chewy, unpleasant texture. Removing it is easy and takes only a minute.
Flip the rack bone-side up. Use a butter knife to gently lift a corner of the membrane. Grab it with a paper towel for a better grip, then pull it off slowly. If it tears, use a paper towel to scrape out the remaining bits. Your oven ribs recipe will taste noticeably better with this one simple step.
Applying the Rib Rub
A good rib rub is the soul of your dish. You can buy pre-made rubs, but making your own is cheap and incredibly rewarding. A basic homemade rib rub combines brown sugar, smoked paprika, garlic powder, onion powder, salt, black pepper, and a touch of cayenne for heat.
Pat the ribs dry with paper towels first. This helps the rub stick better. Apply a generous layer of rub on all sides, pressing it gently into the meat. For the best flavor, wrap the ribs in plastic wrap and refrigerate them for at least one hour or overnight. The longer they sit, the deeper the flavor penetrates.
Bringing Ribs to Room Temperature
Before placing ribs in the oven, let them sit at room temperature for about 30 minutes. This simple step ensures even cooking throughout the rack. Cold ribs going into a hot oven cook unevenly, with the center taking much longer to reach the right temperature.
The Perfect Oven Temperature and Cooking Time
This is the heart of learning how to cook ribs in the oven. Getting the temperature right is the single biggest factor in achieving tender, juicy results.
Why Low and Slow Works Best
Cooking ribs at a low temperature, around 275°F, is the gold standard for slow-cooked ribs in the oven. This gentle heat breaks down collagen and fat slowly, turning tough connective tissue into gelatin. The result is meat that practically falls off the bone.
Higher temperatures like 350°F or above cook ribs too quickly. The meat tightens up, moisture escapes, and you end up with dry, chewy ribs. Patience is your best friend here. Low and slow ribs are the way to go.
Cooking Time Guide by Rib Type
Cooking times vary depending on the type and size of your ribs. Here is a general guide for oven rib cooking time:
- Baby back ribs: 2.5 to 3 hours at 275°F
- Spare ribs: 3 to 3.5 hours at 275°F
- St. Louis-style ribs: 3 to 3.5 hours at 275°F
- Thick-cut back ribs: 3.5 to 4 hours at 275°F
These times are guidelines. The real indicator is internal temperature, not the clock. Use a meat thermometer to check for doneness. You want the internal temperature to reach between 195°F and 203°F. At this range, the collagen has fully broken down, and the meat is succulent and tender.
The Foil Method: Your Secret Weapon for Moist Ribs
One technique that separates good oven-baked ribs from great ones is the foil method. This approach locks in moisture and speeds up cooking without sacrificing flavor.
How to Wrap Ribs in Foil
After your ribs have been in the oven for about two hours, it is time to wrap them. Remove the baking dish and place the ribs meat-side down on a large sheet of heavy-duty aluminum foil. Add a few tablespoons of apple cider vinegar, apple juice, or broth to create steam. Wrap the foil tightly, sealing the edges so no steam escapes.
Return the wrapped ribs to the oven and continue cooking for the remaining time. The foil-wrapped ribs essentially braise in their own juices, becoming incredibly moist and tender.
Unwrapping for the Final Bark
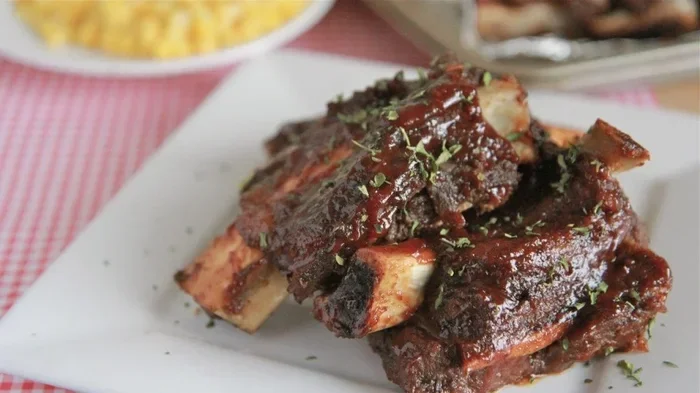
During the last 30 to 45 minutes, unwrap the ribs. This step is crucial for building a beautiful rib bark — that slightly sticky, caramelized exterior that makes barbecue ribs so irresistible.
Brush your favorite rib glaze or barbecue sauce on the meat during this unwrapped phase. The sauce will thicken and stick to the surface, creating a glossy, flavorful coating. Be careful not to apply sauce too early, as the sugars can burn and turn bitter.
Glazing and Finishing Your Ribs
The final step is where your oven ribs recipe truly comes together. A good glaze adds sweetness, tang, and a gorgeous sheen to the finished rack.
Making a Simple Barbecue Glaze
You do not need a complicated recipe for a great glaze. A basic rib glaze combines ketchup, brown sugar, apple cider vinegar, Worcestershire sauce, and a splash of smoked paprika. Warm it gently on the stove until it thickens slightly, then brush it onto the ribs during the final 15 minutes of cooking.
Apply the glaze in thin layers. Two to three coats create a richer, more caramelized finish. Each layer builds flavor and color without becoming sticky or burnt.
Resting the Ribs
Once your juicy ribs in the oven are done, resist the urge to cut into them immediately. Let the ribs rest for 10 to 15 minutes, loosely tented with foil. Resting allows the juices to redistribute throughout the meat. When you finally slice, each piece will be moist and full of flavor.
Use a sharp knife or cleaver to cut between the bones. This gives you clean portions and makes serving effortless. Sliced oven ribs look professional and are much easier to eat than whole racks.
Common Mistakes to Avoid When Cooking Ribs in the Oven
Even experienced cooks make missteps. Knowing what to avoid saves time, money, and a lot of disappointment.
Skipping the Membrane Removal
This cannot be stressed enough. Leaving the membrane on creates a rubbery layer that no amount of seasoning or cooking time can fix. Always remove it before applying your rib rub.
Using Too Much Sauce Too Early
Applying barbecue sauce in the first half of cooking is a common error. The sugars in the sauce burn at high temperatures, turning black and bitter. Save the glaze for the last 15 to 20 minutes only.
Opening the Oven Door Too Often
Every time you open the oven door, you lose heat and moisture. This extends cooking time and can dry out your ribs. Trust the process and resist the temptation to peek. Use the oven light to check on your baked ribs instead.
Not Letting Ribs Rest
Cutting into ribs immediately after removing them from the oven releases all the juices onto the cutting board. A proper rest period ensures every bite is moist and flavorful. Ten to fifteen minutes is all you need.
Serving Suggestions and Side Pairings
Perfect oven ribs deserve equally perfect sides. Here are some ideas to round out your meal:
- Coleslaw: The crunch and coolness of coleslaw balances the rich, smoky flavor of ribs perfectly.
- Cornbread: A warm, buttery cornbread soaks up any remaining glaze and juice beautifully.
- Baked beans: Classic pairing that adds heartiness and a touch of sweetness to the plate.
- Grilled corn on the cob: Charred corn with butter and a sprinkle of chili powder complements ribs wonderfully.
- Mac and cheese: Creamy, cheesy mac and cheese is a crowd-pleasing side that pairs with almost any rib style.
For a complete BBQ ribs in the oven experience, serve with pickles, onion slices, and extra sauce on the side. Let everyone build their own plate.
Expert Tips for Next-Level Oven Ribs
Take your oven-baked ribs from good to unforgettable with these professional tips:
- Use the 3-2-1 method: Smoke for 3 hours, wrap for 2 hours, unwrap and glaze for 1 hour. This works beautifully in the oven with a smoke box or liquid smoke added to the wrap.
- Add wood chips for smoke flavor: Soak hickory or applewood chips and place them in a foil pouch at the bottom of the oven. This adds a subtle, authentic smoke flavor without a grill.
- Double-wrap in foil for extra tenderness: If you prefer ultra-tender ribs, use a double layer of foil during the wrapped phase. This creates an even tighter seal and more steam.
- Experiment with different rubs: Try a coffee-rub, a mustard-based rub, or a spicy chili rub to find your signature flavor profile.
- Brush with honey in the last 10 minutes: A light honey brush adds a beautiful caramelized finish and natural sweetness.
Storing and Reheating Leftover Ribs
How to cook ribs in the oven often produces more than you can eat in one sitting, and that is a good thing. Leftover ribs taste even better the next day as the flavors meld together.
Store cooked ribs in an airtight container in the refrigerator for up to 4 days. To reheat, wrap the ribs in foil with a splash of broth or apple juice and warm them in the oven at 300°F for 20 to 25 minutes. This prevents the meat from drying out and keeps it tender.
You can also freeze ribs for up to 3 months. Wrap them tightly in plastic wrap and foil, then thaw in the refrigerator overnight before reheating. Reheated oven ribs can be just as delicious as fresh if you follow these simple steps.
Conclusion
Learning how to cook ribs in the oven is one of the most rewarding skills you can build in the kitchen. With the right temperature, the right timing, and a little patience, you can produce ribs that rival any barbecue restaurant. The low and slow method at 275°F, combined with proper prep and a great glaze, transforms a simple rack of ribs into a show-stopping centerpiece.
Remember to remove the membrane, apply a flavorful rub, wrap in foil for moisture, and glaze in the final stages. Avoid the common mistakes, use a meat thermometer, and always let your ribs rest before serving. These steps might seem small, but they make a massive difference in the final product.
Now that you have all the tools and knowledge, it is time to fire up your oven and give it a try. Your family and guests will be asking for oven ribs at every gathering. Happy cooking, and enjoy every juicy, tender bite.
Frequently Asked Questions
What is the best oven temperature for cooking ribs?
The best oven temperature for ribs is 275°F. This low heat allows the collagen and fat to break down slowly, resulting in tender, juicy meat with a great texture. Avoid higher temperatures as they dry out the ribs quickly.
How long does it take to cook ribs in the oven?
Most racks of ribs take between 2.5 and 3.5 hours at 275°F. Baby back ribs cook faster at about 2.5 hours, while spare ribs and thicker cuts may need up to 4 hours. Always check the internal temperature for the best results.
Do I need to wrap ribs in foil when cooking them in the oven?
Wrapping ribs in foil is not mandatory but highly recommended. The foil traps steam and moisture, making the meat incredibly tender. It also speeds up cooking time and helps the seasoning penetrate deeper into the meat.
Can I use frozen ribs for oven cooking?
Yes, but it is best to thaw ribs first for even cooking. Place frozen ribs in the refrigerator overnight to defrost. Cooking frozen ribs directly in the oven leads to uneven results and longer cook times.
How do I know when ribs are done in the oven?
Ribs are done when the internal temperature reaches 195°F to 203°F. You can also check by inserting a toothpick into the thickest part of the meat. If it slides in easily and the meat bends slightly when you lift a bone, they are ready.
Can I use liquid smoke for a smoky flavor without a smoker?
Absolutely. Liquid smoke is a great alternative for achieving that classic smoky flavor in the oven. Add a few drops to your rib rub or wrap liquid. Use sparingly, as a little goes a long way in delivering bold, smoky taste.