How To Build A Solar Oven Using Common Household Items
Learn how to build a solar oven using everyday household items like cardboard boxes, aluminum foil, and plastic wrap. This guide gives you a complete step-by-step process to create a working solar cooker at home. You will discover how solar cooking saves energy, cuts costs, and works great for baking, roasting, and heating meals. Whether you want to prepare for power outages or live a more sustainable lifestyle, this project is simple, fun, and incredibly effective.
Key Takeaways
- Build a solar oven from scratch: You only need a few common household items to get started.
- Save money on energy bills: Solar cooking uses free sunlight instead of gas or electricity.
- Easy to customize: You can adjust your design for better heat retention and faster cooking.
- Great for emergencies: A homemade solar oven works during power outages and outdoor adventures.
- Eco-friendly cooking: Reduce your carbon footprint with renewable solar power.
- Perfect for beginners: No special tools or skills are needed to assemble your first solar cooker.
📑 Table of Contents
- How To Build A Solar Oven Using Things You Already Have
- How Does A Solar Oven Work?
- Materials You Need To Build A Solar Oven
- Step-By-Step Guide To Building Your Solar Oven
- Tips For Getting The Best Cooking Results
- Common Mistakes To Avoid When Building A Solar Oven
- Benefits Of Solar Cooking With A Homemade Oven
- Expert Insights On Solar Oven Performance
- Quick Tips For First-Time Builders
- Conclusion
How To Build A Solar Oven Using Things You Already Have
Have you ever thought about cooking food using nothing but sunlight? How To Build A Solar Oven is easier than you might think. You do not need expensive equipment or special skills. In fact, you probably already have most of the materials sitting around your house right now.
Solar cooking is one of the oldest and simplest ways to prepare meals. People across the world have used sun-powered cooking for centuries. Today, building a DIY solar oven is a fantastic project for families, campers, and anyone who wants to save energy. This guide will walk you through every single step.
By the time you finish reading, you will know exactly what materials to gather, how to assemble your oven, and how to cook real meals with it. Let us get started.
Why Build A Solar Oven At Home?
There are many reasons people choose to build a homemade solar oven. Some want to reduce their electricity usage. Others enjoy outdoor cooking and camping. Some people build them as fun science projects with kids. And many people prepare for emergencies by learning off-grid cooking methods.
Whatever your reason, the benefits are clear. A solar oven uses zero fuel. It produces no smoke or emissions. And once built, it cooks food for free every single sunny day. Plus, it is a great way to teach children about renewable energy and sustainable living.
How Does A Solar Oven Work?
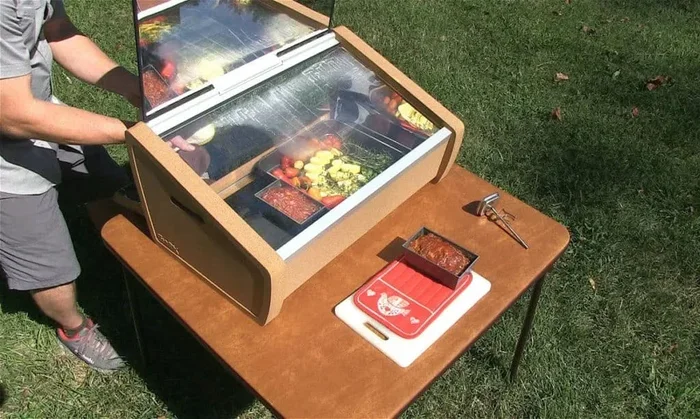
Understanding the basic science behind a solar cooker helps you build a better one. The concept is simple and clever. Sunlight enters the oven through a clear cover. The inside surface reflects and traps the light. The trapped light turns into heat. And the enclosed space keeps that heat from escaping.
This process works because of something called the greenhouse effect. Just like a car heats up when parked in the sun, a solar oven captures and holds thermal energy. The aluminum foil lining acts as a reflector, bouncing more sunlight into the cooking chamber. The plastic wrap or glass cover lets light in but prevents heat from leaving.
The thermal insulation inside the box slows down heat loss. Dark-colored pots or surfaces absorb the sunlight and convert it into solar heat. Together, these elements create a cooking environment that can reach temperatures between 200 and 350 degrees Fahrenheit. That is hot enough to bake, roast, and even boil water.
Materials You Need To Build A Solar Oven
One of the best things about building a solar oven is how simple the material list is. You do not need to visit a specialty store. Everything can be found around your home or at a local dollar store.
Essential Materials List
- Cardboard box — a medium-sized pizza box or shipping box works perfectly
- Aluminum foil — used to line the inside and create reflectors
- Plastic wrap — clear plastic sheeting to cover the opening
- Black construction paper — absorbs heat inside the cooking chamber
- Duct tape — holds everything together and seals gaps
- Scissors or box cutter — for cutting the cardboard
- Ruler and pencil — for measuring and marking
- Glue stick — to attach foil and paper
- Small stick or skewer — to prop open the reflector flap
- Dark pot or pan — for placing food inside the oven
Optional But Helpful Additions
You can upgrade your DIY solar oven with a few extra items. These additions improve heat retention and cooking performance. Consider adding a piece of thermal insulation like newspaper or cotton balls along the inner walls. A second layer of plastic wrap creates a better seal. Some builders add a small mirror to boost the solar reflection. You can also paint the outside of the box black to absorb more solar energy.
Step-By-Step Guide To Building Your Solar Oven
Now comes the fun part. Follow these steps carefully, and you will have a working solar cooker in under an hour. Each step is simple and straightforward.
Step 1: Prepare The Cardboard Box
Start with a clean cardboard box. A pizza box is ideal because it already has a hinged lid. If you are using a shipping box, cut off the top flaps to create an open top. Make sure the box is sturdy and free of holes. Any gaps will let heat escape, which reduces your cooking temperature.
Line the entire inside bottom of the box with black construction paper. Use glue or tape to secure it flat. The black surface is essential because it absorbs solar heat instead of reflecting it away. This is the same reason dark cars get hotter in the sun.
Step 2: Line The Reflector Flap With Aluminum Foil
The lid of your box will act as the reflector. Open it flat and cover the entire inside surface with aluminum foil. Make sure the foil is smooth and shiny side out. Use a glue stick to attach it evenly. Smooth out any wrinkles because wrinkles scatter light instead of reflecting it properly.
This foil-covered flap is what makes your solar oven so effective. It catches sunlight and directs it into the box. The more sunlight you can reflect into the cooking area, the hotter your oven will get.
Step 3: Cut The Window Opening
Using a ruler and pencil, trace a rectangle on the lid of the box. Leave about one inch of border around all sides. Carefully cut along the lines with scissors or a box cutter. This creates a window where sunlight will enter.
Next, stretch a layer of plastic wrap tightly over the opening. Tape it down on all four sides. This creates an airtight seal that lets light in but traps heat inside. For better results, add a second layer of plastic wrap with a small air gap between the two layers. This double-pane setup improves thermal insulation significantly.
Step 4: Create A Reflector Stand
Cut a small notch in the top edge of the box lid. This is where you will insert a stick or skewer to prop the reflector flap open. The angle of the flap matters a lot. You want it angled so that sunlight bounces directly into the box through the window.
Adjust the flap angle throughout the day as the sun moves. The best angle is when the foil reflects sunlight straight down into the oven. You can use a small mirror as an additional reflector if you want to boost the solar heat even more.
Step 5: Place Your Food Inside And Start Cooking
Place your dark pot or pan on top of the black paper inside the box. Put your food inside the pot. Close the lid and make sure the plastic wrap is secure. Position the reflector flap to face the sun directly.
Use a stick or skewer to hold the flap open at the right angle. Check your food every 30 minutes and adjust the flap as the sun moves. A solar oven cooks more slowly than a regular oven, so patience is key. Most recipes will take about twice as long as normal cooking time.
Comparison: Different Types Of Solar Ovens
There are several types of solar cookers you can build. Each design has its own strengths. Here is a quick comparison to help you understand your options.
| Type | How It Works | Max Temperature | Best For |
|---|---|---|---|
| Box Solar Oven | Enclosed box with reflective flap and clear cover | 200-300°F | Baking, roasting, slow cooking |
| Parabolic Solar Cooker | Curved reflector focuses sunlight to a single point | 400-600°F | Frying, boiling, high-heat cooking |
| Panel Solar Cooker | Flat reflective panels surround a dark cooking pot | 150-250°F | Simple heating, warming, simmering |
The box-style solar oven described in this guide is the easiest to build and the most beginner-friendly. It is perfect for first-time builders. Parabolic cookers get hotter but require more careful handling because the focused light can be dangerous. Panel cookers are the simplest design but also the least efficient.
Tips For Getting The Best Cooking Results
Building your solar oven is only half the battle. Using it correctly makes a huge difference in your results. Here are some practical tips that will help you cook better with solar power.
- Cook during peak sunlight hours. The best time to use your solar cooker is between 10 a.m. and 2 p.m. when the sun is at its highest point.
- Use dark-colored cookware. Dark pots absorb solar heat much better than shiny or light-colored pans. If you only have light pots, wrap them in black paper or cloth.
- Keep the oven sealed tight. Every time you open the lid, you lose heat. Plan your checks so you do not open the oven too often. Use the plastic wrap window to check on your food instead.
- Preheat the oven before adding food. Let the oven sit in direct sunlight for 15 to 20 minutes before placing your food inside. This helps it reach the right cooking temperature faster.
- Cut food into smaller pieces. Smaller pieces cook faster and more evenly in a solar oven. This is especially helpful for vegetables and meats.
- Use a thermometer. A simple oven thermometer placed inside the box helps you track your solar heat levels. This way you know when the oven is ready for cooking.
- Protect the plastic wrap from melting. On very hot days, the plastic can soften. Keep the reflector flap angled to reduce direct heat on the cover. A piece of glass instead of plastic wrap works even better in extreme heat.
Common Mistakes To Avoid When Building A Solar Oven
Even simple projects come with common pitfalls. Avoiding these mistakes will save you time and frustration. Here is what to watch out for when you build a solar oven.
Using The Wrong Box Material
Not all cardboard boxes are created equal. A flimsy box will fall apart in the heat and wind. Choose a thick, sturdy box that can hold its shape. Pizza boxes work well for small projects, but for serious solar cooking, a larger shipping box gives you more space and better stability.
Skipping The Insulation
One of the biggest mistakes people make is forgetting about thermal insulation. Without insulation, your oven loses heat quickly, especially on windy days. Line the inner walls with newspaper, cotton balls, or even old towels. This simple addition can raise your cooking temperature by 20 to 30 degrees.
Not Reflecting Enough Sunlight
If your foil is wrinkled or you use too little of it, your solar oven will not get hot enough. Make sure the reflector flap is fully covered with smooth, shiny aluminum foil. You can also add extra reflectors made from cardboard and foil to surround the box and boost the solar energy entering the oven.
Cooking On Cloudy Days
Solar cooking depends on direct sunlight. Do not expect good results on cloudy or overcast days. If you live in a cloudy climate, look for the brightest days of the week to use your oven. Even partial clouds can cut your solar heat in half.
Benefits Of Solar Cooking With A Homemade Oven
Once you start using your DIY solar oven, you will notice many advantages. These benefits go beyond just saving money on your energy bill.
Solar cooking is completely clean. There is no smoke, no fuel, and no pollution. This makes it ideal for outdoor use and for areas where indoor cooking with wood or gas creates harmful air quality. It is also incredibly quiet, so you can cook during a camping trip without disturbing anyone.
Using a solar oven reduces your dependence on electricity and gas. This is especially valuable during power outages or in areas with unreliable energy access. A sun oven also teaches important lessons about renewable energy and resourcefulness. Children love watching food cook using nothing but the power of the sun.
From a financial perspective, solar cooking costs nothing after the initial build. You are using a free, unlimited energy source every time the sun shines. Over time, this adds up to real savings on your utility bills. It is also a wonderful way to practice sustainable living and reduce your environmental footprint.
Expert Insights On Solar Oven Performance
Many people wonder how well a homemade solar oven actually performs compared to a conventional oven. The answer depends on several factors, including the design, the weather, and what you are cooking.
According to solar cooking experts, a well-built box solar oven can reach temperatures of 250 to 300 degrees Fahrenheit on a clear, sunny day. This is hot enough to bake bread, roast vegetables, heat casseroles, and even make cookies. The key is maximizing solar reflection and minimizing heat loss through proper insulation and sealing.
Experienced builders recommend starting with simple recipes that require longer, steadier cooking times. Things like rice, beans, soups, and roasted vegetables work beautifully in a solar cooker. Foods that need very high, direct heat may not cook as evenly. But with practice and adjustments, you can prepare a wide variety of meals using nothing but the sun.
One expert tip is to place your oven on a south-facing surface if you are in the northern hemisphere. This ensures maximum sun exposure throughout the day. Angling the reflector flap to track the sun also improves performance. Even small adjustments every 30 to 45 minutes can make a noticeable difference in your solar cooking results.
Quick Tips For First-Time Builders
Building your first solar oven is exciting. These quick tips will help you succeed on your first try.
- Start with a pizza box for your first project. It is the perfect size and already has a hinged lid.
- Use the shiniest aluminum foil you can find. Dull foil reflects less light and reduces performance.
- Test your oven on a warm, sunny day before trying to cook a full meal.
- Place a small piece of food inside first to get a feel for how fast it cooks.
- Have fun with it! Solar cooking is a creative project that the whole family can enjoy together.
Conclusion
How To Build A Solar Oven is one of the most rewarding and practical DIY projects you can tackle. You use simple household items, create something useful, and start cooking with free solar energy. Whether you are preparing for emergencies, saving on energy costs, or just looking for a fun family activity, a homemade solar cooker delivers real results.
The process is straightforward, the materials are easy to find, and the benefits are significant. You get clean, fuel-free cooking that works every time the sun shines. Once you build your first DIY solar oven, you will wonder why you did not try it sooner.
Grab your cardboard box, some aluminum foil, and a few other supplies. Follow the steps in this guide, and you will be cooking with the sun in no time. Solar cooking is simple, sustainable, and incredibly satisfying. Start your project today and enjoy the power of renewable energy right in your own backyard.
Frequently Asked Questions
What household items do I need to build a solar oven?
You need a cardboard box, aluminum foil, black construction paper, plastic wrap, duct tape, scissors, a glue stick, and a dark pot or pan. These common household items are all you need to build a working DIY solar oven. Most people already have these materials at home.
How hot can a homemade solar oven get?
A well-built box-style solar oven can reach temperatures between 200 and 300 degrees Fahrenheit on a clear, sunny day. The cooking temperature depends on factors like the reflector angle, insulation quality, and direct sunlight exposure. Proper construction and regular adjustments help you achieve the best results.
Can you really cook full meals in a solar oven?
Yes, you can cook full meals in a solar cooker. People regularly bake bread, roast vegetables, heat soups, and even make cookies using solar power. Cooking times are longer than a conventional oven, usually about twice as long, but the results are delicious and completely fuel-free.
What is the best type of solar oven for beginners?
The box-style solar oven is the best type for beginners. It is easy to build, uses simple materials, and produces reliable solar heat. Unlike parabolic cookers, box ovens are safe, stable, and require no special handling. Start with a box design and you will master solar cooking quickly.
Does a solar oven work on cloudy days?
Solar ovens work best in direct, bright sunlight. On cloudy or overcast days, the solar energy is reduced significantly, and cooking times increase or may not work at all. For best results, use your homemade solar oven on clear, sunny days between 10 a.m. and 2 p.m.
Is solar cooking safe for children?
Yes, solar cooking is very safe for children. There is no fire, no gas, and no electricity involved. It is a wonderful hands-on way to teach kids about renewable energy and sustainable living. Just make sure an adult supervises the setup and handles any cutting with scissors or box cutters.