How Long Thin Chicken Breast In Oven Cooks Perfectly
Cooking thin chicken breast in the oven is fast, easy, and delivers amazing results every time. The key is getting the temperature and timing just right so the meat stays juicy and tender. Most thin chicken breasts cook in 15 to 20 minutes at 400°F, but several factors can change that. This guide covers everything you need to know about thin chicken breast in oven cooking time, temperature, and techniques. Follow these tips and you will always have perfectly cooked chicken breast on your plate.
There is nothing quite like a perfectly cooked thin chicken breast in oven. It is quick, it is simple, and when done right, it is incredibly juicy and flavorful. Whether you are meal prepping for the week or cooking dinner for your family, knowing exactly how long to bake thin chicken breast makes all the difference.
Many people struggle with dry, overcooked chicken breast. The problem usually comes down to timing and temperature. Thin chicken breast cooks much faster than thicker cuts, so it needs close attention. This guide will walk you through everything step by step. You will learn the ideal oven temperature, the exact cooking time, and simple tricks to keep your chicken moist and delicious every single time.
By the end of this article, you will feel confident cooking thin chicken breast in oven like a pro. No more guessing. No more dry meat. Just perfectly baked chicken breast that everyone will love.
Key Takeaways
- Cook Time: Thin chicken breast cooks in 15 to 20 minutes at 400°F.
- Internal Temperature: Always reach 165°F for safe and juicy chicken.
- Pat Dry: Drying the surface helps get a crispy exterior.
- Rest the Meat: Let chicken rest for 5 minutes after cooking.
- Season Well: Simple seasoning brings out great flavor.
- Use a Meat Thermometer: This is the best way to avoid overcooking.
- Brine for Moisture: A quick brine keeps chicken breast tender.
📑 Table of Contents
- Understanding Thin Chicken Breast
- What Temperature to Cook Thin Chicken Breast in Oven
- How Long Thin Chicken Breast in Oven Cooks
- Step-by-Step Guide to Baking Thin Chicken Breast
- Tips for Juicy and Tender Chicken Breast
- Common Mistakes to Avoid
- Serving Ideas for Oven-Baked Chicken Breast
- Meal Prep with Thin Chicken Breast
- Conclusion
Understanding Thin Chicken Breast
Before we get into cooking times, it helps to understand what makes thin chicken breast different. Not all chicken breasts are the same. Thin cuts are typically about half an inch to one inch thick. They cook much faster than standard or thick-cut breasts. This is why knowing the right chicken breast cooking time matters so much.
Thin chicken breast is great for several reasons. It cooks quickly, which saves time. It absorbs seasoning well because the meat is not too thick. And it works perfectly for a wide range of recipes, from simple weeknight dinners to meal prep favorites. If you are new to cooking chicken, thin breast is the best place to start.
What Is Thin Chicken Breast?
Thin chicken breast refers to boneless, skinless chicken cuts that are flattened or naturally slim. You can buy them pre-flattened at many grocery stores. Some people also pound thicker breasts to an even thickness using a meat mallet. This ensures even cooking throughout the piece of meat.
When you buy thin chicken breast, look for cuts that are uniform in thickness. Uneven pieces will cook at different rates, which can lead to some parts being overcooked while others are still underdone. Consistency is key for the best results with your oven-baked chicken.
Why Cook Thin Chicken Breast in the Oven?
The oven is one of the best ways to cook thin chicken breast. Here is why:
- Even heat distribution: The oven surrounds the chicken with hot air, cooking it evenly on all sides.
- Minimal effort: Once the chicken is in the oven, you can focus on other things.
- Crispy exterior: Oven baking can create a nice golden crust on the outside.
- Easy to scale: You can cook multiple pieces at once without much extra effort.
- Healthy cooking method: Baking uses less oil compared to frying.
Compared to stovetop cooking or grilling, oven-baked chicken breast gives you more control and more consistent results. It is also very forgiving, which makes it perfect for beginners who are still building their chicken breast recipe skills.
What Temperature to Cook Thin Chicken Breast in Oven
The temperature you choose has a big impact on your results. Most recipes for thin chicken breast in oven call for temperatures between 375°F and 425°F. Each temperature range has its own advantages and best use cases.
400°F: The Sweet Spot
400°F is widely considered the best temperature for baking thin chicken breast. At this heat, the outside gets nicely golden while the inside stays moist. The cooking time is short, which reduces the risk of drying out the meat.
At 400°F, thin chicken breast typically needs about 15 to 18 minutes. This temperature also allows for better caramelization, which adds flavor and texture. If you want crispy edges and a golden finish, 400°F is your go-to setting for oven baked chicken breast.
375°F: The Lower and Slower Option
If you prefer a more gentle cooking process, 375°F works well. The chicken cooks a bit slower, which can help retain moisture. However, it takes a little longer, usually around 18 to 22 minutes.
The lower temperature is a good choice if you are cooking chicken breast with a coating or breading. The lower heat gives the coating more time to crisp up without burning the outside before the inside is fully cooked. It is also great for tender chicken breast that you want to keep very moist.
425°F: The High-Heat Method
For the fastest cook time and the crispiest result, try 425°F. Thin chicken breast at this temperature can be done in as little as 12 to 15 minutes. This method works best when you want maximum crispiness and minimal moisture loss.
The trade-off is that you need to watch the chicken closely. At higher temperatures, it is easier to overcook thin cuts. Keep a close eye on the clock and use a meat thermometer to check for chicken breast doneness. Start checking at the 12-minute mark to be safe.
How Long Thin Chicken Breast in Oven Cooks
This is the question at the heart of this guide. The answer depends on several factors, including the oven temperature, the thickness of the breast, and whether you are cooking one piece or multiple pieces at once. Getting the timing right is the difference between dry, tough meat and juicy, flavorful results.
Cooking Time at 400°F
At 400°F, thin chicken breast cooks in about 15 to 20 minutes. This is the most common recommendation and works well for most cuts. The exact time depends on how thin the breast is. A half-inch thick piece might be done in 15 minutes, while a one-inch thick piece could need closer to 20 minutes.
Always use a meat thermometer to check the internal temperature. The chicken is done when it reaches 165°F in the thickest part. This is the safest and most reliable way to know your baked chicken breast is ready. Trust the thermometer, not the clock alone.
Cooking Time at 375°F
At 375°F, expect the cook time to be slightly longer, around 18 to 22 minutes. The lower heat means the chicken takes a bit more time to reach the safe internal temperature of 165°F.
This temperature is a good choice if you are cooking chicken breast with a coating or breading. The lower heat gives the coating more time to crisp up without burning the outside before the inside is fully cooked. It also works well for chicken breast seasoning blends that need time to toast and develop flavor.
Cooking Time at 425°F
At 425°F, thin chicken breast cooks very quickly, usually in 12 to 15 minutes. This high heat is excellent for getting a crispy exterior while keeping the inside juicy. However, because the cook time is so short, it is easy to miss the window of perfection.
Start checking the chicken at the 12-minute mark. Pull it out as soon as it hits 165°F internally. Overcooking by even a couple of minutes at this temperature can dry out the meat. The difference between perfect and overcooked is just a few minutes.
Factors That Affect Cooking Time
Several factors can change how long your thin chicken breast in oven needs to cook:
- Thickness of the breast: Thinner pieces cook faster. A half-inch breast might need 12 to 15 minutes, while a one-inch breast could need 18 to 20 minutes.
- Starting temperature: Chicken that comes straight from the fridge will take longer than chicken that has been brought to room temperature first.
- Oven accuracy: Not all ovens heat evenly or accurately. An oven thermometer can help you know the true temperature inside your oven.
- Number of pieces: Cooking multiple pieces at once can increase the cook time slightly because the oven needs to recover heat.
- Whether the chicken is covered or uncovered: Covering the chicken traps steam and can speed up cooking, but it may also prevent crispiness.
- Use of a baking rack: Elevating the chicken on a rack allows air to circulate underneath, which promotes even cooking and crispier results.
Step-by-Step Guide to Baking Thin Chicken Breast
Now that you know the temperature and time, here is a simple step-by-step guide to baking thin chicken breast in the oven. Follow these steps and you will get great results every time. This process works whether you are cooking one breast or a full batch.
Step 1: Prepare the Chicken
Remove the chicken breast from the refrigerator about 15 to 20 minutes before cooking. This lets the meat come closer to room temperature, which promotes more even cooking. Pat the chicken dry with paper towels. Dry surface means better browning and crispiness on your oven-baked chicken.
If the chicken has a thick tendon or pocket of fat, trim it off now. These parts do not cook at the same rate as the rest of the breast and can create uneven results. Simple prep work at this stage saves you from disappointment later.
Step 2: Season Generously
Seasoning is where you can get creative. A simple mix of olive oil, salt, pepper, garlic powder, and paprika works beautifully. You can also use Italian seasoning, lemon zest, or any spices you enjoy.
For extra flavor, try marinating the chicken for 30 minutes before cooking. A quick marinade of olive oil, lemon juice, garlic, and herbs adds tremendous flavor to thin chicken breast. Even a 15-minute marinating makes a noticeable difference in the final taste of your thin chicken breast recipe.
Step 3: Preheat the Oven
Preheat your oven to the desired temperature. Most people choose 400°F for thin chicken breast. Give the oven at least 10 to 15 minutes to reach the target temperature. A properly preheated oven ensures the chicken starts cooking immediately and evenly from the moment it goes in.
Do not skip this step. Putting chicken into a cold or lukewarm oven throws off the cook time and can lead to uneven results. Patience at this stage pays off with better texture and flavor.
Step 4: Arrange on a Baking Sheet
Line a baking sheet with parchment paper or lightly grease it. Place the chicken breasts in a single layer with space between each piece. Overcrowding the pan traps steam and prevents the chicken from getting crispy.
For even better results, place the chicken on a wire rack set over the baking sheet. This allows hot air to circulate all around the meat, giving you a more evenly cooked and crispy result. A wire rack is a small kitchen tool that makes a big difference in the texture of your crispy chicken breast.
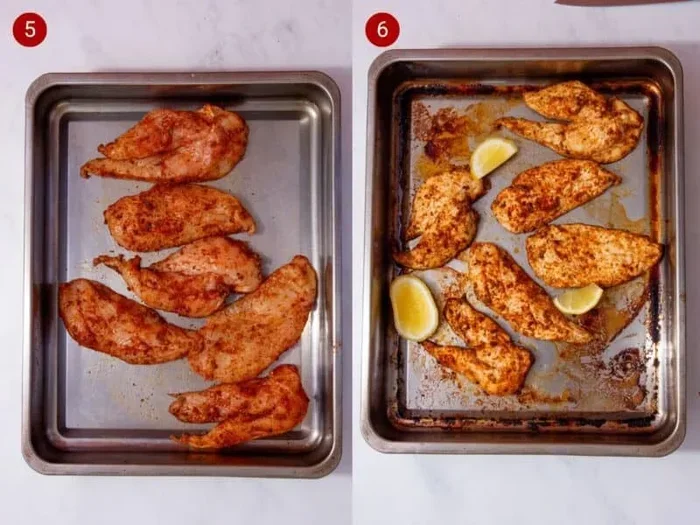
Step 5: Bake and Monitor
Place the baking sheet in the center of the oven. Set a timer for the recommended cook time. At 400°F, thin chicken breast usually needs 15 to 20 minutes. Halfway through cooking, flip the pieces over for even browning on both sides.
Use a meat thermometer to check the internal temperature. When it reads 165°F, the chicken is done. If you do not have a thermometer, make a small cut in the thickest part. The juices should run clear, not pink. Trust your senses, but always verify with a thermometer for the safest results.
Step 6: Rest Before Serving
Once the chicken is out of the oven, let it rest for 5 minutes before cutting. This resting period allows the juices to redistribute throughout the meat. Cutting too early releases those juices onto the cutting board, and your chicken can end up dry and less flavorful.
Tent the chicken loosely with foil during resting. This keeps it warm without trapping too much steam, which would soften the crispy exterior. Five minutes of resting makes a noticeable difference in the juiciness of your oven baked chicken breast.
Tips for Juicy and Tender Chicken Breast
Getting juicy, tender chicken breast every time is easier than you think. A few simple techniques make a huge difference in the final result. These tips will take your thin chicken breast in oven game to the next level.
Brine the Chicken
Brining is one of the best ways to ensure moist chicken breast. A simple brine of water, salt, and a touch of sugar works wonders. Soak the chicken for 30 minutes to 2 hours before cooking. The salt helps the meat retain moisture during baking. Even a quick 15-minute brine makes a noticeable difference in the tenderness of your chicken breast tender results.
Butterfly or Pound Evenly
If your chicken breast is uneven in thickness, pound it to an even size. Use a meat mallet or the bottom of a heavy pan. Place the chicken between two sheets of plastic wrap to prevent splashing. Even thickness means even cooking, which means no dry edges with raw centers.
This technique is especially helpful when you are working with boneless chicken breast that has not been pre-flattened. Taking two minutes to pound the chicken saves you from unevenly cooked pieces that ruin the whole meal.
Do Not Overcook
This is the single most important tip for cooking thin chicken breast. Overcooked chicken dries out very quickly because the meat is so thin. Pull the chicken out as soon as it hits 165°F. The carryover heat will raise the temperature a few more degrees as the meat rests.
Set your timer and watch the clock closely. Thin chicken breast goes from perfect to overcooked in just a couple of minutes. Being attentive during the last few minutes of cooking is what separates good results from great ones.
Use a Baking Rack
A baking rack elevates the chicken above the pan, allowing hot air to flow underneath. This promotes crispiness on all sides and prevents the bottom from getting soggy. It is a small kitchen tool that makes a big difference in the quality of your baked chicken breast.
If you do not have a baking rack, you can use a cooling rack placed on top of a baking sheet. The principle is the same: air needs to circulate around the chicken for even cooking and crispy skin on all sides.
Add a Sauce or Glaze
Brushing the chicken with a sauce during the last few minutes of cooking adds flavor and moisture. Honey mustard, barbecue sauce, or a simple lemon butter glaze all work great. Apply the sauce in the last 5 minutes to prevent burning.
The sugar in many sauces can caramelize quickly at high temperatures. Watch the chicken closely during this final stage. A well-timed glaze adds a beautiful sheen and deep flavor to your perfectly cooked chicken.
Common Mistakes to Avoid
Even experienced cooks make mistakes when baking chicken breast. Knowing what to avoid saves you from dry, disappointing results. Here are the most common errors and how to avoid them.
Skipping the Pat-Dry Step
Moisture on the surface of the chicken creates steam instead of allowing browning. Always pat the chicken dry before seasoning. This one simple step leads to significantly better results. Wet chicken steams rather than roasts, and you lose the crispy exterior that makes oven-baked chicken so satisfying.
Overcrowding the Pan
Putting too many pieces of chicken on one baking sheet traps steam. The chicken steams instead of roasts, which leads to soggy skin and uneven cooking. Give each piece enough space. If you need to cook more, use two pans or bake in batches. Your chicken breast moisture levels depend on proper air circulation.
Not Using a Meat Thermometer
Guessing when chicken is done is a recipe for disappointment. A meat thermometer takes the guesswork out of cooking. Invest in a good instant-read thermometer. It costs a few dollars and will transform your cooking. You will never wonder again if your chicken breast internal temperature is safe and perfect.
Cooking from Cold
Putting cold chicken straight into a hot oven means the outside cooks much faster than the inside. Let the chicken sit at room temperature for 15 to 20 minutes before baking. This small step leads to more even cooking throughout. It is a simple habit that makes a real difference in the quality of your thin chicken breast in oven results.
Cutting Into the Chicken Too Soon
Cutting into the chicken to check if it is done releases all the juices. Resist the urge. Use a meat thermometer instead. If you must cut, wait until the resting period is over. Those juices are flavor and moisture, and you want them staying inside the meat where they belong.
Ignoring Carryover Cooking
Chicken continues to cook after you take it out of the oven. This carryover cooking can raise the internal temperature by 5 to 10 degrees. Pull the chicken out when it reaches 160°F, and it will reach the safe 165°F during resting. This is a pro tip that keeps chicken juicy every time.
Serving Ideas for Oven-Baked Chicken Breast
Thin chicken breast in oven is incredibly versatile. It pairs well with almost any side dish or sauce. Here are some easy serving ideas to inspire your next meal:
- Grilled chicken salad: Slice the cooked chicken and toss it over a fresh garden salad with your favorite dressing.
- Chicken wrap: Add the sliced chicken to a tortilla with veggies, hummus, and a drizzle of tahini.
- Pasta dish: Toss the chicken with cooked pasta, olive oil, garlic, cherry tomatoes, and fresh basil.
- Rice bowl: Serve over rice with steamed vegetables, avocado, and a drizzle of soy sauce and sriracha.
- Sandwich: Pile the chicken between two slices of crusty bread with lettuce, tomato, and mayo.
- Plain with sides: Sometimes simple is best. Serve with roasted vegetables and a baked potato.
Each of these ideas works great with oven-baked thin chicken breast. The chicken absorbs flavors from marinades and seasonings, so it pairs well with almost any combination. Chicken breast recipe variations are endless once you master the basic cooking method.
Meal Prep with Thin Chicken Breast
Thin chicken breast is one of the best proteins for meal prep. Because it cooks so quickly, you can batch-cook several servings in one session. This saves enormous time during busy weekdays and helps you stick to healthy eating habits. Here are some tips for meal prep success:
- Cook a large batch on Sunday and portion it out for the week ahead.
- Store cooked chicken in airtight containers in the refrigerator for up to 4 days.
- Freeze cooked chicken breast for up to 3 months if you need it later in the week.
- Reheat gently in the oven or microwave to keep the chicken from drying out.
- Season different portions differently so you have variety throughout the week.
Meal prepping chicken breast saves time and money. Having cooked chicken ready to go makes it much easier to eat healthy and stick to your meal plan. Once you nail the thin chicken breast in oven technique, meal prep becomes effortless and enjoyable.
Conclusion
Cooking thin chicken breast in oven is one of the simplest and most rewarding cooking skills you can learn. With the right temperature, timing, and a few proven techniques, you can consistently produce juicy, flavorful, and perfectly cooked chicken breast every single time.
Remember the key points: aim for 400°F, cook for 15 to 20 minutes, use a meat thermometer, and let the chicken rest before serving. Avoid the common mistakes like overcrowding the pan, skipping the pat-dry step, and cutting into the meat too early. These small habits make a massive difference.
Once you master thin chicken breast in oven, you will have a go-to recipe that works for lunch, dinner, snacks, and meal prep. It is healthy, it is delicious, and it is incredibly easy to make. So preheat your oven, season your chicken, and enjoy the process. You have got this, and your perfectly cooked chicken breast is just 20 minutes away.
Frequently Asked Questions
Can you cook thin chicken breast at 350°F?
Yes, you can cook thin chicken breast at 350°F. At this lower temperature, the cook time increases to about 20 to 25 minutes. The chicken will still reach a safe internal temperature of 165°F. However, you may not get the same level of browning and crispiness as you would at 400°F or 425°F. Lower temperatures work well if you prefer a softer texture or are cooking chicken with a sauce.
How do you know when thin chicken breast is done in the oven?
The most reliable way to check is by using a meat thermometer. Insert it into the thickest part of the breast. When the internal temperature reaches 165°F, the chicken is done and safe to eat. If you do not have a thermometer, cut into the thickest part and check that the juices run clear and the meat is no longer pink. Always let the chicken rest for a few minutes after cooking, as the temperature will continue to rise slightly.
Should you cover chicken breast when baking in the oven?
Most of the time, you should bake thin chicken breast uncovered. Leaving it uncovered allows the outside to become crispy and golden. Covering the chicken traps steam, which can make the surface soggy. However, if you are cooking chicken with a sauce or glaze, you can cover it loosely with foil for the first part of cooking and then uncover it for the last few minutes to crisp up.
How long does cooked chicken breast last in the fridge?
Cooked chicken breast stays fresh in the refrigerator for 3 to 4 days when stored properly in an airtight container. Make sure the chicken has cooled down before putting it in the fridge. If you need to store it longer, you can freeze cooked chicken breast for up to 3 months. Always reheat leftover chicken to an internal temperature of 165°F before eating.
Can you bake frozen thin chicken breast in the oven?
Yes, you can bake frozen thin chicken breast, but you will need to increase the cooking time significantly. Frozen chicken may take 25 to 30 minutes at 400°F, depending on the thickness. It is important to make sure the internal temperature reaches 165°F throughout. For the best results, it is recommended to thaw the chicken first by placing it in the refrigerator overnight. Thawed chicken cooks more evenly and has a better texture.
What is the best seasoning for thin chicken breast in the oven?
The best seasoning depends on your personal taste, but some classics work every time. A simple mix of olive oil, salt, black pepper, garlic powder, and paprika is a foolproof choice. For something more flavorful, try lemon zest with dried oregano and thyme. If you enjoy a bit of heat, add cayenne pepper or chili flakes. You can also use pre-made seasoning blends like Italian seasoning or taco seasoning for quick and easy flavor on your chicken breast seasoning game.
=== CONCLUSION ===
Now you know everything about how long thin chicken breast in oven cooks perfectly. From the ideal temperature to the exact timing, you have all the tools you need to make restaurant-quality chicken at home. Remember to keep an eye on the clock, use a meat thermometer, and always let your chicken rest before serving.
With a little practice, you will be able to whip up perfectly baked thin chicken breast in under 20 minutes. It is a skill that saves time, money, and stress in the kitchen. So go ahead, give it a try, and enjoy the delicious results. Your oven-baked chicken breast journey starts today.