How Long Do Shrinky Dinks Go In The Oven For Best Results
Shrinky dinks typically need 1 to 3 minutes in a preheated oven set between 325°F and 350°F to shrink properly and achieve a flat, glossy finish. The exact baking time depends on the brand of shrink plastic, the thickness of your cutouts, and your oven’s accuracy. This guide walks you through the full baking process so your craft project turns out perfectly every single time.
Have you ever wondered how long do shrinky dinks go in the oven and what the perfect result looks like? Shrink plastic crafts are one of the most fun and rewarding DIY projects you can do at home. Whether you are making charms, keychains, ornaments, or little gifts for friends, the process is simple and satisfying. But the secret to amazing shrink art lies in getting the time and temperature just right.
Too little time and your pieces will curl up and stay wavy. Too much time and they can burn or turn brown. In this article, we will walk you through everything you need to know about baking shrinky dinks in the oven. We will cover the correct temperature, the exact timing, and all the little tips that make the difference between good results and great results.
By the end of this guide, you will feel confident enough to start your first or next shrink plastic craft with ease. Let us dive in and make sure your next project turns out perfectly.
Key Takeaways
- Bake at 325°F to 350°F: This is the ideal temperature range for most shrink plastic brands.
- Bake for 1 to 3 minutes: Watch for the plastic to curl and then flatten before removing it.
- Use parchment paper: It prevents sticking and makes cleanup a breeze.
- Let the oven do the work: Do not open the door too early or you may interrupt the shrinking process.
- Cool completely before handling: The plastic is hot and flexible right out of the oven but hardens as it cools.
- Check your shrink plastic brand: Different brands may have slightly different time and temperature needs.
📑 Table of Contents
What Are Shrinky Dinks and How Do They Work?
Shrinky dinks are sheets of special plastic that shrink when exposed to heat. You draw or print on them, cut out your shapes, and then place them in a hot oven. As the plastic heats up, it curls, shrinks down to a fraction of its original size, and flattens back out into a hard, durable piece of art.
The Science Behind Shrink Plastic
The magic happens because of the type of plastic used. Most shrink plastic sheets are made from polystyrene. When you heat polystyrene, it softens and shrinks. The plastic is printed or drawn on with a rough side that holds the ink or crayon marks. When the heat hits the plastic, the molecules tighten up, making your artwork smaller but just as colorful.
This is why shrink art is so popular in classrooms and craft rooms. Kids and adults alike love watching their flat drawings transform into tiny, hard charms. It feels like real magic every single time.
Types of Shrink Plastic Sheets
Not all shrink plastic is the same. There are a few different types you might come across:
- Standard shrink plastic: Shrinks to about half its original size. This is the most common type for home crafts.
- Clear shrink plastic: Great for window hangings and ornaments where you want to see through the finished piece.
- White shrink plastic: Works well for stickers and pins where you want a clean, opaque background.
- Frosted shrink plastic: Has a matte finish that looks elegant and is great for gift tags and decorative pieces.
Each type may have slightly different baking needs, so always check the instructions on the package. But the general oven temperature and timing guidelines we cover in this article apply to most brands.
The Right Oven Temperature for Shrinky Dinks
Getting the oven temperature right is the single most important factor in making great shrinky dinks. Too hot and the plastic burns. Too cool and it does not shrink properly and may stay curled.
Recommended Temperature Range
The standard temperature for baking shrink plastic is between 325°F and 350°F. Most craft brands recommend 325°F as a safe starting point. If your oven runs cool, you might need to go up to 350°F. If it runs hot, stick closer to 325°F.
Here is a quick reference for the most popular shrink plastic brands:
- Shrinky Dinks brand sheets: 325°F for about 1 to 2 minutes
- Grafix shrink film: 325°F to 350°F depending on the line
- Generic or store-brand shrink plastic: Always start at 325°F and adjust if needed
Why Oven Accuracy Matters
Many home ovens are not perfectly accurate. Your oven might say 325°F on the dial but actually be at 340°F or 310°F. This can make a big difference when you are working with shrink plastic that only needs a minute or two in the heat.
If you do a lot of craft projects, consider getting a cheap oven thermometer. Place it inside your oven and check the real temperature. This small step can save you from ruined projects and burnt plastic. It is one of the best craft tips for anyone who loves arts and crafts at home.
Convection vs. Conventional Ovens
If you have a convection oven, be careful. The fan circulates hot air and can cause the plastic to move around on the tray or even blow off the sheet. If you use a convection oven, try lowering the temperature by about 25°F and keep a close eye on your pieces.
For most beginners, a conventional oven works best for baking shrinky dinks. It provides steady, even heat without the extra airflow that can cause problems.
How Long Do Shrinky Dinks Go In The Oven?
This is the big question. How long do shrinky dinks go in the oven for the best results? The answer depends on a few factors, but the general range is about 1 to 3 minutes.
Timing Based on Thickness
Thin shrink plastic sheets will shrink faster than thick ones. Here is a basic timing guide:
- Thin sheets (standard craft grade): 1 to 2 minutes at 325°F
- Thick sheets (extra durable or heavy gauge): 2 to 3 minutes at 325°F
- Small pieces: Closer to 1 minute since they heat up fast
- Large pieces: May need the full 2 to 3 minutes
The key is to watch the plastic closely through the oven window. You do not need to open the door to check on it. Just look and wait for the right moment.
What to Look For During Baking
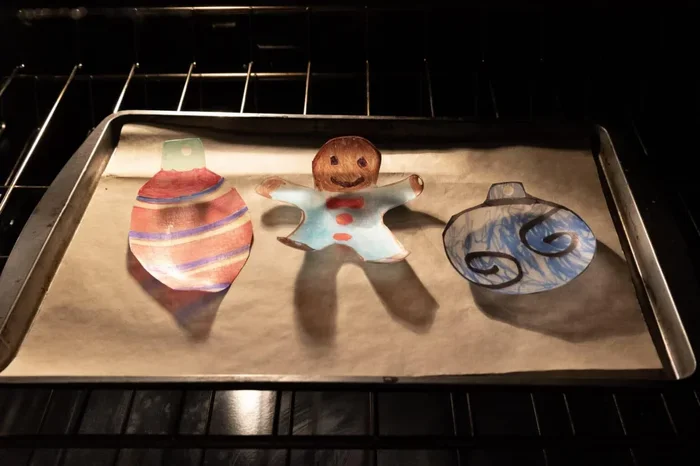
When you first put the shrink plastic in the oven, it will start to curl up at the edges. This is completely normal. Do not panic. Here is what happens next:
- The plastic curls inward: This happens within the first 15 to 30 seconds.
- The plastic begins to flatten: As the heat continues, the curls relax and the sheet flattens back out.
- The surface becomes smooth and glossy: This is your signal that the shrinking is complete.
- Remove from the oven: As soon as it looks flat and smooth, take it out.
If you leave it in too long, the plastic may brown or warp. If you take it out too early, it may still be wavy and not fully hardened. Timing is everything.
The Role of Your Oven Rack Position
Where you place the tray in the oven also matters. The middle rack is usually the best spot. It provides the most even heat distribution. Avoid placing the tray too close to the top heating element, as the direct heat can cause the plastic to brown on top before it shrinks evenly.
Step-by-Step Guide to Baking Shrinky Dinks
Now that you know the temperature and timing, let us walk through the full process step by step. Following these steps will give you the best results every time.
Step 1: Prepare Your Design
Start by drawing or printing your design on the rough side of the shrink plastic sheet. You can use colored pencils, sharpie markers, or even printed copies from a laser printer. Inkjet printers do not work well because the ink can smear during baking.
Keep your designs simple and bold. Fine details can get lost as the plastic shrinks down to a smaller size. Remember, the plastic will shrink to about half its original size, so plan your artwork accordingly.
Step 2: Cut Out Your Shapes
Use scissors or craft cutters to carefully cut out your shapes. Make sure there are no rough edges. You can also use a hole punch to add a hole for a keychain or necklace before baking.
Tip: Cut your shapes a little bigger than you want the final result to be. This gives you room for any slight shrinking variations.
Step 3: Preheat Your Oven
Preheat your oven to 325°F. Let it reach the full temperature before you put the plastic in. This ensures even heating from the start.
Step 4: Line Your Baking Sheet
Cover a cookie sheet with parchment paper or a silicone baking mat. This prevents the plastic from sticking and makes cleanup easy. Do not use aluminum foil alone, as the plastic can stick to it.
Step 5: Place the Plastic on the Tray
Put your cutout shapes on the tray with the rough (drawn) side facing up. Leave a little space between each piece so they do not touch as they shrink.
Step 6: Bake and Watch
Place the tray in the middle of the preheated oven. Set a timer for 1 minute. Then watch through the oven window. As soon as the plastic flattens out and looks smooth, pull the tray out.
Most pieces need between 1 and 3 minutes total. The exact time varies based on the size and thickness of your cutouts.
Step 7: Cool and Flatten
Once out of the oven, the plastic will be hot and flexible. You can press it flat with a spatula or simply let it cool on the tray. It will harden as it cools. If it is still slightly curved, you can place a heavy book on top of it while it cools to keep it flat.
Common Mistakes When Baking Shrinky Dinks
Even experienced crafters make mistakes. Here are the most common errors and how to avoid them.
Opening the Oven Door Too Early
One of the biggest mistakes is opening the oven door too soon. When you open the door, the temperature drops quickly. This can cause the plastic to curl unevenly or not shrink at all. Wait until the plastic has fully flattened before you open the door.
Using the Wrong Type of Plastic
Not all plastic sheets are meant for shrinking. Make sure you are using actual shrink plastic designed for oven use. Regular plastic sheets will melt, smoke, and create a mess in your oven. Always check the packaging to confirm it is safe for oven baking.
Overbaking the Plastic
It is easy to leave shrinky dinks in the oven too long. When overbaked, the plastic turns brown, develops bubbles, or warps beyond repair. Set a timer and watch closely. When the plastic looks flat and smooth, it is done.
Skipping the Parchment Paper
Some people skip the parchment paper to save time. This is a mistake. Without it, the plastic can stick to the tray and leave a mess. Parchment paper or a silicone mat is a small step that makes a big difference.
Drawing on the Wrong Side
Shrink plastic has two sides. One side is rough and holds color well. The other side is smooth and shiny. Always draw or print on the rough side, or your design may not transfer properly after baking.
Expert Tips for Perfect Shrinky Dink Results
Want to take your shrink plastic crafts to the next level? Here are some pro tips that make a huge difference.
Use a Craft Knife for Clean Edges
If you are making intricate shapes, a craft knife gives you cleaner edges than scissors. Just be careful and cut on a stable surface. Clean edges mean a more professional-looking finished piece.
Add a Hole Before Baking
If you plan to turn your shrinky dinks into keychains or necklaces, punch the hole before you bake. The plastic shrinks, so the hole will get smaller. A standard hole punch works great for this.
Color Both Sides for a Professional Look
For a polished finish, color the back side of your plastic too. This prevents the blank white back from showing through and gives your charm a more finished appearance.
Experiment with Different Markers
Not all markers and colored pencils give the same results. Sharpie markers tend to be the most vibrant after baking. Oil-based pastels also work well. Test a small piece first if you are trying a new medium.
Make Multiple Pieces at Once
You can bake several pieces on one tray at a time. Just make sure they do not touch each other. This saves time if you are making a batch of charms or ornaments.
Seal Your Finished Pieces
Once cooled, you can seal your shrinky dinks with a clear acrylic spray or Mod Podge. This adds a protective layer and makes the colors pop. It also helps the piece last longer, especially if you are making jewelry or items that will be handled often.
Frequently Asked Questions
Can I use an toaster oven to bake shrinky dinks?
Yes, you absolutely can use a toaster oven to bake shrinky dinks. Set it to 325°F and follow the same timing guidelines. Toaster ovens can actually be great for small craft projects because they heat up faster and use less energy. Just make sure the tray fits inside and keep an eye on your pieces since toaster ovens can run hot in spots.
What happens if I overbake shrinky dinks?
Overbaking causes the plastic to turn brown or tan, develop bubbles, and sometimes warp beyond use. The artwork may also fade or burn. To avoid this, watch the plastic closely and remove it as soon as it flattens out and looks smooth. Timing is critical, so set a timer and never walk away from the oven while baking shrink plastic.
Do I need to use parchment paper or can I use aluminum foil?
Parchment paper or a silicone baking mat is the best choice for baking shrinky dinks. Aluminum foil can cause the plastic to stick and may create uneven heating. Parchment paper provides a non-stick surface and helps the plastic bake evenly. It is a small change that makes a big difference in your results.
Can I use an inkjet printer to print on shrink plastic?
No, you should not use an inkjet printer for shrink plastic. The ink is water-based and will smear during baking. Use a laser printer or draw by hand with markers or colored pencils. If you want to print designs, make sure your printer uses laser toner, which bonds properly with the plastic and survives the heat.
How much do shrinky dinks shrink when baked?
Most shrink plastic shrinks to about 50 to 60 percent of its original size. This means a 6-inch piece will shrink down to about 3 inches after baking. The exact shrink ratio depends on the brand and type of plastic you use. Always check the package instructions for the specific shrink percentage of your sheets.
Is baking shrinky dinks safe for kids?
The craft part is perfectly safe for kids, but the oven should be handled by an adult. The plastic is safe once it cools down, but the oven is very hot. Always supervise children during the baking process. Let the adult handle placing the tray in and taking it out of the oven. Once the pieces cool, kids can decorate, seal, and enjoy their creations safely.
Conclusion
How long do shrinky dinks go in the oven for the best results? The answer is clear: 1 to 3 minutes at 325°F to 350°F. With the right temperature, the right timing, and a little patience, you can create beautiful shrink art that turns heads. Whether you are a complete beginner or a seasoned crafter, mastering the baking process is the key to consistent, professional-looking results.
Remember to always preheat your oven, use parchment paper, watch your pieces closely through the window, and remove them as soon as they look flat and smooth. Avoid the common mistakes we covered, and try the expert tips to elevate your craft game.
Shrink plastic crafts are a wonderful way to express your creativity and make unique gifts, decorations, and accessories. Once you get the hang of the timing and temperature, you will find yourself making shrinky dinks again and again. So preheat that oven, grab your markers, and start creating. Your perfect shrink art is just a few minutes away.