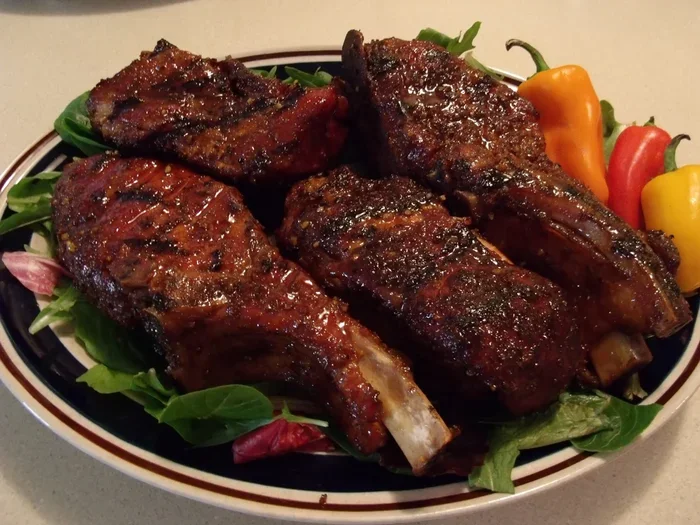
How To Cook Country Style Ribs In The Oven Perfectly
Cooking country style ribs in the oven is simple when you follow the right steps. Use a low and slow temperature around 300°F, a flavorful dry rub, and a little patience to get tender, juicy pork ribs. This guide covers everything from prep to serving so you can enjoy perfect oven-baked ribs at home.
Key Takeaways
- Low and slow cooking at 300°F is the secret to tender, juicy country style ribs in the oven.
- A homemade dry rub with brown sugar, paprika, and garlic powder builds deep flavor before cooking even starts.
- Wrapping ribs in foil partway through cooking locks in moisture and speeds up the process.
- Use a meat thermometer to check that the internal temperature reaches 195°F for the best texture.
- Resting the ribs for 15-20 minutes after cooking lets the juices redistribute for a better bite.
- Slicing against the grain ensures each piece is easy to eat and full of flavor.
- Applewood chips or a splash of apple cider vinegar adds a subtle smoky tang that complements pork ribs perfectly.
📑 Table of Contents
- Why Country Style Ribs Are Perfect for Oven Cooking
- Choosing the Best Country Style Ribs
- Preparing Your Ribs for the Oven
- The Best Oven Temperature and Timing for Country Style Ribs
- Using Barbeque Sauce on Oven Ribs
- Checking Doneness and Resting Your Ribs
- Serving and Slicing Country Style Ribs
- Expert Tips for the Best Oven Ribs Every Time
- Frequently Asked Questions
Why Country Style Ribs Are Perfect for Oven Cooking
Country style ribs come from the pork shoulder area. They are meaty, rich, and full of flavor. Unlike spare ribs or baby back ribs, these cuts have more marbling and connective tissue. That means they need slow, gentle heat to break down properly.
The oven gives you complete control over temperature and timing. You do not need to watch a grill or manage charcoal. Just set it, forget it, and let the oven do the work. This makes oven-baked ribs ideal for beginners and busy weeknights alike.
Many people think ribs need a smoker or outdoor grill. That is not true. A standard home oven can produce slow-cooked ribs that are just as tender and flavorful. The key is understanding temperature, timing, and a few simple techniques.
When you cook these ribs low and slow, the fat renders slowly. The collagen in the meat turns into gelatin. This creates that melt-in-your-mouth texture everyone craves. Plus, the oven keeps the heat even on all sides, so no hot spots or uneven cooking.
What Makes Country Style Ribs Different
Not all ribs are the same. Country style ribs are thicker and fattier than baby backs. They come from the shoulder, not the belly or loin. This gives them a bolder flavor and a chewier texture when raw.
Because of the extra fat, they benefit from long cooking times. A short roast will leave them tough and chewy. But give them a few hours at a low temperature, and they become incredibly soft. The bones also add flavor as they cook, enriching the meat from the inside out.
Choosing the Best Country Style Ribs
Not every rack of ribs is created equal. When you are shopping, look for a few key things. First, check the color. The meat should be a light pink to rose color. Avoid ribs that look gray or dull. That usually means they have been sitting too long.
Next, feel the fat layer. A good rack will have a thin white layer of fat over the meat. You want some fat because it melts during cooking and keeps the ribs moist. But too much fat means you will be trimming a lot away later.
Check the bones too. They should look moist, not dried out. Dry bones mean the rib has been in the fridge too long. Also, look at the thickness. Uniform thickness helps the ribs cook evenly. If one end is much thicker than the other, you can fold a piece of foil under the thin end to level it out.
Bone-In vs Boneless Country Style Ribs
Bone-in ribs tend to have more flavor. The bone adds a richness to the meat as it cooks. They are also easier to handle because the bone gives you a natural grip. Many pitmasters and home cooks prefer bone-in for oven cooking.
Boneless ribs cook a bit faster. They are also easier to slice and serve. However, they can dry out more quickly if you are not careful. If you go boneless, make sure you keep a close eye on the internal temperature and do not overcook them.
Preparing Your Ribs for the Oven
Preparation is the foundation of great ribs. Skip this step, and even the best oven will not save you. Take your time here, and the results will speak for themselves.
Start by removing the membrane from the back of the rack. This thin, papery layer can be tough and chewy when cooked. Use a butter knife to loosen one corner. Then grab it with a paper towel for grip and peel it off in one piece. It only takes a few seconds and makes a big difference.
Next, pat the ribs dry with paper towels. Dry meat absorbs rub better and develops a better crust. If your ribs are very wet, the dry rub will slide right off instead of sticking to the surface.
Making the Perfect Dry Rub
A good rib rub is simple but powerful. You need a balance of sweet, smoky, and savory flavors. Here is a basic recipe that works beautifully for oven-baked ribs:
- 2 tablespoons brown sugar
- 1 tablespoon smoked paprika
- 1 teaspoon garlic powder
- 1 teaspoon onion powder
- 1 teaspoon chili powder
- 1 teaspoon cumin
- 1 teaspoon salt
- 1/2 teaspoon black pepper
- 1/2 teaspoon cayenne pepper (optional for heat)
Mix all the ingredients in a small bowl. Sprinkle the rub generously over all sides of the ribs. Press it in with your hands so it sticks. For the best flavor, cover the ribs with plastic wrap and refrigerate them for at least 2 hours. Overnight is even better. The longer the rub sits, the deeper the flavor goes into the meat.
Quick Tips for Rib Prep
- Always remove the membrane before applying rub.
- Pat the meat dry for better seasoning adhesion.
- Let the rubbed ribs rest in the fridge uncovered for an hour if you have time. This helps form a tacky surface that creates a better bark.
- Do not skip the resting time. Even 30 minutes makes a noticeable difference.
The Best Oven Temperature and Timing for Country Style Ribs
Temperature control is the single most important factor in cooking country style ribs in the oven. Too high, and the outside burns before the inside is tender. Too low, and the ribs take forever and may dry out.
The sweet spot is 300°F (150°C). This low temperature allows the fat to render slowly and the collagen to break down gently. Most racks of country style ribs will take about 2.5 to 3.5 hours at this temperature. Thicker cuts may need closer to 4 hours.
Preheat your oven before placing the ribs inside. A consistent temperature from the start leads to even cooking. Avoid opening the oven door too often, as this lets heat escape and can cause uneven results.
The Two-Hour Method for Juicy Ribs
Here is a simple method that produces excellent results. It is called the two-phase method because you cook the ribs uncovered first, then wrap them and finish low and slow.
Phase 1: Place the ribs bone-side down on a lined baking sheet or in an oven-safe pan. Cook uncovered at 300°F for 2 hours. This lets the surface dry out slightly, which helps form a crusty bark. The fat starts rendering and the meat begins to shrink away from the bones.
Phase 2: Remove the ribs from the oven. Wrap them tightly in a double layer of heavy-duty foil. Add a small splash of apple cider vinegar or apple juice inside the foil packet. This creates steam that keeps the ribs moist. Return the wrapped ribs to the oven and cook for another 1 to 1.5 hours at 300°F.
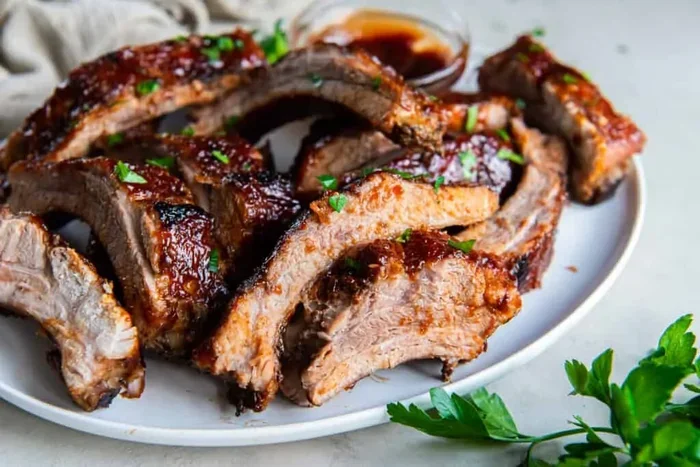
After the second phase, unwrap the ribs and return them to the oven for 20-30 minutes uncovered. This final step crisps up the outside and gives you that beautiful caramelized surface.
Using Barbeque Sauce on Oven Ribs
Barbeque sauce is optional, but it adds a delicious layer of flavor. Not all ribs need sauce. The dry rub alone can create a flavorful crust. But if you love that sweet, tangy glaze, here is how to do it right.
Apply sauce in the last 15-20 minutes of cooking. Brush a thin layer on all sides. The sugar in the sauce can burn if you put it on too early. A thin coat caramelizes nicely without turning into a sticky mess.
Let the ribs rest for a few minutes after the final sauce application. This gives the sauce time to set and cling to the meat. You can also serve extra sauce on the side so each person can add their own.
Homemade vs Store-Bought Barbeque Sauce
Homemade sauce gives you control over the sweetness and tang. A simple mix of ketchup, apple cider vinegar, brown sugar, and a pinch of mustard powder works great. Store-bought sauce is fine too. Look for one with real tomato and natural sweeteners for the best flavor.
Some people prefer mustard-based sauces or vinegar-based sauces. These are thinner and tangier. They work well on pork ribs because the acidity cuts through the richness of the fat. Experiment with different styles to find your favorite.
Checking Doneness and Resting Your Ribs
Knowing when your ribs are done is a skill that takes a little practice. The most reliable method is using a meat thermometer. Insert it into the thickest part of the meat, avoiding the bone. You are aiming for an internal temperature of 195°F to 205°F. At this range, the collagen has fully broken down, and the meat is tender and juicy.
Another test is the bend test. Pick up the rack of ribs from one end with tongs. If the meat cracks and bends slightly but does not fall apart, they are done. If they bend without cracking, they may need a few more minutes. If they do not bend at all, they need more time.
Once your ribs are done, take them out of the oven and let them rest for 15 to 20 minutes. This is just as important as the cooking itself. During resting, the juices redistribute throughout the meat. If you cut too soon, the juices run out, and the ribs become dry.
Common Mistakes When Cooking Ribs in the Oven
- Cooking at too high a temperature. This dries out the meat before the connective tissue has time to break down.
- Skipping the foil wrap. Wrapping helps retain moisture. Without it, leaner cuts can become tough.
- Adding sauce too early. The sugars in sauce burn at high temperatures, creating a bitter taste.
- Not resting the meat. Cutting immediately after cooking releases all the juices, leaving dry ribs.
- Using a thin baking sheet. A heavy-duty pan or a baking sheet lined with foil works much better for even heat distribution.
Serving and Slicing Country Style Ribs
Slicing ribs the right way makes a big difference in how they feel and taste. Always cut against the grain. This means you slice perpendicular to the muscle fibers. It makes each piece easier to chew and more enjoyable to eat.
Use a sharp knife for clean cuts. A dull knife will tear the meat and make it look messy. Slice each rib into individual portions, about one inch wide. This gives you a nice balance of meat and bone in each bite.
Serve your oven-baked ribs with classic sides. Coleslaw, cornbread, baked beans, and mac and cheese are all great choices. The sweetness of cornbread pairs especially well with the smoky, savory flavors of pork ribs.
Storing Leftover Ribs
If you have leftovers, store them in an airtight container in the refrigerator. They will keep for up to 4 days. Reheat gently in the oven at 250°F wrapped in foil to keep them moist. Microwaving can make them rubbery, so the oven is always the better choice for reheating.
You can also freeze cooked ribs for up to 3 months. Wrap them tightly in foil and place them in a freezer bag. Thaw overnight in the refrigerator before reheating.
Expert Tips for the Best Oven Ribs Every Time
Even experienced cooks can improve their rib game. Here are some expert tips that take your slow-cooked ribs from good to outstanding:
- Use applewood chips for extra smoke flavor. Soak them in water for 30 minutes, then wrap them in foil with a few holes poked in the top. Place the packet on the oven rack below the ribs. It adds a subtle smoky aroma without needing a smoker.
- Dry brine overnight. Salt the ribs generously the night before and leave them uncovered in the fridge. This draws out moisture, which then gets reabsorbed along with the salt. The result is deeper flavor and a better texture.
- Rotate the pan halfway through. Most ovens have hot spots. Rotating the pan ensures even cooking on all sides.
- Do not be afraid of low heat. Patience is the secret ingredient. Low and slow always wins when it comes to pork ribs.
- Add a honey glaze at the end. A thin brush of honey mixed with a little mustard in the last 10 minutes creates a beautiful glossy finish.
These small details make a huge difference. They separate good ribs from ribs that make people go back for seconds and thirds.
Frequently Asked Questions
Can I cook country style ribs at a higher temperature to save time?
You can, but the results will be different. Higher temperatures cook faster, but they also dry out the meat before the collagen has time to break down. If you must cook at a higher temperature, aim for no more than 325°F and check the internal temperature frequently. The best flavor and texture come from the low and slow approach at 300°F.
Do I need to flip the ribs while they cook in the oven?
It is not strictly necessary, but flipping them halfway through can help with even cooking. If you flip, make sure to keep the foil wrap sealed tightly so you do not lose the moisture inside. Many cooks skip flipping and still get excellent results because the oven heat is even on all sides.
What is the best wood chip flavor for oven ribs?
Applewood is the most popular choice for pork ribs. It gives a mild, sweet smoke flavor that complements the richness of the meat. Hickory is another great option with a stronger, more traditional BBQ taste. Cherry wood adds a beautiful color to the bark and a subtle fruity flavor.
Can I use a baking pan instead of a baking sheet for ribs in the oven?
Absolutely. A deep baking pan or even a Dutch oven works well. The deeper sides help contain the juices and keep the ribs moist. Just make sure the pan is oven-safe and can handle the 300°F temperature for several hours without warping.
How do I know if my ribs are done without a meat thermometer?
The bend test is the best alternative. Lift the rack from one end with tongs. If the surface cracks slightly and the meat bends, it is done. Another method is to insert a toothpick into the thickest part of the meat. If it goes in smoothly with little resistance, the ribs are tender and ready.
Can I cook frozen country style ribs in the oven?
It is best to thaw ribs before cooking. Cooking from frozen leads to uneven results, with the outside overcooked while the inside is still thawing. If you must cook from frozen, increase the cooking time by about 50% and use a meat thermometer to check that the center reaches 195°F before serving.