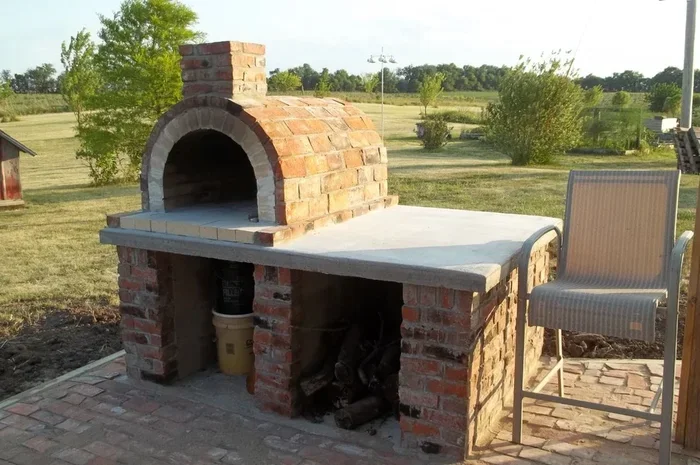
How Many Fire Bricks For Pizza Oven Complete Build Guide
Building a pizza oven at home starts with knowing exactly how many fire bricks for pizza oven you need. This complete guide walks you through every calculation, size, and layout so you can plan your DIY pizza oven build with confidence. We cover floor bricks, dome bricks, base bricks, and insulation layers to give you a precise material list. Whether you are building a small backyard oven or a larger outdoor kitchen setup, this guide has you covered.
There is something truly special about pulling a perfectly charred, blistered pizza out of a homemade oven. The smell of wood smoke, the crispy crust, and the melted cheese all come together in a way that no regular kitchen oven can match. But before you get to that magical moment, you need to figure out one very important detail: how many fire bricks for pizza oven construction you actually need.
This is not a question you want to guess at. Buying too few bricks means stopping mid-build and making extra trips. Buying too many wastes money and creates unnecessary clutter in your workspace. That is exactly why we put together this complete build guide. We will walk you through every single brick you need, from the oven floor to the dome, the base to the insulation layer. By the end of this article, you will have a clear, confident plan for your pizza oven build.
Fire bricks are the backbone of any wood-fired pizza oven. They handle temperatures that would destroy regular bricks in minutes. Understanding how many you need, what sizes work best, and where each brick goes is the foundation of a successful DIY pizza oven project. Let us dive in and break it all down for you.
Key Takeaways
- You need between 100 and 250 fire bricks for a standard home pizza oven, depending on the size of your build and the type of oven you want.
- The oven floor requires the most bricks, typically 40 to 80 bricks depending on your cooking surface area.
- Standard fire brick dimensions are 9 x 4.5 x 3 inches, but sizes can vary by manufacturer and region.
- Always use refractory-grade bricks, not regular construction bricks, because they can handle extreme heat without cracking.
- Insulating your oven with lightweight fire bricks improves heat retention and reduces fuel consumption significantly.
- Planning your brick count before you start building saves time, money, and prevents frustrating mid-project trips to the hardware store.
📑 Table of Contents
- What Are Fire Bricks and Why They Matter for Pizza Oven Builds
- How Many Fire Bricks Do You Need for Each Part of Your Pizza Oven
- Fire Brick Sizes, Types, and What to Look For
- Step-by-Step Guide to Building a Pizza Oven with Fire Bricks
- Common Mistakes to Avoid When Using Fire Bricks for Pizza Oven
- Expert Tips for Getting the Most Out of Your Fire Bricks
What Are Fire Bricks and Why They Matter for Pizza Oven Builds
Fire bricks, also known as refractory bricks, are specially engineered bricks designed to withstand extremely high temperatures. Unlike standard red construction bricks, fire bricks are made from clay and other minerals that can handle heat up to 1,800 degrees Fahrenheit or more. This is what makes them essential for any pizza oven construction project.
What Makes Fire Bricks Different from Regular Bricks
Regular bricks are made for structural purposes. They hold up walls and support weight. But when you expose them to high heat, they crack, crumble, and fail. Fire bricks contain alumina and silica, which give them incredible thermal stability. They expand and contract with heat changes without breaking apart.
For a pizza oven, you need bricks that can absorb intense heat and radiate it evenly. This is called thermal mass. A good thermal mass in your oven floor and dome ensures your pizza cooks evenly at temperatures between 700 and 900 degrees Fahrenheit. Regular bricks simply cannot do this job.
Why You Cannot Skip Fire Bricks in Your Build
Some people try to save money by using regular bricks for their oven. This is a mistake that almost always leads to problems. Within a few uses, regular bricks will develop cracks. They can also release harmful chemicals when heated to extreme temperatures. Your food could absorb these chemicals, which is a serious health concern.
Fire bricks are a non-negotiable part of any serious brick pizza oven build. They are the difference between an oven that lasts for decades and one that falls apart after a single season. Always invest in proper refractory bricks for your project.
How Many Fire Bricks Do You Need for Each Part of Your Pizza Oven
The number of fire bricks for pizza oven you need depends on the size and design of your oven. A standard home pizza oven typically requires between 100 and 250 fire bricks total. But this number breaks down into specific parts of the build. Let us go through each section so you know exactly what to expect.
Counting Bricks for the Oven Floor
The oven floor is where your pizza sits while it cooks. It needs to be flat, smooth, and made entirely of fire bricks. Most home pizza ovens have a cooking surface that is about 42 to 48 inches wide. Using standard 9 x 4.5 inch fire bricks laid on their sides, you will need approximately 40 to 60 bricks for the floor alone.
Here is a simple way to estimate your floor brick count:
- Measure your oven floor area. For a 44-inch diameter oven, the floor area is roughly 1,520 square inches.
- Calculate the area of one brick. A standard 9 x 4.5 inch brick on its side covers about 40.5 square inches.
- Divide total floor area by brick area. 1,520 divided by 40.5 equals approximately 37 to 38 bricks.
- Add 10 to 15 percent extra. This accounts for cuts, breakage, and irregular shapes. So plan for about 42 to 45 floor bricks.
Always use a fire brick calculator online to double-check your numbers. These tools account for brick size and oven dimensions automatically.
How Many Bricks for the Dome
The dome is the curved ceiling of your pizza oven. It reflects heat back down onto the pizza and creates the perfect cooking environment. Building a dome requires more bricks than the floor because of the curved shape.
For a standard 42 to 44 inch diameter dome, you will need approximately 60 to 90 fire bricks. The exact number depends on whether you use:
- Full-sized bricks cut in half for the inner layer of the dome
- Smaller bricks or pieces for the outer insulating layer
- A sand form to shape the dome before laying bricks
Some builders prefer to use a form made of sand and a tarp to shape the dome first. They then lay bricks against this form. This method uses more bricks but produces a smoother, more even dome shape.
Base and Insulation Layer Bricks
The base of your pizza oven needs structural support. This is where you stack regular or fire bricks to create a sturdy platform. A typical base uses about 30 to 50 bricks, depending on how tall you want your oven to be.
Above the base, you add an insulation layer. This layer prevents heat from escaping downward into the ground. Many builders use lightweight insulating fire bricks for this purpose. These bricks are larger and lighter than dense fire bricks, and you will need about 20 to 30 of them for a standard build.
Here is a quick breakdown of the total brick count for a standard home pizza oven:
- Oven floor: 40 to 60 bricks
- Dome (inner and outer layers): 60 to 90 bricks
- Base structure: 30 to 50 bricks
- Insulation layer: 20 to 30 bricks
- Arch and door pieces: 10 to 15 bricks
- Total range: 160 to 250 fire bricks
Fire Brick Sizes, Types, and What to Look For
Not all fire bricks are created equal. Understanding the different sizes and types available helps you plan your build more accurately and choose the right pizza oven materials for the job.
Standard Fire Brick Dimensions
The most common fire brick size used in pizza oven builds is 9 x 4.5 x 3 inches. These are sometimes called “standard duty” fire bricks. They are widely available at most brick suppliers and online retailers.
Some manufacturers also sell fire bricks in these sizes:
- 9 x 4.5 x 2.5 inches (slightly thinner, good for curved surfaces)
- 12 x 6 x 2 inches (larger format, fewer joints to mortar)
- 9 x 9 x 3 inches (square format, useful for base layers)
When planning your build, always measure your bricks before you start. Slight variations in size between manufacturers can affect your total brick count. This is especially important if you are using a fire brick calculator to estimate your needs.
Dense vs. Insulating Fire Bricks
There are two main types of fire bricks you will encounter when building a pizza oven. Dense fire bricks are the standard choice for the oven floor and dome. They have high thermal conductivity, which means they absorb and radiate heat very effectively.
Insulating fire bricks, on the other hand, are lighter and softer. They have low thermal conductivity, which means they resist heat transfer. You use insulating bricks in the base and outer layers of your oven to keep heat inside the cooking chamber.
For the best results, use a combination of both types:
- Dense fire bricks for the oven floor and inner dome
- Insulating fire bricks for the base, outer dome, and insulation layer
This combination gives you excellent heat retention and even cooking temperatures. It also extends the life of your oven significantly.
Step-by-Step Guide to Building a Pizza Oven with Fire Bricks
Now that you know how many bricks you need and what types to use, let us walk through the actual building process. This guide covers the key steps for a successful pizza oven build using fire bricks.
Building the Base
Start by building a sturdy base for your oven. This can be made from concrete blocks, poured concrete, or stacked bricks. The base should be level and strong enough to support the weight of the oven, which can be several hundred pounds when fully built.
Use standard bricks or concrete blocks for the base structure. You do not need fire bricks here unless the base will be exposed to direct flame. Stack the base to your desired height, typically 36 to 42 inches from the ground. This height is comfortable for most people to slide a pizza in and out of the oven.
Make sure the top surface of the base is perfectly level. Use a spirit level to check. An uneven base will cause your oven floor to slope, which leads to uneven cooking and melted cheese sliding off your pizza.
Laying the Oven Floor
This is one of the most important steps in the entire build. The oven floor needs to be flat, smooth, and made entirely of dense fire bricks.
Start by laying a thin layer of refractory mortar on the base. Then place your fire bricks side by side, tightly together. Use a rubber mallet to tap each brick into place. Leave as few gaps as possible between bricks. Gaps allow heat to escape and create uneven cooking surfaces.
For a traditional Italian-style oven floor, you can slightly angle the bricks toward the front of the oven. This creates a subtle slope that helps the pizza slide out easily with a peel. Just make sure the angle is very slight, no more than a few degrees.
Constructing the Dome
The dome is where the magic happens. It shapes the heat and creates the perfect cooking environment inside your oven.
Start by building a sand form in the shape of a dome on top of the oven floor. The form should be the exact size and shape of your oven interior. Many builders use a template made from cardboard or plywood to get the shape right.
Then begin laying fire bricks on top of the form. Use a herringbone or spiral pattern for the best structural strength. Apply refractory mortar between each brick. Work your way up and around the dome, cutting bricks as needed to fit the curves.
Once the dome is complete, let the mortar cure for at least 24 hours. Then carefully remove the sand form from inside the oven. The bricks should hold their shape perfectly.
Adding the Arch and Door
The arch at the front of your oven is both functional and aesthetic. It creates the opening through which you slide your pizza into the oven. Use a pre-made arch form or build one from cut fire bricks.
The door is optional but recommended. A door helps control airflow and maintains high temperatures inside the oven. You can build a simple door from a single fire brick or use a hinged door made from metal and brick.
Make sure the arch and door opening are sized correctly for your pizza peels. A standard opening is about 12 to 14 inches wide and 10 to 12 inches tall. This accommodates most home-sized pizzas without any issues.
Common Mistakes to Avoid When Using Fire Bricks for Pizza Oven
Even experienced builders make mistakes when working with fire bricks. Knowing what to avoid saves you time, money, and frustration during your pizza oven construction.
Using the Wrong Type of Brick
This is the single most common mistake. Using regular construction bricks instead of fire bricks will ruin your oven. Regular bricks crack at high temperatures, crumble over time, and can release harmful substances into your food. Always purchase bricks specifically labeled as “fire bricks” or “refractory bricks.”
Do not confuse fire bricks with “fireplace bricks” or “decorative bricks.” These are not the same thing. Look for bricks rated for temperatures above 1,200 degrees Fahrenheit to ensure they can handle the extreme heat of a pizza oven.
Skipping Proper Insulation
Insulation is what keeps your oven hot for hours after the fire goes out. Without proper insulation, your oven loses heat too quickly and requires constant fueling. Many beginners skip insulation to save time and money, but this is a costly mistake.
Use lightweight insulating fire bricks for the outer dome layer and the base insulation. You can also add a layer of vermiculite or perlite mixed with cement around the outside of the oven for extra insulation. This simple step dramatically improves your oven’s heat retention and fuel efficiency.
Not Planning for Thermal Expansion
Fire bricks expand when heated and contract when cooled. If you pack bricks too tightly without any gaps for expansion, they can crack and shift over time. Leave small gaps between bricks and use flexible refractory mortar that can accommodate movement.
This is especially important at the base of your oven where bricks meet concrete. The different materials expand at different rates, which can cause cracking if you do not account for it. Use a thin layer of sand or flexible sealant between the base and the first course of fire bricks.
Expert Tips for Getting the Most Out of Your Fire Bricks
Once your pizza oven is built, proper care ensures it lasts for many years of delicious cooking. These expert tips help you get the best performance from your fire bricks for pizza oven setup.
Seasoning Your New Oven
Before you cook your first pizza, you should season your oven. This process involves building a small fire inside the oven and letting it burn slowly for several hours. The heat cures the refractory mortar and prepares the bricks for cooking temperatures.
Start with a small fire using kindling and small sticks. Gradually add larger pieces of wood over several hours. Do not rush this process. A slow, gradual heat increase prevents thermal shock that can crack your fire bricks or damage the mortar joints.
Maintenance and Longevity
Fire bricks are incredibly durable, but they still need basic maintenance. After each use, allow the oven to cool completely before sweeping out the ash. Never use water to cool down a hot oven, as this can cause thermal shock and cracking.
Inspect your bricks once or twice a year for any cracks or damage. Small cracks can be repaired with refractory mortar. Larger cracks may require replacing individual bricks. Keeping up with minor repairs prevents bigger problems down the road.
Cover your oven with a weatherproof cover when it is not in use. Rain and snow can penetrate the mortar joints and cause damage over time. A simple waterproof cover extends the life of your oven significantly.
Building a pizza oven is one of the most rewarding DIY projects you can take on. The satisfaction of cooking a perfect pizza in an oven you built yourself is unmatched. By understanding how many fire bricks for pizza oven you need and following the right build process, you set yourself up for success from day one.
Remember that every oven is a little different. Your brick count will vary based on your design, your chosen brick sizes, and your personal preferences. Use the guidelines in this article as a starting point, and adjust based on your specific build. The most important thing is to take your time, plan carefully, and enjoy the process.
With the right materials, a solid plan, and a little patience, you will be pulling homemade pizzas out of your very own brick pizza oven in no time. Happy building, and happy cooking.
Frequently Asked Questions
How thick should fire bricks be for a pizza oven?
Standard fire bricks for pizza ovens are typically 3 inches thick. This thickness provides the right balance of heat absorption and structural strength. For larger ovens or those used for bread baking, some builders prefer 4.5 inch thick bricks for greater thermal mass.
Can I use regular bricks instead of fire bricks?
No, regular bricks are not suitable for pizza ovens. They crack under high heat, can release harmful chemicals, and will fail within a few uses. Always use proper refractory fire bricks rated for high temperatures.
How many fire bricks do I need for a small pizza oven?
A small pizza oven with a 36 inch cooking diameter typically requires about 80 to 120 fire bricks total. This includes the floor, dome, base, and insulation layers. Always add 10 to 15 percent extra for cuts and breakage.
What temperature can fire bricks withstand?
Most fire bricks can withstand temperatures between 1,400 and 1,800 degrees Fahrenheit. Pizza ovens typically operate between 700 and 900 degrees Fahrenheit for cooking, well within the safe range of standard fire bricks.
How do I calculate how many fire bricks I need?
Measure the area of each section of your oven (floor, dome, base) and divide by the surface area of one brick. Add 10 to 15 percent extra for cuts and breakage. Online fire brick calculators can automate this process for you.
Can I reuse old fire bricks for a pizza oven?
Yes, you can reuse old fire bricks if they are not cracked or crumbling. Inspect each brick carefully for damage. Bricks that have been exposed to extreme heat many times may be more brittle, so handle them with care during installation.
=== CONCLUSION ===
Knowing exactly how many fire bricks for pizza oven you need transforms a confusing project into a clear, manageable plan. From the oven floor to the dome, the base to the insulation layer, every brick has a purpose and a place. With the guidelines in this complete build guide, you can confidently purchase your materials and start building with precision.
Remember to choose the right type of fire bricks, plan for insulation, and avoid common mistakes that can compromise your build. A well-built pizza oven using proper refractory bricks will serve you for decades of delicious homemade pizza. Start planning your build today and enjoy the incredible experience of cooking with a wood-fired oven you created with your own hands.