How To Dehydrate Plums In Oven For Sweet Healthy Snacks
Discover the simple way to make oven-dehydrated plums for crunchy, sweet snacks. This guide shows you exactly how to dehydrate plums in oven with minimal effort and no additives. You’ll learn homemade plum snacks that are perfect for healthy munching.
Making oven-dehydrated plums at home is one of the easiest ways to enjoy sweet healthy snacks all year round. If you have been wondering how to dehydrate plums in oven, you are in the right place. This guide walks you through every step with clear instructions and helpful tips. You will learn how to turn fresh plums into crispy plum chips and chewy dried plum snacks that the whole family will love.
Dehydrating fruit in the oven is a simple kitchen skill that anyone can master. Unlike store-bought dried fruit, homemade low sugar plum snacks let you control the ingredients. You can enjoy pure plum flavor with no added preservatives. Whether you want a quick energy boost or a healthy treat for lunchboxes, oven-dried plums fit the bill perfectly.
The process of dehydrating plums in oven does not require any fancy equipment. A basic oven, a baking sheet, and a sharp knife are all you need. I will show you how to pick the best plums, slice them correctly, and set the right oven temperature. By the end of this article, you will feel confident making your own homemade plum snacks anytime you like. Let us dive into the delicious world of plum dehydration.
Key Takeaways
- Easy oven method: You can make oven-dehydrated plums with just a few simple steps and a standard home oven.
- Perfect temperature: Drying plums at 135°F to 175°F ensures chewy, flavorful plum chips without burning.
- Healthy snacking: Low sugar plum snacks are packed with fiber and antioxidants, making them a great healthy plum treat.
- Proper prep matters: Slicing plums evenly and removing pits leads to uniform plum dehydration and better texture.
- Storage tips: Keep homemade dried plums in airtight containers for weeks of fresh oven-dried fruit snacks.
- Creative uses: Beyond plain chips, you can make plum fruit leather, trail mix, and energy bites with your dried plum snacks.
📑 Table of Contents
Why Oven-Dried Plums Make the Perfect Healthy Snack
Fresh plums are juicy and delicious, but they do not last long. Oven-dehydrated plums solve that problem beautifully. Removing the water concentrates the natural sugars, creating a sweet and intense flavor. These plum chips are lightweight and easy to carry, making them ideal for hiking, school lunches, or office snacks.
One of the biggest advantages of drying plums in oven is the control you have over the process. Commercial dried plums often contain added sugar or sulfur dioxide to preserve color. When you make homemade dried plums, you know exactly what goes in. You can keep them completely natural or add a light dusting of cinnamon for extra warmth. Low sugar plum snacks are also great for people watching their sugar intake.
The texture of oven-dried fruit snacks is another big draw. Some people prefer chewy plum leather, while others love crispy plum chips. Oven drying lets you achieve both textures by simply adjusting the time and temperature. This versatility makes plum dehydration a fun project for beginners and seasoned foodies alike.
Quick Tips for Best Results
- Choose ripe but firm plums for the sweetest oven-dried fruit snacks.
- Use a mandoline or sharp knife for even plum slices.
- Line baking sheets with parchment paper to prevent sticking.
- Rotate trays halfway through plum dehydration for uniform drying.
- Let plums cool completely before storing to avoid moisture buildup.
Picking the Best Plums for Dehydration
Not all plums are created equal when it comes to drying plums in oven. The best plums for homemade plum snacks are ripe but still firm. Avoid overripe fruit that feels mushy, as it may turn to mush in the oven. Look for plums with smooth skin and a rich, even color. Freestone varieties are easiest to work with because the pit comes out cleanly.
Color can vary from deep purple to bright red and even golden yellow. Each type offers a slightly different flavor profile. Darker plums tend to be sweeter and more intense, while yellow plums are often tangier. Mixing different colors can create a beautiful and flavorful mix of oven-dehydrated plums. Wash all plums thoroughly and pat them dry before slicing.
Size matters too. Larger plums give you bigger plum slices, which are fun to snack on. Smaller plums dry faster and can be halved instead of sliced. Whatever variety you choose, make sure there are no bruises or blemishes. Clean, unblemished fruit leads to the best dried plum snacks and plum fruit leather later on.
Common Mistakes When Choosing Plums
One common mistake is using underripe plums. They will be sour and tough after drying. Another error is skipping the wash. Pesticides and dirt can remain on the skin and affect the taste of your healthy plum treat. Finally, do not use bruised or overripe fruit. They can harbor mold and spoil the entire batch of plum chips. Always inspect each plum carefully before starting the plum dehydration process.
Step-by-Step: How To Dehydrate Plums In Oven
Now that you have your plums ready, it is time to learn how to dehydrate plums in oven the right way. The process is simple and forgiving, so even beginners will succeed. Follow these steps closely for the best oven-dehydrated plums.
Step 1: Preheat the oven. Set your oven to a low temperature between 135°F and 175°F. A lower temperature works better for chewy plum leather, while a slightly higher temp creates crispier plum chips. Never exceed 200°F, or the plums will cook instead of dry.
Step 2: Wash and slice the plums. Rinse the plums under cool water and remove any stems. Use a sharp knife to cut them in half. Twist the halves to remove the pit. Then slice each half into thin strips about 1/4 inch thick. Uniform plum slices dry at the same rate, which is key for perfect dried plum snacks.
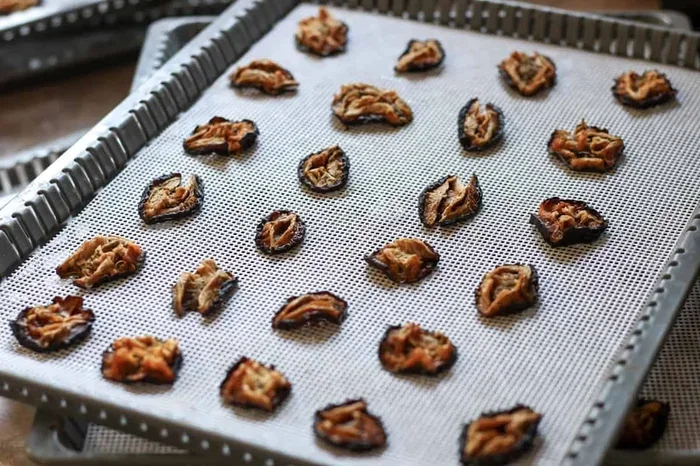
Step 3: Arrange on baking sheets. Line baking sheets with parchment paper or silicone mats. Place the plum slices in a single layer without touching. Leave a little space between each piece for air circulation. Overcrowding leads to uneven drying and longer wait times.
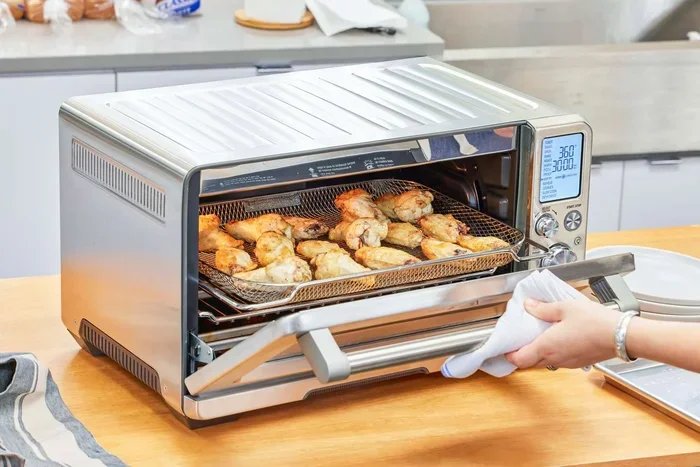
Step 4: Dry the plums. Place the trays in the oven on the middle rack. Prop the oven door open slightly with a wooden spoon to allow moisture to escape. This small trick makes a big difference in plum dehydration. Check the plums every 30 minutes and rotate the trays for even results.
Step 5: Test for doneness. The drying time varies based on thickness and oven accuracy. Plum chips are done when they feel leathery and slightly tacky but not wet. They should not be crispy or brittle. Remove them from the oven and let them cool completely on the trays. They will firm up as they cool.
Expert Insights on Slicing and Drying
Professional dehydrators often recommend using a mandoline for perfectly even plum slices. This tool ensures every piece dries at the same rate. If you do not have a mandoline, use a sharp chef’s knife and practice steady, thin cuts. The goal is to remove as much water as possible while keeping the natural sugars intact. This is what makes oven-dried fruit snacks so satisfying and naturally sweet.
Oven Temperature and Time: Getting It Just Right
Temperature control is the most important part of dehydrating plums in oven. Too high a heat will cook the plums and make them tough. Too low a heat will leave them moist and prone to mold. The sweet spot is usually between 135°F and 175°F. At 135°F, plum dehydration takes longer but produces very chewy plum leather. At 175°F, you get crispier plum chips in less time.
Estimated Drying Times
Here is a general guide for drying plums in oven based on thickness and temperature. These times help you plan your homemade plum snacks with confidence.
- 1/4 inch slices at 135°F: 6 to 8 hours for chewy plum chips.
- 1/4 inch slices at 175°F: 4 to 5 hours for crispier dried plum snacks.
- 1/8 inch slices at 135°F: 3 to 5 hours for light, crispy plum crisps.
- Halved plums at 135°F: 5 to 7 hours for soft, jammy oven-dehydrated plums.
Common Mistakes to Avoid
One of the biggest mistakes is opening the oven door too often. Each time you open it, you release heat and moisture, which slows down plum dehydration. Another error is using a convection setting without adjusting the temperature. Convection ovens dry faster, so reduce the heat by about 15°F. Also, never skip the cooling step. Storing warm plums traps steam and causes mold in your healthy plum treat containers.
Quick Tips for Perfect Plum Chips
- Place a wooden spoon between the oven door and frame to keep it slightly ajar.
- Use an oven thermometer to verify the actual temperature inside.
- Line trays with parchment paper for easy cleanup and to prevent sticking.
- Check for done plums by touching them. They should be dry but still pliable.
- If some slices dry faster, remove them early to prevent burning.
Storing Your Homemade Plum Snacks Properly
Proper storage keeps your oven-dehydrated plums fresh and flavorful for weeks. Once the plums have cooled completely, transfer them to an airtight container. Glass jars with tight lids work wonderfully for homemade dried plums. You can also use reusable silicone bags or vacuum-sealed bags for longer shelf life. Avoid using plastic bags that are not airtight, as they let moisture in and can ruin your dried plum snacks.
Store the containers in a cool, dark place like a pantry or cupboard. Direct sunlight and heat will degrade the quality of your low sugar plum snacks. Properly stored plum chips can last for 2 to 4 weeks at room temperature. For even longer storage, you can keep them in the refrigerator for up to 3 months or freeze them for up to 6 months.
Signs Your Stored Plums Have Gone Bad
Always check your homemade plum snacks before eating. If you see any white spots or feel stickiness, moisture has gotten in. Discard any plums that smell off or show signs of mold. Freshly dried plums should have a sweet, fruity aroma and a chewy or crispy texture. Trust your senses when evaluating oven-dried fruit snacks. When in doubt, throw them out and make a fresh batch of plum dehydration treats.
Creative Recipes and Snack Ideas with Dried Plums
Once you master the basic plum dehydration technique, you can get creative with your homemade plum snacks. Dried plums are incredibly versatile and pair well with many flavors. Here are some fun ideas to try with your oven-dehydrated plums.
Plum Fruit Leather
One of the best uses for dried plums is making plum fruit leather. Blend your dried plum slices with a little water until smooth. Spread the mixture thinly on a dehydrator sheet or parchment-lined baking sheet. Dry it again at 135°F for 2 to 3 hours until it peels away cleanly. Roll it up and slice into strips for a fun, healthy plum snack idea. Kids love this healthy plum treat.
Trail Mix and Energy Bites
Combine your dried plum snacks with nuts, seeds, and dark chocolate chips for a custom trail mix. The natural sweetness of plum chips balances the savory nuts perfectly. For energy bites, blend dried plums with oats, almond butter, and a little honey. Roll into balls and chill. These low sugar plum snacks are packed with energy and taste amazing. They make great gifts too.
Plum Crisps and Crumbles
For a crunchy twist, try making plum crisps from very thinly sliced plum slices. Dry them at 175°F until completely crisp. Crush them over yogurt or ice cream for a delightful crunch. You can also add dried plum crisps to muffin batter for a fruity burst of flavor. These oven-dried fruit snacks elevate simple desserts into something special.
Spiced Plum Chips
Add a little adventure to your plum dehydration by seasoning the slices before drying. Toss plum slices with a tiny bit of chili powder, lime zest, or cinnamon sugar. The spices add a surprising kick to these sweet healthy snacks. Just be careful not to add too much liquid, or the plums will not dry properly. Light seasoning works best for homemade plum snacks.
Conclusion
Learning how to dehydrate plums in oven opens up a world of sweet healthy snacks you can make anytime. From chewy plum leather to crispy plum chips, the possibilities are endless. The process is simple, affordable, and gives you complete control over what goes into your healthy plum treat. With the right temperature, a little patience, and good plums, you will have delicious oven-dehydrated plums in no time.
Remember to slice your plums evenly, keep the oven temperature low, and store your finished dried plum snacks properly. These low sugar plum snacks are perfect for snacking, hiking, or sharing with friends. Once you start making homemade dried plums, you will never go back to store-bought versions. Enjoy the process and the tasty results of your plum dehydration journey.
Frequently Asked Questions
Can I dehydrate plums with the skin on?
Yes, you can dehydrate plums with the skin on. The skin adds fiber and nutrients to your oven-dehydrated plums. Just wash them thoroughly to remove any dirt or residue. Some people prefer to remove the skin for a smoother texture in plum fruit leather, but it is entirely optional. The skin helps hold the shape during plum dehydration.
How long do oven-dried plums last?
Properly stored homemade dried plums last 2 to 4 weeks at room temperature. In the refrigerator, they stay fresh for up to 3 months. For the longest shelf life, freeze your dried plum snacks for up to 6 months. Always use airtight containers to keep moisture out and maintain the best quality of your low sugar plum snacks.
What is the best oven temperature for dehydrating plums?
The ideal temperature for dehydrating plums in oven is between 135°F and 175°F. Lower temperatures around 135°F create chewy plum leather, while higher temps around 175°F make crispier plum chips. Avoid going above 200°F, as this will cook the plums instead of drying them. Use an oven thermometer to ensure accuracy for perfect oven-dried fruit snacks.
Can I use a convection oven to dry plums?
Yes, a convection oven works great for plum dehydration. Because the fan circulates hot air, the drying process is faster and more even. Reduce the temperature by about 15°F compared to a regular oven setting. Check the plum slices more frequently, as they may dry in less time. Convection ovens are excellent for making homemade plum snacks with a consistent texture.
Why are my oven-dried plums sticky?
Sticky oven-dehydrated plums usually mean they still contain some moisture. This happens when the slices are too thick or the oven temperature is too low. Extend the drying time by another 1 to 2 hours and check again. Allow the plums to cool completely before storing, as trapped heat can create condensation and make your dried plum snacks sticky.
Can I add sugar or sweetener to plums before drying?
You can add a light coating of sugar or honey, but it is not necessary. Fresh plums are naturally sweet, and low sugar plum snacks are healthier. If you do add sweetener, use a very light hand. Too much sugar can prevent proper plum dehydration and make the snacks overly sticky. A sprinkle of cinnamon or a tiny drizzle of honey adds flavor without compromising the drying process for your sweet healthy snacks.