How To Reheat Costco Ribs In Oven For Perfect Results
Reheating Costco ribs in oven is the best way to bring back that smoky, fall-off-the-bone flavor without drying them out. Whether you have bone-in ribs or pulled pork from your last warehouse run, our guide covers everything you need. You will learn the ideal oven temperature, timing, and pro tips for crispy ribs that taste just like the first day.
There is nothing quite like the taste of Costco ribs. Whether you grabbed a full rack of smoked ribs or a tray of Costco pulled pork, these barbecue ribs are a crowd favorite. But here is the thing — reheating them can be tricky. You want that same smoky, tender bite without turning your leftovers into dry, tough meat.
If you have ever wondered how to get perfect reheated ribs from your oven, you are in the right place. This guide walks you through everything step by step. From choosing the right oven temperature to wrapping techniques and timing, we have got you covered. By the end, you will feel confident reheating your Costco ribs like a pro.
Let us dive in and make sure every bite of your leftover rib rack tastes just as amazing as the first time. No more sad, dry ribs. We are going to fix that right now.
Key Takeaways
- Low and slow is the way: Reheat at 250°F to keep ribs moist and tender.
- Wrap in foil: This locks in steam and prevents the meat from drying out during reheating.
- Use a meat thermometer: Ensure your ribs reach a safe internal temperature of 165°F.
- Add liquid for moisture: Apple cider vinegar or broth helps revive the smoky flavor.
- Unwrap for the last 10 minutes: This creates a delicious crispy exterior on your reheated ribs.
- Store ribs properly: Refrigerate leftovers within two hours to keep them safe and fresh.
- Avoid high heat: Cranking the oven too high will dry out your leftover ribs quickly.
📑 Table of Contents
- Why Reheat Costco Ribs In Oven?
- Preparing Your Costco Ribs For Reheating
- Step-By-Step Guide To Reheating Costco Ribs In Oven
- Tips For Crispy, Juicy Ribs Every Time
- Common Mistakes To Avoid When Reheating Ribs
- Expert Tips For The Best Reheated Ribs
- How Long Do Reheated Ribs Last?
- Comparison: Oven Vs. Other Reheating Methods
- Frequently Asked Questions
- Final Thoughts
Why Reheat Costco Ribs In Oven?
You might be asking yourself, why bother reheating ribs in the oven at all? Can you just microwave them? The short answer is no. Microwaving leftover ribs is one of the fastest ways to ruin them. The microwave heats unevenly, which turns the edges rubbery while the center stays cold. It also strips away the smoky flavor and moisture that makes Costco ribs so special in the first place.
The oven, on the other hand, gives you gentle, even heat. This method keeps the meat juicy and helps the bbq sauce settle back into the fibers. If you used foil wrapping during the initial cook, you already know how well it traps moisture. The same principle applies when you are reheating leftover ribs.
Here are a few reasons why the oven is the best reheating method for smoked ribs:
- Even heat distribution — no hot spots or cold zones.
- Moisture retention — especially when you use foil or a liquid.
- Crispy exterior — you can unwrap at the end for that satisfying crunch.
- Better flavor — the smoky taste comes alive again with gentle warmth.
- Safe reheating — the oven brings meat to a safe internal temperature evenly.
So next time you pull a tray of Costco ribs from the fridge, skip the microwave. Your taste buds will thank you.
Preparing Your Costco Ribs For Reheating
Before you turn on the oven, a little preparation goes a long way. How you handle your leftover ribs before reheating determines the final result. Let us walk through the steps.
Check Your Storage
First things first — make sure your ribs were stored properly. Refrigerated ribs should be kept in the fridge within two hours of cooking or purchasing. If you bought your rib rack from Costco and plan to reheat it the next day, you are already on the right track. Store them in an oven-safe dish or wrap tightly with plastic wrap and aluminum foil.
If your ribs have been in the fridge for more than three to four days, consider freezing them instead. Frozen ribs can last up to three months. Just make sure you thaw them in the refrigerator overnight before reheating.
Let Them Come to Room Temperature
Take your Costco ribs out of the fridge about 20 to 30 minutes before reheating. Letting them sit at room temperature helps them heat more evenly. Cold ribs straight from the fridge can cook unevenly, leaving some parts overdone while others remain chilly.
Add Moisture Before Wrapping
This is a game-changer. Before wrapping your ribs in foil, add a small amount of liquid to the dish. You can use:
- Apple cider vinegar — adds tang and helps tenderize the meat.
- Beef or chicken broth — keeps the meat moist and adds depth.
- Water — simple but effective for basic reheating.
- A splash of your favorite bbq sauce — adds extra flavor.
A tablespoon or two is plenty. You do not want to drown the ribs. The goal is to create a little steam inside the foil that keeps the meat tender during the reheating process.
Step-By-Step Guide To Reheating Costco Ribs In Oven
Now for the part you have been waiting for. Here is the full process for getting perfect oven-reheated ribs that taste just as good as the day you bought them.
Step 1: Preheat Your Oven
Set your oven to 250°F. This low temperature is the key to low and slow reheating. It gently warms the meat without drying it out. If you set the oven too high, the outside will burn before the inside is warm. Trust the process — 250°F is your sweet spot for reheated ribs.
Step 2: Arrange the Ribs in an Oven-Safe Dish
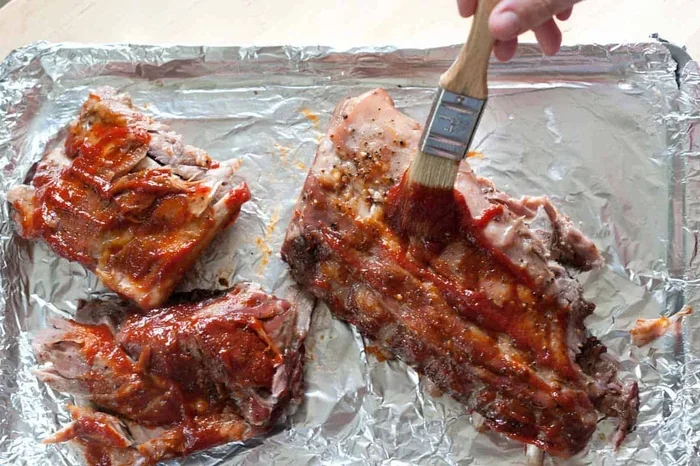
Place your bone-in ribs or pulled pork in a baking dish or on a sheet pan lined with foil. If you have a full rack, lay it flat. If the ribs are chopped or pulled, spread them out evenly. You want each piece to get some direct heat for even warming.
Step 3: Add Liquid and Wrap Tightly
Drizzle a little bit of apple cider vinegar or broth over the ribs. Then wrap the dish tightly with aluminum foil, or place another sheet of foil directly over the top. The seal is important — it traps steam and creates a mini oven inside the dish. This keeps your smoked ribs juicy and tender.
Step 4: Reheat for 20 to 30 Minutes
Place the wrapped dish in the oven and let it heat for about 20 to 30 minutes. The exact time depends on how much meat you have and how cold it was going in. A full rack might need closer to 30 minutes, while smaller portions may be ready in 20.
Use a meat thermometer to check the internal temperature. You want the ribs to reach at least 165°F in the thickest part. This ensures they are heated through and safe to eat.
Step 5: Unwrap and Broil for Crispiness
Here is the secret step that takes your reheated ribs to the next level. Remove the foil and place the ribs back in the oven for 5 to 10 minutes under the broiler. Watch them carefully — you want a light golden-brown crust to form, not a charred mess.
This step adds that crispy ribs texture on the outside while keeping the inside moist and tender. It is the difference between good leftovers and great leftovers.
Step 6: Serve and Enjoy
Take your Costco ribs out of the oven and let them rest for a couple of minutes. Serve them with extra bbq sauce on the side if you like. Pair with coleslaw, cornbread, or baked beans for the full experience.
Tips For Crispy, Juicy Ribs Every Time
Getting the perfect balance of crispy outside and juicy inside takes a little practice, but these tips make it easier every time.
Use a Rib Rack
If you have a rib rack, use it. It lifts the ribs off the bottom of the pan, allowing hot air to circulate around all sides. This promotes even heating and helps the surface get crispier during the final broil step.
Do Not Skip the Foil Step
Some people like to skip wrapping and go straight to the oven. That works for some meats, but not for reheated ribs. The foil trapping steam is what keeps the meat from drying out. Think of it as a protective blanket for your leftover ribs.
Brush With Sauce at the End
If you like your ribs saucy, wait to add the bbq sauce until the very end. Brush it on during the last 5 minutes of reheating or right after you take them out. Sauce applied too early can burn and turn sticky or bitter under high heat.
Let the Meat Rest
Just like with a fresh cook, resting is important. Give your reheated ribs a few minutes to settle after coming out of the oven. This lets the juices redistribute throughout the meat, making every bite more flavorful.
Reheat Only What You Will Eat
Avoid reheating the entire batch if you only need a portion. Repeatedly reheating and cooling the same meat degrades the quality and increases food safety risks. Take out what you need and keep the rest stored properly.
Common Mistakes To Avoid When Reheating Ribs
Even with the best intentions, people make mistakes when reheating leftover ribs. Here are the most common ones and how to avoid them.
Using Too High a Temperature
This is the number one mistake. Cranking the oven to 350°F or higher might seem faster, but it dries out the meat quickly. The exterior overcooks while the center struggles to warm through. Stick with 250°F and be patient. Good things come to those who wait.
Forgetting to Add Liquid
Without moisture, your smoked ribs will turn tough and chewy. Always add a little liquid before wrapping. This simple step makes a huge difference in the texture and juiciness of your reheated ribs.
Not Using a Meat Thermometer
Guessing whether the ribs are done is risky. You want to be sure they have reached a safe internal temperature. A meat thermometer takes the guesswork out and gives you peace of mind.
Overbroiling
The broiler is great for getting crispy ribs, but it works fast. Leaving ribs under the broiler for too long can turn them into charcoal. Keep a close eye on them and pull them out as soon as you see a light golden-brown color.
Reheating in the Original Packaging
If your Costco ribs came in a foam tray with plastic wrap, do not reheat them in that packaging. Always transfer to an oven-safe dish or wrap in fresh foil. Plastic wrap and foam trays are not designed for oven use and can release harmful chemicals when heated.
Expert Tips For The Best Reheated Ribs
We spoke with barbecue enthusiasts and home cooking experts to bring you the best advice for reheating Costco ribs. Here is what the pros recommend.
The Steam Method
Some pitmasters swear by adding a small pan of water to the oven alongside the ribs. The extra steam creates a humid environment that prevents the meat from drying out. This works especially well for bone-in ribs that tend to lose moisture faster during reheating.
The Butter Baste
A thin layer of melted butter brushed on the ribs before wrapping adds richness and flavor. It also helps the surface brown beautifully during the final broil. This technique works wonders for reheated pulled pork as well.
Double Wrap for Extra Protection
If your ribs have been in the fridge for a couple of days, consider double-wrapping them in foil. The extra layer holds in more steam and provides additional protection against drying out. This is especially helpful for leftover ribs that have been stored for a longer time.
Experiment With Different Liquids
Do not be afraid to get creative with the liquid you add before reheating. Some people love a splash of apple cider vinegar, while others prefer a mix of honey and mustard. Each adds a different flavor dimension to your reheated ribs. Try different combinations and find what you like best.
How Long Do Reheated Ribs Last?
Once you have reheated your Costco ribs, you might wonder how long they will stay safe to eat. The general rule is simple — consume reheated ribs within two hours of taking them out of the oven. After that, bacteria can start to grow, especially at room temperature.
If you have leftovers after your meal, put them back in the fridge promptly. Refrigerated reheated ribs will last an additional two to three days. If you want to keep them longer, freeze them in an airtight container. They will stay good for up to three months in the freezer.
Always reheat ribs to at least 165°F before eating, even if they have been refrigerated again. Food safety should always come first, especially with meat products like smoked ribs and Costco pulled pork.
Comparison: Oven Vs. Other Reheating Methods
Wondering how the oven stacks up against other reheating methods? Here is a quick comparison to show you why the oven wins for reheated ribs.
| Method | Moisture Level | Texture | Flavor | Ease |
|---|---|---|---|---|
| Oven | High — stays juicy | Crispy outside, tender inside | Rich and smoky | Moderate |
| Microwave | Low — dries out quickly | Rubbery and uneven | Flat and muted | Very easy |
| Air Fryer | Medium — can dry edges | Crispy but smaller batches | Good but can overcook | Easy |
| Stovetop | Medium — needs monitoring | Good if done carefully | Decent | Requires attention |
As you can see, the oven delivers the best overall results for reheating leftover ribs. It may take a little longer than the microwave, but the difference in taste and texture is worth every minute.
Frequently Asked Questions
Can I reheat Costco ribs in the oven without foil?
Yes, you can, but the results will not be as moist. Foil helps trap steam and keeps the meat tender. If you prefer not to use foil, add a small amount of liquid to the dish and cover it with a lid instead. Just be aware that the ribs may dry out slightly more without the protective foil wrap.
What is the best temperature to reheat ribs in the oven?
The best temperature is 250°F. This low and slow approach gently warms the meat without drying it out. It also preserves the smoky flavor that makes Costco ribs so delicious. Avoid higher temperatures, as they can overcook the exterior before the inside is heated through.
How long should I reheat ribs in the oven?
Plan for about 20 to 30 minutes at 250°F. The exact time depends on the size of the rack and how cold the ribs were going in. Use a meat thermometer to check that the internal temperature reaches 165°F. For extra crispy ribs, add 5 to 10 minutes under the broiler after unwrapping.
Can I reheat Costco ribs more than once?
Technically yes, but it is not recommended. Each time you reheat and cool meat, the quality decreases and food safety risks increase. For the best taste and safety, only reheat what you plan to eat in one sitting. Store any remaining portions properly in the refrigerator or freezer.
Should I add sauce before or after reheating ribs?
Add sauce after reheating, during the last few minutes or right before serving. Sauce contains sugar and other ingredients that can burn under high heat. Brushing it on at the end keeps it fresh, flavorful, and prevents it from turning sticky or bitter on your reheated ribs.
Can I freeze Costco ribs and reheat them later?
Absolutely. Frozen ribs can be reheated directly from the freezer, though thawing them first in the refrigerator overnight gives better results. Wrap them tightly in foil and reheat at 250°F for about 35 to 45 minutes. The low and slow method works just as well for frozen smoked ribs as it does for fresh leftovers.
Final Thoughts
Reheating Costco ribs in oven is simple once you know the right technique. The key is patience, low heat, and a little moisture. By following the steps in this guide, you will enjoy tender, juicy, and flavorful ribs every single time. No more wasted leftovers or disappointing microwave meals.
Remember to use 250°F as your go-to temperature, wrap your ribs in foil with a splash of apple cider vinegar, and finish with a quick broil for that perfect crispy finish. Whether you are reheating a full rack or a few pieces of Costco pulled pork, these methods work every time.
Now that you have all the tools and tips, go ahead and give it a try. Your next batch of leftover ribs will taste even better than the first. Happy reheating, and enjoy every bite!