How Hot Oven To Season Cast Iron The Complete Guide
Discover the ideal oven temperature to season cast iron cookware and achieve a durable, non-stick finish. This guide covers the exact heat settings, best oils, and proven techniques for oven seasoning cast iron at home. Whether you are new to cast iron cookware or refreshing an old skillet, you will find clear, actionable steps to get professional results.
Seasoning cast iron in the oven is one of the simplest and most effective ways to build a durable non-stick surface on your cookware. But the question everyone asks is, how hot oven to season cast iron? The answer might surprise you. You do not need a fancy setup or expensive equipment. With the right temperature, the correct oil, and a little patience, you can transform a bare or rusty skillet into a kitchen workhorse.
This complete guide walks you through everything you need to know about how hot oven to season cast iron. We will cover the ideal temperature settings, the best oils to use, step-by-step instructions, and common mistakes to avoid. Whether you are seasoning a brand-new pan or restoring an old family heirloom, this guide has you covered. Let us get your cast iron cookware ready for years of cooking excellence.
The process of seasoning cast iron in oven involves applying a thin layer of oil to the pan and baking it at a high temperature. The heat causes the oil to polymerize, forming a hard, smooth coating that protects the iron and creates a natural non-stick surface. This is why oven seasoning remains the gold standard for cast iron care. It is reliable, consistent, and produces results that last.
Key Takeaways
- Preheat your oven to 450-500°F: This is the sweet spot for seasoning cast iron and creating a polymerized oil layer.
- Use high-smoke-point oils: Flaxseed oil, canola oil, and grapeseed oil work best for oven-baked seasoning layers.
- Apply thin coats: Multiple thin layers create a stronger seasoning finish than one thick coat.
- Bake upside down: This prevents oil pooling and ensures an even cast iron seasoning across the surface.
- Repeat the process: 3-4 rounds of seasoning builds a robust, long-lasting non-stick surface on your cookware.
- Avoid common mistakes: Using too much oil, skipping the preheat, and choosing the wrong oil can ruin your seasoning layers.
- Maintenance matters: Proper cleaning and storage keep your seasoned cast iron in top condition for decades.
📑 Table of Contents
- Why Oven Seasoning Is the Best Method for Cast Iron
- The Right Temperature to Season Cast Iron in Your Oven
- Step-by-Step Process to Season Cast Iron in the Oven
- Best Oils for Seasoning Cast Iron at High Heat
- How Many Coats You Need for Perfect Seasoning
- Common Mistakes That Ruin Cast Iron Seasoning
- Maintaining Your Seasoned Cast Iron for Long-Term Use
- Final Thoughts on Oven Seasoning Cast Iron
Why Oven Seasoning Is the Best Method for Cast Iron
You might wonder why oven seasoning beats other methods. There are several reasons. First, an oven provides even, consistent heat all around the pan. Stovetop seasoning can create hot spots and uneven coverage. Second, oven seasoning lets you work on multiple pieces at once. Third, the high heat ensures the oil fully polymerizes, creating a hard and durable finish.
Oven vs Stovetop Seasoning
Many cooks debate oven seasoning versus stovetop seasoning. Here is a quick look at how they compare.
- Oven seasoning provides even heat distribution across the entire pan surface.
- Stovetop seasoning requires constant monitoring and can lead to uneven results.
- Oven seasoning allows you to season multiple pieces simultaneously.
- Stovetop seasoning works faster but demands more attention.
- Oven seasoning produces a thicker, more durable seasoning layer over multiple rounds.
For most home cooks, oven seasoning is the clear winner. It is hands-off, forgiving, and produces excellent results every time. If you want to learn more about seasoning cast iron properly, oven baking is the way to go.
What Happens During the Seasoning Process
When you heat oil past its smoke point, it breaks down and bonds to the iron surface. This process is called polymerization. The result is a hard, plastic-like coating that protects the metal from rust and makes cooking easier. Each layer you add builds on the last one. Over time, these layers create a thick, glossy finish that improves with every use.
This is why cast iron maintenance through regular seasoning is so important. Every time you cook with fat, you add another micro-layer to your seasoning. Oven seasoning jump-starts this process and gives you a strong foundation to build on.
The Right Temperature to Season Cast Iron in Your Oven
Now let us answer the big question: how hot oven to season cast iron? The recommended temperature range is between 450°F and 500°F (232°C to 260°C). This range is high enough to fully polymerize the oil but not so high that it burns or creates a brittle coating.
Why 450°F to 500°F Works Best
At this temperature, the oil undergoes a chemical transformation. The fatty acids in the oil break apart and recombine, forming long chains that bond tightly to the iron. This creates a hard, smooth, and resilient surface. If the temperature is too low, the oil will not polymerize properly and will feel sticky. If the temperature is too high, the oil will burn and flake off.
Most experts agree that 450°F is the sweet spot for seasoning cast iron in oven. Some prefer 500°F for a slightly harder finish. Either temperature works well. The key is consistency. Pick one temperature and stick with it for each round of seasoning.
Temperature Tips for Different Ovens
Not all ovens heat the same way. Here are a few tips to get the best results.
- Convection ovens: Use 450°F. The fan circulates heat evenly, so you may not need to go higher.
- Standard ovens: 475°F to 500°F works well for even polymerized oil formation.
- Older or less accurate ovens: Use an oven thermometer to verify the actual temperature. Many ovens run hot or cold.
- Toaster ovens: These work great for small cast iron pieces. Set to 450°F and keep a close eye on the pan.
Investing in a simple oven thermometer is one of the best things you can do for cast iron care. It removes the guesswork and ensures your seasoning temperature is always correct.
Step-by-Step Process to Season Cast Iron in the Oven
Follow these steps for a flawless oven seasoning cast iron experience. Each step is designed to maximize adhesion and durability.
Step 1: Clean the Pan Thoroughly
Before you season, the pan must be completely clean. If it is new, wash it with warm water and mild dish soap. If it is old or rusty, use a steel wool pad or a chainmail scrubber to remove any rust or old seasoning. Rinse it well and dry it immediately with a towel or in the oven at 200°F for a few minutes. Moisture is the enemy of cast iron.
Step 2: Preheat the Oven
Set your oven to 450°F to 500°F and let it preheat fully. A fully preheated oven ensures the oil begins to polymerize the moment the pan goes in. Do not skip this step. A cold oven will not create a proper seasoning finish.
Step 3: Apply a Thin Layer of Oil
This is where many people go wrong. You need a very thin layer of oil. Use a paper towel or a clean cloth to spread a small amount of oil over the entire pan, inside and out. The surface should look glossy, not wet or dripping. Think of it like wiping down a surface, not painting it.
Pro tip: Apply the oil, then buff it off with a dry towel. Any excess oil will become sticky and uneven.
Step 4: Place the Pan Upside Down in the Oven
Place the pan upside down on the middle oven rack. This allows any excess oil to drip off during baking. Put a sheet of aluminum foil on the rack below to catch drips. This keeps your oven clean and prevents smoke buildup.
Step 5: Bake for One Hour
Bake the pan for one full hour at your chosen temperature. The heat will transform the liquid oil into a hard, bonded layer. Do not open the oven door frequently, as this drops the temperature and can affect the process.
Step 6: Cool Completely Before Removing
After one hour, turn off the oven and let the pan cool inside. This slow cooling helps the seasoning set properly. Do not remove the pan while it is still hot. Let it come to room temperature naturally, then remove it and inspect the finish.
Repeat this entire process 3 to 4 times for the best results. Each round adds another seasoning layer and builds a stronger non-stick surface.
Best Oils for Seasoning Cast Iron at High Heat
Not all oils are created equal when it comes to seasoning cast iron. The best oils have a high smoke point and are composed of fats that polymerize well. Choosing the right oil makes a huge difference in the quality of your seasoning layers.
Top Oils for Cast Iron Seasoning
Here are the most popular and effective oils for oven seasoning.
- Flaxseed oil: Often called the gold standard for cast iron seasoning. It polymerizes into an extremely hard and durable finish. However, it can be brittle over time if applied too thickly.
- Canola oil: Affordable, widely available, and reliable. It creates a good seasoning layer with a high smoke point of around 400°F.
- Grapeseed oil: A light, neutral oil with a high smoke point. It produces a smooth and even finish.
- Crisco or vegetable shortening: Solid fats work well because they are easy to apply thinly. They polymerize nicely at high heat.
- Sunflower oil: Another good option with a high smoke point and neutral flavor.
Oils to Avoid
Some oils do not work well for cast iron seasoning. Avoid olive oil, butter, coconut oil, and any oil with a low smoke point. These oils will not fully polymerize and will leave a sticky, gummy residue on your pan.
Comparison Table: Best Oils for Cast Iron Seasoning
| Oil | Smoke Point | Polymerization Quality | Ease of Use |
|---|---|---|---|
| Flaxseed Oil | 225°F (107°C) | Excellent – very hard finish | Easy – thin layers work best |
| Canola Oil | 400°F (204°C) | Good – reliable and consistent | Very easy – widely available |
| Grapeseed Oil | 420°F (216°C) | Good – smooth and even | Easy – light and non-greasy |
| Crisco/Shortening | 360°F (182°C) | Good – solid fats apply easily | Easy – spreads smoothly |
| Olive Oil | 375°F (190°C) | Poor – sticky residue | Not recommended |
| Coconut Oil | 350°F (177°C) | Poor – uneven finish | Not recommended |
As you can see, the smoke point of the oil matters a great deal. Higher smoke point oils generally produce better seasoning results. Flaxseed oil stands out because it polymerizes more completely than other options, creating a notably hard and slick surface.
How Many Coats You Need for Perfect Seasoning
The number of seasoning coats you apply directly affects the quality of your non-stick surface. Most experts recommend 3 to 4 rounds of oven seasoning for a new pan or a freshly stripped one.
Building Layers Over Time
Each round of oven seasoning adds a new polymerized oil layer to the pan. Think of it like building a wall. One layer is too thin to be effective. Two layers are better. Three or four layers create a robust, durable coating that can handle years of daily cooking.
After the initial 3 to 4 rounds, you can maintain your seasoning finish by doing a single round of oven seasoning every few months. Many cooks also build seasoning naturally through everyday cooking. Frying eggs, searing meat, and sautéing vegetables all add thin layers of polymerized fat to the surface.
Do not rush the process. Patience is the secret ingredient in great cast iron seasoning. Rushing through the steps or applying too much oil will lead to a poor result.
Quick Tips for Multiple Coats
- Let the pan cool completely between each round.
- Wipe the pan with a dry cloth between rounds to remove any residue.
- Use the same oil for all rounds to maintain consistency.
- After 3 rounds, do a water drop test. If water beads up and glides across the surface, your seasoning is working.
Common Mistakes That Ruin Cast Iron Seasoning
Even experienced cooks can make mistakes when seasoning cast iron in oven. Here are the most common errors and how to avoid them.
Using Too Much Oil
This is the number one mistake. A thick coat of oil will not polymerize properly. It will remain sticky, feel tacky to the touch, and peel off during cooking. Always use a thin layer and buff it well before baking.
Skipping the Preheat
Putting a coated pan into a cold or lukewarm oven prevents proper polymerization. The oil will not bond to the iron effectively. Always preheat your oven fully before placing the pan inside.
Choosing the Wrong Oil
As mentioned earlier, low smoke-point oils like olive oil and coconut oil will leave a sticky mess. Stick to high smoke-point options like flaxseed oil, canola oil, or grapeseed oil for the best seasoning cast iron results.
Not Letting the Pan Cool Slowly
Removing the pan from the oven while it is still hot can cause thermal shock. The seasoning may crack or flake. Always let the pan cool down inside the turned-off oven. This slow cooling helps the polymerized layers set firmly.
Ignoring Rust or Residue Before Seasoning
If you are restoring an old pan, you must remove all rust and old seasoning before applying new layers. Any residue left on the surface will prevent the new seasoning layers from bonding properly. Use steel wool, a vinegar soak, or a dedicated cast iron cleaner to start with a bare surface.
Expert Insight: The Science Behind Seasoning
Understanding the science helps you get better results. Polymerization is a chemical reaction where oil molecules cross-link under heat to form a hard plastic-like coating. The higher the smoke point of the oil, the more complete this reaction becomes. This is why oils like flaxseed and canola work so well for oven-baked seasoning. They break down fully and bond tightly to the iron surface, creating a protective barrier that improves with each use.
Maintaining Your Seasoned Cast Iron for Long-Term Use
Once you have invested the time to build a great seasoning finish, you want to protect it. Proper maintenance extends the life of your cast iron cookware by decades, sometimes generations.
Daily Care Tips
- Avoid soaking cast iron in water for extended periods. This can cause rust.
- Clean with a stiff brush or chainmail scrubber and warm water. A small amount of mild soap is fine for modern seasoning.
- Dry the pan immediately after washing. Place it on the stove over low heat for a minute to ensure all moisture is gone.
- Apply a thin layer of oil after cleaning to protect the surface.
- Store in a dry place with the lid off or slightly ajar to allow air circulation.
When to Re-Season
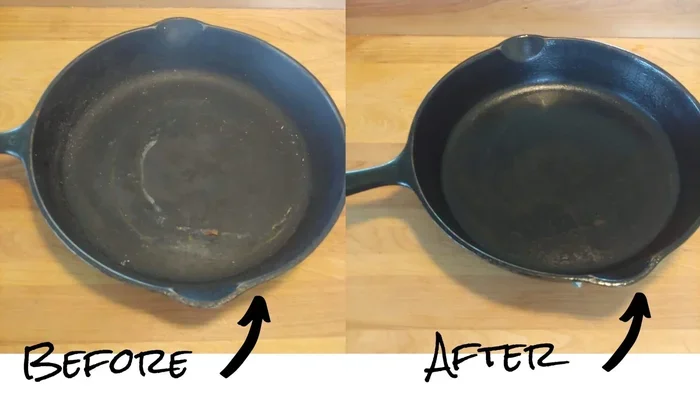
Over time, your seasoning layers may wear down, especially if you cook acidic foods frequently or use harsh scrubbers. Signs that it is time to re-season include food sticking, visible rust spots, or a dull, rough surface. When you notice these issues, simply repeat the oven seasoning process and rebuild your protective coating.
Regular maintenance keeps your cast iron cookware performing at its best. A little care goes a long way toward preserving that hard-earned non-stick surface.
Final Thoughts on Oven Seasoning Cast Iron
Learning how hot oven to season cast iron is one of the most useful skills any home cook can develop. The process is straightforward, the results are impressive, and the benefits last a lifetime. By following the right temperature of 450°F to 500°F, using a high-quality high-smoke-point oil, and applying thin even coats, you can build a beautiful, durable seasoning on any piece of cast iron cookware.
Remember to be patient. Great seasoning does not happen in a single round. It builds over multiple baking sessions. Each layer you add strengthens the protective coating and improves the cooking performance of your pan. With proper care and regular maintenance, your seasoned cast iron will serve you well for years to come.
Start with the basics. Preheat your oven, choose the right oil, apply a thin coat, and bake for one hour. Repeat the process a few times, and you will be rewarded with a pan that cooks beautifully, releases food effortlessly, and looks stunning. Happy seasoning!
Frequently Asked Questions
What is the best temperature to season cast iron in the oven?
The best temperature is between 450°F and 500°F. This range allows the oil to fully polymerize and bond to the iron surface, creating a hard and durable non-stick finish. Most experts recommend 450°F for reliable and consistent results.
How long should you bake cast iron when seasoning it?
Bake the cast iron for one full hour at your chosen temperature. This gives the oil enough time to undergo polymerization and form a solid seasoning layer. Always let the pan cool inside the turned-off oven before removing it.
Can you use olive oil to season cast iron in the oven?
It is not recommended. Olive oil has a relatively low smoke point and does not polymerize well at high temperatures. It tends to leave a sticky, gummy residue instead of a hard seasoning layer. Use flaxseed oil, canola oil, or grapeseed oil instead.
How many times should you season a cast iron skillet in the oven?
For a new or freshly restored skillet, repeat the oven seasoning process 3 to 4 times. Each round adds another protective layer. After that, a single maintenance round every few months is usually enough to keep the seasoning in great condition.
Do you need to use a lot of oil when seasoning cast iron?
No, less is more. Apply a very thin layer of oil and buff it off with a dry cloth. Too much oil will not polymerize properly and will leave a sticky, uneven surface. A thin, even coat produces the best results.
Can you season cast iron in a toaster oven?
Yes, a toaster oven works well for small cast iron pieces like a single skillet or a Dutch oven lid. Set the toaster oven to 450°F and follow the same process. Just be mindful of the smaller interior space and place a piece of foil underneath to catch drips.