How To Slow Cook A Chuck Roast In The Oven For Tender Meat
Discover how to slow cook a chuck roast in the oven and achieve fall-apart tender meat every single time. This guide covers everything from choosing the right cut to nailing the perfect oven temperature and cook time. You will learn proven techniques, expert tips, and common mistakes to avoid for a perfect slow cooked chuck roast that your whole family will love.
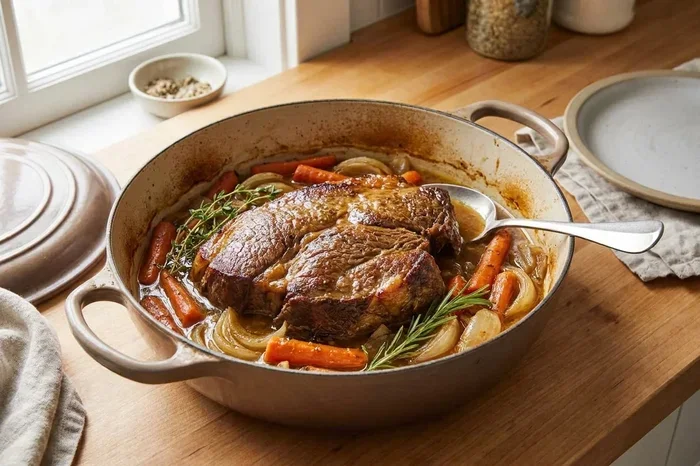
There is something deeply satisfying about pulling a slow cooked chuck roast out of the oven. The kitchen smells incredible. The meat falls apart at the touch of a fork. And every bite is packed with rich, beefy flavor.
Whether you are a beginner cook or someone who has been making oven-braised beef for years, this guide will help you master the art of how to slow cook a chuck roast in the oven. We will walk you through every single step. You will learn about the best temperature, the ideal cook time, how to prep your roast, and how to get that melt-in-your-mouth texture everyone loves.
The beauty of low and slow cooking is that it turns an inexpensive cut of beef into something truly special. A chuck roast is affordable, full of flavor, and perfect for this method. By the end of this article, you will feel confident enough to make this dish on a weeknight or for a weekend dinner with friends.
Key Takeaways
- Low and slow is the way to go: Cooking at 300-325°F for 3-4 hours transforms a tough chuck roast into tender, juicy perfection.
- Searing first matters: A good sear on all sides builds deep flavor and a beautiful crust before the oven does the work.
- Internal temperature is key: Aim for 190-200°F for shredded, tender results and 145°F for sliceable roast beef.
- Use a Dutch oven or oven-safe pan: The right cookware traps moisture and ensures even cooking throughout.
- Rest your roast: Letting the roast rest for 15-20 minutes keeps the juices locked in for a better eating experience.
- Avoid common mistakes: Skipping the sear, cooking at too high a temperature, and cutting too early ruin an otherwise great roast.
- Store and reheat properly: Leftover slow cooked beef stays delicious for 3-4 days when stored correctly in the fridge.
📑 Table of Contents
- What Is a Chuck Roast and Why Oven Slow Cooking Works
- How To Prepare Your Chuck Roast for the Oven
- The Best Oven Temperature and Time for Perfect Results
- Step-by-Step Guide To Slow Cooking Chuck Roast
- Tips for Maximum Flavor and Tenderness
- Common Mistakes To Avoid When Slow Cooking Chuck Roast
- Serving and Storing Your Slow Cooked Chuck Roast
- Conclusion
What Is a Chuck Roast and Why Oven Slow Cooking Works
A chuck roast comes from the shoulder area of the cow. This muscle does a lot of work, which means it has a lot of connective tissue and collagen. When you cook it fast at high heat, it gets tough and chewy. But when you apply low and slow cooking, something magical happens. The collagen breaks down into gelatin. The meat becomes incredibly tender. The fat renders out and keeps everything moist.
Why the Oven Is Great for Slow Cooking Beef
You might wonder why use an oven instead of a slow cooker. Both methods work well, but the oven has some real advantages. First, the dry heat from the oven helps you get a better sear on the outside of the roast. Second, the oven circulates heat more evenly. Third, you can cook at a lower temperature for a longer time, which gives you more control over the final texture.
Another big plus is that you can cook vegetables right in the same pan. A chuck roast with vegetables like carrots, potatoes, and onions makes a complete meal with very little cleanup. The beef roast juices soak into the veggies and create a natural gravy that is absolutely delicious.
Understanding Beef Roast Cuts
Not all beef roasts are the same. Some cuts are lean and best cooked quickly. Others have the marbling and connective tissue needed for braised chuck roast perfection. Here are a few cuts that work well for oven slow cooking:
- Chuck roast: The gold standard for slow cooking. Rich in flavor and collagen.
- Bottom round roast: Leaner but still works well with low and slow methods.
- Brisket: A larger cut that benefits greatly from long, slow oven cooking.
- Short ribs: Extremely flavorful and become incredibly tender when braised.
For this guide, we focus on the classic beef chuck roast. It is the most popular choice for a reason. It is affordable, widely available, and produces outstanding results every time.
How To Prepare Your Chuck Roast for the Oven
Preparation is the most important part of how to slow cook a chuck roast in the oven. Taking the time to prep properly sets you up for success. Rushing this step is the number one mistake home cooks make.
Choosing the Right Roast
When you pick out your beef chuck roast at the store, look for a few key things. The meat should have a good amount of marbling — those white streaks of fat running through it. The fat cap on the outside should be about a quarter-inch thick. Avoid roasts that look dry or have a grayish color. A bright red color with white marbling is what you want.
For most families, a 3-4 pound roast works perfectly. It fits well in a standard Dutch oven and cooks evenly. If you are cooking for a larger group, a 5-6 pound roast will do the trick.
Trimming and Seasoning the Roast
Before you season, take a sharp knife and trim off any large chunks of external fat. You do not want to remove all the fat — just the really thick, hard pieces. Leave about a quarter-inch of fat on the surface. This fat will render during cooking and keep the meat juicy.
Now it is time to season. Keep it simple for the best results. Here is what you need:
- Coarse salt — about 1 teaspoon per pound of meat
- Black pepper — freshly ground if possible
- Garlic powder — 1 teaspoon
- Onion powder — 1 teaspoon
- Paprika — 1/2 teaspoon for color and depth
- A pinch of cumin (optional)
Rub the seasoning all over the roast. Press it into the meat with your hands. Let the seasoned roast sit at room temperature for about 30 minutes before cooking. This helps the meat cook more evenly. It also gives the seasoning time to penetrate the surface.
Why Searing Matters
Searing is a step you should never skip. When you sear the outside of the roast at high heat, you trigger the Maillard reaction. This is a chemical process that creates hundreds of new flavor compounds. It gives your roast a beautiful brown crust and adds a depth of flavor that slow cooking alone cannot achieve.
Heat a tablespoon of oil in your Dutch oven over medium-high heat. Once the oil is shimmering, place the roast in the pan. Do not move it for about 4 minutes. Let the bottom develop a deep brown crust. Then flip and sear the other sides. You want a nice brown color on every surface.
After searing, remove the roast and set it aside. You will use the browned bits stuck to the bottom of the pan — those are pure flavor gold. That is where your braising liquid starts.
The Best Oven Temperature and Time for Perfect Results
Getting the temperature right is the single most important factor in how to slow cook a chuck roast in the oven. Too hot and the meat dries out. Too low and it takes forever. The sweet spot is between 300°F and 325°F.
Recommended Oven Temperature
Most experts agree that 325°F is the ideal temperature for oven-braised beef. At this heat, the meat cooks slowly enough for the connective tissues to break down, but fast enough that the process finishes in a reasonable amount of time. If you prefer an even slower cook, 300°F works too. It just adds about 30-45 minutes to the total time.
Here is a quick reference table for different roast sizes:
- 2-3 pound roast: 325°F for about 3 hours
- 3-4 pound roast: 325°F for about 3.5 to 4 hours
- 4-5 pound roast: 325°F for about 4 to 5 hours
- 5-6 pound roast: 325°F for about 5 to 6 hours
Internal Temperature Guide
Using a beef roast thermometer is the best way to know exactly when your roast is done. Here are the target temperatures for different textures:
- 145°F: Medium-rare. The roast will be pink in the center and sliceable. Best for slicing against the grain.
- 160°F: Medium. A good balance of tenderness and sliceability.
- 170°F: Well done. The meat starts to dry out a bit but is still usable.
- 190-200°F: Fall-apart tender. This is the sweet spot for shredded or pulled beef. The collagen has fully broken down.
For the most tender results, aim for 190-200°F. This is the temperature where the magic happens. The braised chuck roast will be so tender that a fork just falls apart.
How To Calculate Cook Time
A good rule of thumb is about 30 minutes per pound at 325°F. But this is just a starting point. The actual time depends on several factors:
- The shape of the roast — a flat roast cooks faster than a thick, round one
- Whether you seared it first — searing adds flavor but does not change cook time much
- Your specific oven — some ovens run hot or cold, so always use a thermometer
- Whether you add liquid — more liquid creates more steam and can slightly reduce cook time
The best approach is to start checking the internal temperature after about 2.5 hours. Use a meat thermometer inserted into the thickest part of the roast, avoiding any bone if present.
Step-by-Step Guide To Slow Cooking Chuck Roast
Now that you understand the why and the how, let us put it all together. Here is a complete chuck roast recipe you can follow step by step.
Step 1: Preheat and Prep
Preheat your oven to 325°F. While the oven is heating up, take your seasoned roast out of the fridge. Let it sit on the counter for 30 minutes. This small step makes a big difference in even cooking.
Step 2: Sear the Roast
Heat a Dutch oven or oven-safe roasting pan over medium-high heat. Add a tablespoon of cooking oil. Once the oil is hot, place the roast in the pan. Sear for 4 minutes on each side until you have a deep brown crust on every surface. Remove the roast and set it on a plate.
Step 3: Build the Braising Liquid
Lower the heat to medium. Add diced onions, minced garlic, and chopped carrots to the same pan. Stir for about 2 minutes, scraping up all those browned bits from the bottom. Pour in beef broth — about 2 cups for a 3-4 pound roast. Add a splash of red wine if you like (this is optional but adds great flavor). Stir in a tablespoon of tomato paste and a bay leaf. Bring the liquid to a gentle simmer.
Step 4: Braise in the Oven
Place the seared roast back into the pan. Add potatoes and any other vegetables you like around the roast. The liquid should come up about halfway up the sides of the roast — not covering the top. Cover the pan tightly with a lid or aluminum foil. Place it in the preheated oven.
Step 5: Cook and Monitor
Set a timer for 3 hours. After 3 hours, open the oven and check the internal temperature. If it has not reached your target yet, keep cooking and check every 30 minutes. The roast is done when it reaches 190-200°F for fall-apart tender meat.
Step 6: Rest the Roast
This step is critical. Remove the roast from the oven and let it rest for at least 15-20 minutes before cutting. During resting, the juices redistribute throughout the meat. If you cut too early, all those juices run out onto the cutting board instead of staying in the meat. Tent the roast loosely with aluminum foil to keep it warm while it rests.
Step 7: Make the Gravy
While the roast is resting, you can make a quick gravy from the braising liquid. Strain the liquid into a saucepan, discarding the vegetables and bay leaf. Bring it to a simmer and let it reduce by about half. If you want a thicker gravy, mix a tablespoon of cornstarch with a tablespoon of cold water and stir it in. Let it simmer for 2-3 minutes until it thickens. Season with salt and pepper to taste.
Tips for Maximum Flavor and Tenderness
Even a simple slow cooking beef recipe can go from good to outstanding with a few extra tricks. Here are some expert tips that make a real difference.
Use the Right Liquid
The braising liquid is the flavor foundation of your roast. Beef broth is the most common choice, but you can mix it up. Try using a combination of broth and red wine for deeper flavor. Add a splash of Worcestershire sauce for umami depth. A teaspoon of soy sauce might sound unusual, but it adds a rich, savory quality that complements the beef beautifully.
Do Not Skip the Resting Step
Resting is not just a suggestion — it is essential. When you remove the roast from the oven, the internal temperature will continue to rise by about 5-10 degrees. This is called carryover cooking. The resting period allows the muscle fibers to relax and reabsorb moisture. The result is juicier, more flavorful meat.
Cook Low and Slow — But Not Too Low
There is a balance to strike. Cooking below 275°F for a standard chuck roast can result in slightly uneven texture. The outside might be overcooked while the center is still tough. Stick to the 300-325°F range for the best results. This temperature range allows the collagen to break down gradually and evenly throughout the meat.
Add Vegetables at the Right Time
If you are adding vegetables like carrots and potatoes, add them in the last 1.5 to 2 hours of cooking. If you add them too early, they will turn to mush. Onions and garlic can go in earlier since they hold up better during long cooking times.
Use a Heavy, Oven-Safe Pan
A cast iron Dutch oven or a heavy enameled pot works best for pot roast in oven recipes. The heavy walls retain heat evenly and prevent hot spots. A thin, lightweight pan will cook the roast unevenly and may cause the liquid to evaporate too quickly.
Let the Roast Come to Room Temperature
Taking the roast out of the fridge 30-45 minutes before cooking is a small step with big results. A cold roast going into a hot oven will cook unevenly. The outside will be overcooked while the inside is still cold. Letting it warm up slightly ensures more even cooking throughout.
Common Mistakes To Avoid When Slow Cooking Chuck Roast
Even experienced cooks can run into trouble when making beef chuck roast in the oven. Here are the most common mistakes and how to avoid them.
Mistake 1: Cooking at Too High a Temperature
This is the number one mistake. Some people set the oven to 350°F or higher thinking it will save time. The problem is that high heat causes the muscle fibers to contract too quickly. The moisture gets squeezed out, and you end up with dry, tough meat. Stick to 300-325°F and be patient.
Mistake 2: Not Browning the Roast
Skipping the sear means missing out on a layer of complex flavor. The Maillard reaction that happens during searing creates hundreds of new flavor compounds. It is a quick step — just a few minutes per side — but it makes a huge difference in the final taste.
Mistake 3: Cutting Into the Roast Too Soon
We know the smell is tempting. But cutting into the roast right after it comes out of the oven releases all those precious juices. Let it rest for at least 15-20 minutes. Your patience will be rewarded with juicier, more flavorful meat.
Mistake 4: Using Too Much or Too Little Liquid
The liquid should come up about halfway up the roast, not covering it. Too much liquid turns the braise into a stew. Too little liquid causes the roast to dry out. A good guideline is 2 cups of liquid for a 3-4 pound roast.
Mistake 5: Not Using a Thermometer
guessing when the roast is done is a recipe for disappointment. A beef roast thermometer takes the guesswork out of cooking. Invest in a good instant-read thermometer and use it every time. It is the difference between a perfect roast and an overcooked or undercooked one.
Mistake 6: Choosing the Wrong Cut of Meat
Not all beef cuts are created equal for slow cooking. Lean cuts like sirloin or tenderloin will dry out in the oven over long cook times. Stick to well-marbled cuts like chuck roast, short ribs, or bottom round for the best results.
Serving and Storing Your Slow Cooked Chuck Roast
Your tender beef roast is done and resting. Now what? Serving it the right way and storing leftovers properly will make this meal even better.
How To Serve
Slice the roast against the grain for the most tender bite. If you cooked it to 190-200°F and it is fall-apart tender, you can shred it with two forks instead of slicing. Serve with the braised vegetables and spoon the gravy over the top. This chuck roast with vegetables makes a complete, satisfying meal.
Some great side dishes to pair with your slow cooked beef include:
- Creamy mashed potatoes
- Buttered egg noodles
- Roasted root vegetables
- Crusty bread for soaking up the gravy
- A simple green salad for freshness
Storing Leftovers
Leftover slow cooking beef stores beautifully. Let the roast cool to room temperature within 2 hours of cooking. Store it in an airtight container in the refrigerator. Properly stored, it will keep for 3-4 days.
You can also freeze the roast for up to 3 months. Wrap it tightly in plastic wrap and then in aluminum foil, or place it in a heavy-duty freezer bag. When you are ready to eat it, thaw it in the refrigerator overnight and reheat gently in the oven at 300°F until warmed through.
Reheating Without Drying It Out
Reheating is where many people go wrong. The microwave can make the meat tough and rubbery. Instead, reheat in the oven at 300°F with a splash of beef broth or water. Cover the dish with foil to trap moisture. Heat for 20-30 minutes until the internal temperature reaches 165°F. This method keeps the meat moist and tender.
Conclusion
How to slow cook a chuck roast in the oven is one of the most rewarding cooking skills you can learn. It takes a little patience, but the results are absolutely worth it. From choosing the right cut to nailing the perfect oven temperature, every step matters. The low and slow method transforms an affordable piece of beef into a meal that feels like it came from a fancy restaurant.
Remember the key principles: sear your roast first, cook at 325°F for the right amount of time, use a thermometer to check doneness, and always let the roast rest before cutting. Avoid the common mistakes, follow the tips in this guide, and you will make a perfect slow cooked chuck roast every single time.
Start with this recipe on a quiet weekend when you have time to enjoy the process. Once you see how easy and delicious it is, you will make it again and again. Your family and guests will keep asking for more. Happy cooking!
Frequently Asked Questions
Can I use a different cut of beef instead of chuck roast?
Yes, you can use bottom round, brisket, or short ribs for oven slow cooking. However, chuck roast remains the best choice because it has the ideal balance of fat and connective tissue. Other cuts may require slight adjustments to cook time and temperature.
How do I know when the roast is done without a thermometer?
The easiest way is to use a fork. Insert a fork into the thickest part of the roast and twist gently. If the meat falls apart easily, it is done. You can also press the roast with your finger — if it feels very soft and gives easily, the collagen has broken down properly.
Can I slow cook a chuck roast in the oven overnight?
Yes, you can cook it on a low setting of 275°F for 8-10 hours for an overnight roast. This method works well if you want to prepare dinner before going to bed. Just make sure your Dutch oven is oven-safe and that there is enough liquid in the pan.
What is the difference between braising and slow cooking in the oven?
Braising and slow cooking are very similar. Both use low heat and moisture over a long period. Braising typically involves searing the meat first and then cooking it partially submerged in liquid. Slow cooking in the oven uses the same principles but often with less liquid, allowing the natural juices to do more of the work.
How long can I store leftover slow cooked chuck roast?
Leftover roast stays fresh in the refrigerator for 3-4 days when stored in an airtight container. You can also freeze it for up to 3 months. Always reheat gently to maintain the tender texture and prevent the meat from drying out.
Do I need to add wine to the braising liquid?
No, wine is completely optional. You can use extra beef broth or even a mix of broth and balsamic vinegar for a similar depth of flavor. If you choose not to use wine, simply add more broth to compensate for the liquid volume.