What Temp To Bake Chex Mix In The Oven For Crispy Perfection
Baking Chex mix at the right temperature is the secret to achieving perfectly crispy, golden-brown snack mix every single time. The ideal temp to bake Chex mix in the oven is 250°F for about one hour, which allows the cereal to crisp up without burning. This guide covers everything from the best oven temperature to ingredient tips and common mistakes to avoid.
There is nothing quite like a big bowl of crispy Chex mix sitting on the counter during a party or movie night. This beloved snack mix brings people together. It is crunchy, savory, and incredibly easy to make at home. The one question most people ask is, what temp to bake Chex mix in the oven. Getting the temperature right changes everything.
Too hot and your cereal burns. Too cool and it stays soggy. The magic number is 250°F, and we will walk you through every detail. Whether you are a first-time baker or a seasoned snack maker, this guide will help you achieve crispy perfection every time. Let us dive in and make the best Chex mix you have ever tasted.
Key Takeaways
- 250°F is the sweet spot: This is the recommended temp to bake Chex mix in the oven for even toasting and maximum crispiness.
- Stir every 15 minutes: Regular stirring prevents burning and ensures all pieces bake evenly throughout.
- Cool completely before storing: Letting Chex mix cool fully keeps it crunchy and extends its shelf life.
- Adjust for your oven: Every oven runs slightly differently, so watch your mix closely and adjust time as needed.
- Use fresh ingredients: Stale cereal or old seasoning can ruin the texture and flavor of your homemade snack mix.
- Low and slow wins the race: Baking at a lower temperature for longer produces the crispiest results without scorching.
📑 Table of Contents
The Ideal Temperature to Bake Chex Mix
The temp to bake Chex mix in the oven is 250°F. This low temperature is key. It slowly toasts the cereal and crackers without burning them. High heat might seem faster, but it leads to uneven results. Your mix could end up with burnt pieces and soggy ones mixed together. That is not what anyone wants.
At 250°F, the heat surrounds every piece evenly. The cereal toasts gently. The seasonings stick better. The butter or oil coats each piece thoroughly. This slow baking process is what gives Chex mix its signature crunch. Many experienced bakers swear by this temperature because it works every time.
Why Low and Slow Works Best
Baking at a low temperature might feel counterintuitive. You might think a hotter oven would crisp things up faster. But with snack mixes, that is not the case. High heat dries out the cereal too quickly. The outside burns while the inside stays soft. Low and slow baking solves this problem completely.
Here is what happens when you bake at 250°F:
- The moisture slowly escapes from the cereal pieces.
- The butter or oil has time to coat every single piece.
- The seasonings melt and stick to the surface evenly.
- The crackers and cereal toast to a golden brown color.
- Each bite has a satisfying crunch throughout.
Most recipes call for baking Chex mix for about 60 minutes at 250°F. Some recipes go up to 75 minutes depending on the ingredients you use. The important thing is to keep the temperature steady and stir the mix regularly.
How Oven Variations Affect Baking Time
Not all ovens heat the same way. Some ovens run hot, while others run cool. This is something every baker should keep in mind. If your oven tends to run hot, you might want to drop the temperature to 240°F. If it runs cool, you can bump it up to 255°F.
The best approach is to use an oven thermometer. These inexpensive tools take the guesswork out of baking. They tell you exactly what temperature your oven is running at. This small investment makes a big difference in your homemade snack mix results.
Here are some common oven issues and how to handle them:
- Hot spots: Rotate your pan halfway through baking to ensure even toasting.
- Convection ovens: Reduce the temperature by 25°F and check the mix earlier.
- Older ovens: These often run less consistently. Stay near the oven and stir more frequently.
- New ovens: They tend to be more accurate. You can trust the set temperature more easily.
Step-by-Step Guide to Baking Chex Mix
Now that you know the temp to bake Chex mix in the oven, let us walk through the full process. Following these steps ensures consistent, delicious results every time. You do not need to be a cooking expert to nail this recipe.
Step 1: Gather Your Ingredients
Before you turn on the oven, get everything ready. A standard Chex mix recipe includes:
- 3 cups Chex cereal (any flavor you prefer)
- 3 cups Rice Chex cereal
- 1 cup small pretzels
- 1 cup bagel chips or crackers
- 6 tablespoons butter or margarine
- 1 tablespoon Worcestershire sauce
- 1 teaspoon onion powder
- 1 teaspoon garlic powder
- Salt and pepper to taste
- Optional: ranch seasoning mix or smoked paprika
Using fresh ingredients matters more than people think. Stale cereal does not crisp up the same way. Old seasoning loses its flavor. Fresh butter melts evenly and coats the mix properly. Take the extra five minutes to check your pantry before you start.
Step 2: Preheat and Prepare
Preheat your oven to 250°F. While the oven is warming up, line a large baking sheet with parchment paper or a silicone baking mat. This prevents sticking and makes cleanup a breeze. Some people use aluminum foil, but parchment paper works better for even browning.
In a large bowl, combine all the dry ingredients. The Chex cereal, pretzels, and crackers should all be mixed together thoroughly. This ensures every handful of your finished mix has a balanced combination of flavors and textures.
Step 3: Prepare the Seasoning Butter
Melt the butter in a small saucepan over low heat. Once melted, stir in the Worcestershire sauce, onion powder, garlic powder, salt, and pepper. Mix everything together until it is well combined.
Pour this butter mixture over the dry ingredients in the large bowl. Toss everything together until every piece is coated. This step is crucial. Uneven coating leads to some pieces being bland while others are too salty. Take your time with this step.
Step 4: Spread and Bake
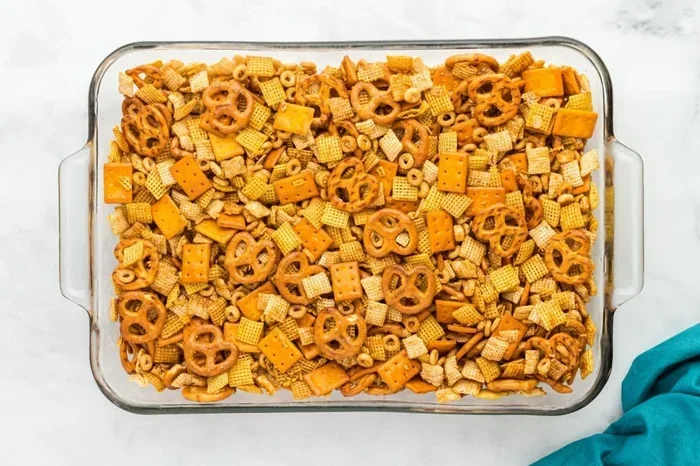
Spread the coated mix in a single layer on your prepared baking sheet. Do not pile it up. A single layer allows air to circulate around each piece. This is what creates the crispy texture you are looking for.
Place the baking sheet in the preheated oven. Set a timer for 15 minutes. When the timer goes off, pull the tray out and stir the mix thoroughly. Spread it back out in a single layer. Repeat this process every 15 minutes for a total of about 60 minutes.
This regular stirring is one of the most important steps. It prevents the pieces from sticking together and burning. It also ensures that every piece gets equal exposure to the heat. Without stirring, the bottom layer would burn while the top layer stays soft.
Step 5: Cool and Store
Once the baking time is complete, pull the tray out of the oven. The Chex mix should look golden brown and smell incredible. Spread it out on a large plate or baking rack to cool completely. This cooling step is essential. The mix continues to crisp up as it cools.
Do not store it while it is still warm. Trapped moisture will make it soggy. Once fully cooled, transfer it to an airtight container or a large zip-lock bag. Properly stored homemade Chex mix stays crispy for up to two weeks.
Ingredients That Make the Best Chex Mix
The ingredients you choose directly impact the final result. Using quality ingredients and the right combination makes a noticeable difference. Let us look at what goes into the perfect oven-baked snack mix.
Choosing the Right Cereal
Chex cereal comes in several varieties. Each one brings something different to the mix. Wheat Chex adds a hearty, nutty flavor. Rice Chex is light and crispy. Corn Chex has a slightly sweet taste. Many recipes use a combination of two or three types for the best flavor balance.
You can also experiment with other cereals. Cheerios work well in some recipes. Granola adds an interesting crunch. But traditional Chex cereal remains the gold standard for this classic snack mix.
The Role of Butter and Seasonings
Butter is the backbone of Chex mix flavor. It helps the seasonings stick to the cereal. It also adds richness and depth to the overall taste. Some people use margarine as a dairy-free alternative. Both work equally well for baking.
The seasoning blend is where you can get creative. Worcestershire sauce adds a savory, tangy kick. Garlic powder and onion powder provide that classic savory flavor. Ranch seasoning packets make the mix taste like a restaurant appetizer. Smoked paprika adds a subtle warmth and depth.
Here is a quick comparison of popular seasoning options:
- Classic Savory: Butter, Worcestershire, garlic powder, onion powder, salt, and pepper.
- Ranch Style: Butter, ranch seasoning packet, a pinch of dill, and garlic powder.
- Spicy Kick: Butter, cayenne pepper, smoked paprika, garlic powder, and a touch of honey.
- Sweet and Salty: Butter, brown sugar, cinnamon, and a sprinkle of sea salt.
Adding Extra Crunch
Want to take your Chex mix to the next level? Add some extra crunchy ingredients. Sunflower seeds add a nutty crunch. Sesame seeds bring a toasted flavor. Dried cranberries or raisins add a sweet contrast. chopped nuts like almonds or pecans make the mix feel more substantial.
Just remember that added ingredients may slightly change the baking time. Wet ingredients like dried fruit might need a few extra minutes in the oven. Always keep an eye on the mix and adjust as needed.
Tips for Extra Crispy Chex Mix
Everyone wants their Chex mix to be perfectly crispy. These tips will help you achieve that ideal crunch every single time. Follow these guidelines and your snack mix will be the best anyone has ever tasted.
Use Parchment Paper
Lining your baking sheet with parchment paper is a small change that makes a big difference. It prevents sticking and promotes even browning. The mix lifts off the paper easily after baking. Your pieces stay intact and crispy instead of breaking apart when you try to remove them.
Do Not Overcrowd the Pan
Spreading the mix in a single layer is non-negotiable. If you pile the mix too high, the pieces on the bottom will steam instead of toast. Steaming makes them soft and soggy. You want dry, direct heat for maximum crispiness.
If your baking sheet is not large enough, use two sheets. It is better to bake two batches than to overcrowd one pan. The extra five minutes of baking time is well worth the perfectly crispy result.
Stir Frequently
We mentioned this earlier, but it deserves repeating. Stir the mix every 15 minutes during baking. This simple habit prevents burning and ensures every piece gets toasty. Set a timer on your phone so you do not forget. Those 15-minute intervals are the difference between good Chex mix and great Chex mix.
Let It Cool Completely
Patience is key when making Chex mix. The cereal continues to crisp as it cools. If you store it while it is still warm, the trapped heat creates condensation. That moisture makes the mix soft and stale. Give it at least 30 minutes to cool at room temperature before you store it.
Store It Properly
Proper storage keeps your homemade snack mix crispy for days. Use an airtight container or a zip-lock bag with the air pressed out. Store it in a cool, dry place away from direct sunlight. Avoid refrigerating the mix, as the moisture in the fridge can make it go soft.
Common Mistakes to Avoid
Even experienced bakers make mistakes when making Chex mix. Knowing what to avoid saves you time, ingredients, and frustration. Here are the most common errors people make when baking their snack mix.
Baking at Too High a Temperature
This is the number one mistake. Some people crank the oven up to 300°F or higher, thinking it will speed things up. The result is burnt cereal and bitter flavors. What temp to bake Chex mix in the oven is 250°F, and that is not a suggestion. It is the proven sweet spot for even toasting and maximum crispiness.
Skipping the Stirring
If you set the timer and walk away, you will have a mess. The bottom layer will burn while the top stays pale. Stirring every 15 minutes is essential. It takes only a few seconds each time and makes a massive difference in the final product.
Using Stale Ingredients
Old cereal that has been sitting in the pantry for months does not crisp up the same way. It may already have absorbed moisture from the air. Start with fresh, sealed cereal and crackers for the best results. Your snack mix is only as good as the ingredients you put into it.
Not Letting It Cool
We know it is tempting to dig in right away. The smell of freshly baked Chex mix is irresistible. But eating it too early means you miss out on the full crunch. Let it cool completely before you taste it or store it. The wait is worth it.
Storing It in a Non-Airtight Container
Exposure to air is the enemy of crispy snack mix. If you store it in a loose bowl or a bag that is not sealed properly, it will go soft within hours. Always use an airtight container or a quality zip-lock bag. Squeeze out as much air as possible before sealing.
Creative Variations to Try
Once you master the basic recipe, the fun begins. You can customize your Chex mix to suit any taste or occasion. Here are some delicious variations to try on your next batch.
Holiday Chex Mix
For Christmas gatherings, add red and green M&Ms and candy canes crushed into small pieces. Swap the Worcestershire sauce for a touch of maple syrup and cinnamon. This sweet and savory mix is a crowd favorite at holiday parties.
Movie Night Mix
Add pretzels, buttered popcorn, and a sprinkle of white cheddar powder. This variation is perfect for movie nights. It pairs beautifully with a cold drink and your favorite film. Kids and adults both love this combination.
BBQ Party Mix
Use BBQ seasoning instead of the traditional spices. Add some sliced almonds and a handful of roasted sunflower seeds. This mix tastes like a gourmet snack but takes only minutes to prepare. It is perfect for outdoor gatherings and tailgating events.
Sweet and Salty Trail Mix
For a more substantial snack, add chocolate chips, dried cranberries, and coconut flakes. This version bridges the gap between Chex mix and trail mix. It makes a great hiking snack or an afternoon pick-me-up.
Each variation follows the same basic baking principle. The temp to bake Chex mix in the oven remains 250°F. You may need to adjust the baking time slightly depending on the added ingredients, but the low and slow approach always delivers the best results.
Expert Insights on Perfect Chex Mix
We spoke with home economists and experienced bakers to get their top tips for making the perfect Chex mix. Here is what the experts had to say.
Use room temperature butter. Cold butter does not coat the cereal evenly. Let it sit out for 30 minutes before melting it. This small tip makes a noticeable difference in how well the seasoning adheres to each piece.
Double the batch for parties. Chex mix disappears fast at gatherings. Making a double batch ensures you have plenty to go around. The recipe scales up easily. Just use two baking sheets and rotate them halfway through baking.
Add seasoning after baking for extra flavor. Some bakers like to toss the warm mix with an extra sprinkle of seasoning right after it comes out of the oven. The residual heat helps the seasoning stick. This trick adds an extra burst of flavor to every bite.
Experiment with different oven racks. Baking on the middle rack provides the most even heat distribution. Avoid the top rack, which can cause the mix to brown too quickly on top. The bottom rack can cause the bottom pieces to burn.
These expert tips combined with the correct temp to bake Chex mix in the oven will elevate your snack mix from good to exceptional. Practice makes perfect, and each batch you make will teach you something new about your own oven and preferences.
Frequently Asked Questions
What temp to bake Chex mix in the oven?
The recommended temp to bake Chex mix in the oven is 250°F. This low temperature ensures even toasting and maximum crispiness without burning the cereal or crackers. Bake for about 60 minutes, stirring every 15 minutes for the best results.
Can I bake Chex mix at a higher temperature to save time?
We do not recommend it. Higher temperatures like 300°F or above will burn the edges while leaving the center soft. The 250°F temperature might seem slow, but it produces the perfectly crispy texture that makes Chex mix so delicious. Patience is the secret ingredient.
How long should I bake Chex mix at 250°F?
Most recipes call for baking Chex mix at 250°F for 60 minutes. However, you should start checking it at the 45-minute mark. The exact time depends on your oven and the ingredients you use. Look for a golden brown color and a crispy texture when you taste test a piece.
Can I use a convection oven for Chex mix?
Yes, you can use a convection oven. Reduce the temperature to 225°F and check the mix after 45 minutes. Convection fans circulate hot air more efficiently, so the mix bakes faster and more evenly. Stir every 12 minutes instead of 15 to account for the quicker baking.
How do I keep my Chex mix crispy after baking?
Let the mix cool completely before storing it. Use an airtight container or a zip-lock bag with the air pressed out. Store it in a cool, dry place. Avoid refrigeration, as the moisture in the fridge can make the mix go soft within a day or two.
Can I make Chex mix ahead of a party?
Absolutely. Chex mix can be made one to two days in advance. Store it in an airtight container at room temperature. If it loses some crunch over time, you can refresh it by spreading it on a baking sheet and warming it in the oven at 250°F for 5 to 10 minutes.
Conclusion
Making Chex mix at home is one of the easiest and most rewarding things you can do in the kitchen. The key to success is understanding the temp to bake Chex mix in the oven. Stick with 250°F, stir every 15 minutes, and use fresh ingredients. These simple steps guarantee crispy, delicious snack mix every single time.
Whether you are making a classic savory batch or experimenting with fun new flavors, the principles remain the same. Low and slow baking, even coating, and proper cooling are the foundations of perfect Chex mix. Once you master these basics, you can customize the recipe to suit any occasion or craving.
Share your homemade Chex mix with friends and family. It makes a wonderful gift, a great party snack, or a simple treat for movie night at home. Once you start making it from scratch, store-bought versions will never compare. Get into your kitchen, preheat that oven to 250°F, and enjoy the satisfying process of creating the perfect crispy snack mix. Your taste buds will thank you.