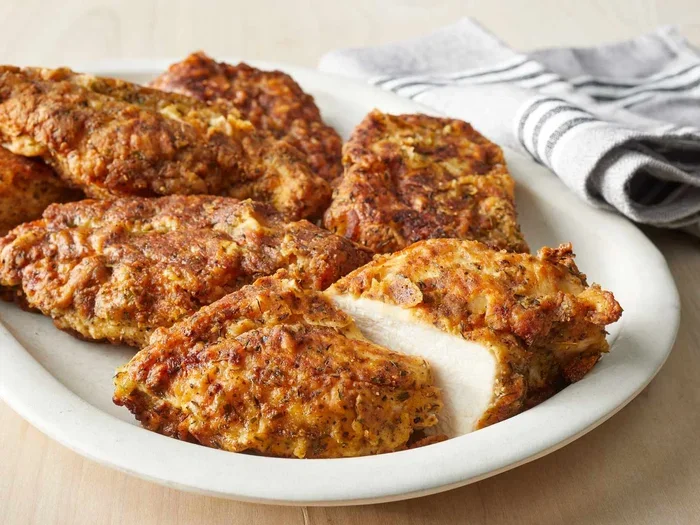
How To Brown Chicken Breast In Oven And Get Perfect Results
Learn how to brown chicken breast in oven and achieve juicy, golden perfection every time. This guide reveals the simple steps to get crispy, flavorful chicken without drying it out. You’ll discover the best oven temperature, timing, and seasoning tips for restaurant-quality results.
Baking chicken breast in the oven is a simple way to cook a healthy meal. But too often, the result is pale and dry. The secret lies in a high-heat sear that creates a golden crust while keeping the inside moist. This guide shows you exactly how to brown chicken breast in oven and get perfect results every time. You will learn the right temperature, the best pans, and easy seasoning tricks that make a big difference.
Whether you are meal prepping for the week or cooking dinner for your family, mastering this technique is a game changer. Oven-baked chicken can be juicy and flavorful when you follow a few key steps. I will walk you through the process from start to finish. You will see why high-heat roasting is the best method for a beautiful, even brown finish.
Key Takeaways
- Use high heat: A hot oven (425°F–450°F) jumpstarts browning and locks in moisture.
- Pat dry the chicken: Removing surface moisture is the key to a golden crust.
- Choose the right pan: A cast-iron skillet or oven-safe pan conducts heat evenly.
- Don’t skip the rest: Letting chicken rest after baking keeps it juicy.
- Season generously: Salt, pepper, and herbs before baking build deep flavor.
- Check internal temperature: 165°F ensures safe, tender chicken breast.
- Butter basting adds richness: Basting with melted butter during roasting enhances browning.
📑 Table of Contents
Why Browning Chicken Breast In Oven Makes a Difference
Browning is not just about looks. It adds depth and flavor that plain baked chicken lacks. When you brown chicken breast in oven, the Maillard reaction creates hundreds of new flavor compounds. This chemical process turns simple ingredients into something truly delicious.
A golden crust also helps trap moisture inside the meat. Without it, chicken can dry out quickly. With a well-browned surface, you get a juicier bite every time. Crispy oven chicken also looks more appetizing on the plate. It makes even a simple weeknight dinner feel special.
Many people confuse browning vs baking. Baking cooks chicken evenly at a steady temperature. Browning uses higher heat to caramelize the surface first. The best oven-baked chicken combines both methods. You start with a hot oven to sear the outside, then lower the heat to cook through gently.
The Science Behind a Perfect Golden Crust
The Maillard reaction happens when proteins and sugars meet high heat. This reaction only works above 280°F (140°C). That is why a hot oven is essential for even browning. The surface dries out quickly, allowing the crust to form. Moisture is the enemy of browning. If the chicken is wet, it will steam instead of sear.
Fat plays a supporting role too. A thin layer of olive oil or butter helps transfer heat. It also carries flavor to the surface. When you brown chicken breast in oven with a little fat, the crust becomes rich and nutty. The result is a juicy chicken breast with a beautiful color.
Step-by-Step: How To Brown Chicken Breast In Oven
Follow these simple steps for consistently great results. Each stage is important for achieving that perfect golden crust.
Prep the Chicken Breast
Start with boneless, skinless chicken breasts. Pat them completely dry with paper towels. This step is the most important for browning. Any surface moisture will create steam and prevent a crust from forming. Use a sharp knife to even out thick parts so the chicken cooks evenly.
Now it is time to season. Generous salt and pepper form the base. Add garlic powder, paprika, or dried herbs like thyme. These spices stick to the dry surface and cling during roasting. For extra flavor, rub a thin layer of olive oil over the chicken first. The oil helps the spices adhere and promotes olive oil browning.
Preheat and Choose Your Pan
Preheat your oven to 425°F (220°C). A hot oven is critical for a quick sear. Place your chosen pan in the oven while it heats. A hot pan jumpstarts the browning process the moment the chicken touches it. Use an oven-safe skillet or a heavy baking sheet lined with a wire rack.
If you want the most even brown on all sides, a cast-iron skillet is ideal. It holds heat steady and radiates it from below. A wire rack set over a baking sheet also works well. It allows air to circulate under the chicken, preventing a soggy bottom.
Sear and Bake
Remove the hot pan from the oven. Place the seasoned chicken breasts in the pan with space between them. Do not crowd the pan. Overcrowding traps steam and leads to pale, uneven cooking. A single layer with at least one inch between pieces is perfect.
Place the pan back in the oven immediately. Bake for 18 to 22 minutes depending on thickness. Thinner cutlets may need only 16 minutes. Thicker breasts might need 25 minutes. Halfway through, you can butter baste the chicken. Spoon melted butter over the top using a ladle. This adds richness and speeds up crispy skin formation.
Check Doneness and Rest
Use a meat thermometer to check the internal temperature. The chicken is done when it reaches 165°F (74°C) in the thickest part. Avoid cutting into the chicken to check. That releases precious juices and dries out the meat. Chicken breast doneness is best judged by temperature, not color.
Once baked, let the chicken rest for 5 to 7 minutes. This resting chicken step allows the juices to redistribute. If you slice immediately, the juices run out and the meat becomes dry. A short rest ensures a moist chicken breast that stays tender from the first bite to the last.
Choosing the Right Pan and Tools
The pan you use affects how well your chicken browns. Not all cookware is equal. Here is a comparison of the best options for brown chicken breast in oven.
| Pan Type | Browning Ability | Best For | Notes |
|---|---|---|---|
| Cast Iron Skillet | Excellent | Even, deep browning | Heavy, retains heat well. Preheat in oven for best results. |
| Stainless Steel Skillet | Very Good | Easy release, quick sear | Choose a heavy-bottomed version to avoid hot spots. |
| Baking Sheet with Wire Rack | Good | Airflow, crispy bottoms | Great for multiple breasts at once. Use a higher rack position. |
| Nonstick Baking Pan | Fair | Easy cleanup | Lower browning potential. Best for thin cutlets. |
Avoid thin, flimsy pans. They create hot spots that lead to uneven brown on all sides. A heavy pan distributes heat evenly. If you do not own cast iron, a thick stainless-steel skillet works well. The key is to preheat the pan in the oven before adding the chicken. This ensures an immediate sizzle when the chicken hits the surface.
Quick Tips for Pan Selection
- Always preheat the pan: A cold pan means a long wait for browning.
- Use a wire rack: It lifts the chicken off the pan for airflow.
- Avoid nonstick for browning: Nonstick surfaces do not promote crust formation as well as bare metal.
Common Mistakes That Ruin Your Browning
Even with the right temperature, small errors can lead to pale, dry chicken. Here are the most common mistakes and how to fix them.
Using a Cold Pan or Oven
The biggest mistake is not preheating. If you place chicken in a cold pan, it will steam instead of sear. Always preheat your oven and your pan together. The sizzle should be immediate when the chicken touches the hot surface. This rapid sear is what creates the golden crust.
Overcrowding the Pan
Crowding traps steam between the pieces. Steam prevents browning and leads to rubbery texture. Give each breast enough space. If you need to cook more, use two pans or bake in batches. Meal prep chicken tastes best when each piece has room to breathe.
Skipping the Dry Step
Wet chicken will not brown. Always pat the breasts dry with paper towels before seasoning. If you skip this, the surface moisture turns to steam and blocks the Maillard reaction. This single step makes the biggest difference in achieving a deep, even brown color.
Cutting Too Early
Slicing the chicken right out of the oven releases all the juices. The meat becomes dry and loses its appeal. Always let it rest for at least 5 minutes. This resting chicken rule applies to all roasted meats. The juices settle back into the fibers, giving you a tender, juicy chicken breast.
Pro Tips for Juicy, Flavorful Oven-Baked Chicken
Once you master the basic method, a few advanced tricks will take your oven-baked chicken to the next level.
Butter Basting for Richness
Basting with melted butter during the last 10 minutes of baking adds incredible flavor. Use a spoon or a basting brush to coat the top of each breast. The butter fries the surface and creates a glossy, crispy chicken skin effect even without the skin. Add a few fresh thyme sprigs to the butter for a fragrant boost.
Brine for Extra Moisture
Brining is a simple way to guarantee juicy results. Soak the chicken in salted water for 30 minutes to 2 hours. The salt penetrates the meat and helps it retain moisture during cooking. After brining, pat the chicken dry thoroughly before seasoning. This step is especially helpful for thinner cutlets that tend to dry out quickly.
Temperature and Timing Chart
Use this quick reference for perfectly timed chicken breast timing based on thickness.
- Thin cutlets (½ inch): 425°F for 14–16 minutes
- Average breasts (¾ inch): 425°F for 18–22 minutes
- Thick breasts (1 inch+): 425°F for 22–26 minutes
Always use a meat thermometer. Thickness varies, and ovens differ. The internal temperature of 165°F is the only reliable indicator of chicken breast doneness.
Meal Prep and Storage
Brown chicken breast in oven makes excellent meal prep. Once cooled, store the chicken in an airtight container in the fridge for up to 4 days. Reheat gently in the oven or a skillet to keep the crust from getting soggy. Microwaving dries out the meat quickly. For the best texture, warm it in a hot pan with a splash of broth.
Conclusion
How to brown chicken breast in oven is a simple skill that transforms everyday cooking. You now know the importance of a hot oven, a dry surface, and the right pan. The steps are easy to follow and the results are consistently impressive. A golden crust and a juicy chicken breast are within reach every time you turn on the oven.
Remember to pat the chicken dry, season generously, and avoid overcrowding the pan. Let the chicken rest after baking to lock in moisture. These small habits make a huge difference. Whether you are cooking for one or feeding a family, oven-baked chicken becomes a reliable, delicious staple. Start with this method and enjoy perfectly browned chicken every single time.
Frequently Asked Questions
Can I brown chicken breast in oven without a cast iron skillet?
Yes, you can use any heavy oven-safe skillet or a baking sheet with a wire rack. The key is preheating the pan in the oven before adding the chicken. A hot surface creates the immediate sizzle needed for a good crust. Stainless steel or heavy aluminum pans work well too.
How do I know when browned chicken breast is fully cooked?
The only reliable way is to use a meat thermometer. Insert it into the thickest part of the breast. The internal temperature must reach 165°F (74°C). The chicken may still look slightly pink near the bone, but the temperature ensures it is safe to eat.
Should I cover the chicken with foil while baking?
No, do not cover the chicken if you want a golden crust. Foil traps steam and prevents browning. Leave the chicken uncovered for the entire baking time. If the top browns too quickly, tent it loosely with foil only for the last few minutes.
Can I brown frozen chicken breast in the oven?
It is not recommended. Frozen chicken cooks unevenly and releases a lot of moisture, which prevents browning. Always thaw chicken completely in the refrigerator before baking. Pat it dry thoroughly for the best crispy, golden result.
What is the best seasoning for oven-browned chicken breast?
A simple mix of salt, pepper, garlic powder, and smoked paprika works beautifully. Fresh herbs like rosemary or thyme add a wonderful aroma. For a Mediterranean twist, use lemon zest and oregano. The seasoning should be applied to a dry surface so it sticks and forms part of the crust.
How long can I store cooked browned chicken breast?
Cooked chicken keeps in the refrigerator for 3 to 4 days. Store it in an airtight container. For longer storage, freeze the chicken for up to 3 months. Reheat gently in the oven at 325°F to keep the meat moist and the crust from getting tough.