When To Tent A Turkey In The Oven For Perfect Results
Knowing when to tent a turkey in the oven makes all the difference between dry meat and a juicy masterpiece. Tenting with aluminum foil during the last phase of roasting locks in moisture and helps the turkey cook evenly. You should tent your turkey for roughly the final 45 to 60 minutes of cooking time, once the skin turns a deep golden brown. This simple step keeps the breast meat tender while letting the thighs reach the right internal temperature. Mastering the turkey tenting technique is the easiest way to elevate your holiday roast.
Roasting a turkey in the oven is one of the most rewarding cooking experiences you can have. But let us be honest. It is also one of the most intimidating. The fear of dry breast meat, uneven cooking, or burnt skin keeps a lot of home cooks up at night. The good news is that a simple technique called tenting solves most of these problems. So, when should you tent a turkey in the oven? That is exactly what we are going to cover today.
Whether you are preparing a Thanksgiving feast or a Sunday family dinner, understanding turkey tenting will change your results completely. This guide breaks down everything you need to know. We will walk through the timing, the method, and the common mistakes to avoid. By the end, you will feel confident enough to roast the best turkey of your life.
Key Takeaways
- Tent at the Right Time: Cover the turkey with foil during the last 45 to 60 minutes of roasting to prevent over-browning and drying out.
- Use the Right Materials: Heavy-duty aluminum foil or a loose tent shape works best to trap heat without pressing against the skin.
- Check Internal Temperature: The turkey is done when the breast reaches 165°F and the thigh reaches 175°F.
- Let It Rest: Always let your turkey rest for at least 20 to 30 minutes after removing it from the oven.
- Avoid Common Mistakes: Do not tent too early, and do not seal the foil tightly, as this traps too much steam and prevents crispy skin.
- Adjust for Turkey Size: Larger birds may need a longer tenting period, while smaller turkeys need less time under the foil.
- Bonus Crispy Skin Tip: Remove the foil for the final 10 minutes if you want extra crispy skin on your roast.
📑 Table of Contents
- What Does It Mean to Tent a Turkey?
- When Should You Start Tenting Your Turkey?
- How to Properly Tent a Turkey in the Oven
- Turkey Tenting vs. No Tenting: What Is the Difference?
- What Temperature Should You Roast a Turkey At?
- Common Mistakes to Avoid When Tenting a Turkey
- Expert Tips for the Perfect Oven-Roasted Turkey
- Key Takeaways for Turkey Tenting Success
- Final Thoughts on Turkey Tenting
What Does It Mean to Tent a Turkey?
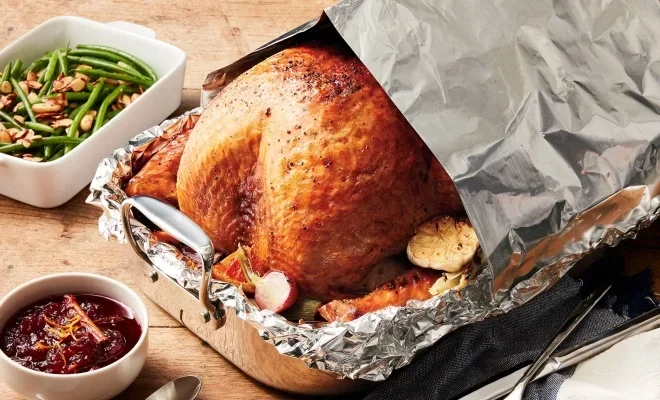
Tenting a turkey means placing a loose cover of aluminum foil over the bird during the roasting process. The foil creates a small tent shape that hovers above the turkey without touching the surface. This simple trick has been used by home cooks and professional chefs for decades. It is one of the most effective ways to control how your turkey cooks in the oven.
The purpose of tenting is twofold. First, it slows down the browning process. Turkey skin can go from golden to burnt surprisingly fast. Second, it traps moisture inside the oven cavity. This moisture keeps the meat from drying out, especially in the breast area. Think of it as a gentle shield that gives your turkey a little extra care during the final stretch of cooking.
Why Is Tenting Important for Roast Turkey?
Not every turkey needs to be tented. In fact, tenting too early can actually work against you. The skin needs direct exposure to oven heat to become crispy. If you cover the bird too soon, you end up with pale, soft skin instead of that beautiful golden crunch everyone loves.
Tenting becomes important during the second half of the cooking process. By that point, the skin has had enough time to brown properly. The turkey has also started to develop flavor through the Maillard reaction. Covering it now keeps the juices inside while the turkey finishes cooking through evenly. Without tenting, the outer parts of the bird can dry out while the inside is still reaching the right temperature.
When Should You Start Tenting Your Turkey?
This is the million-dollar question. The answer depends on a few key factors. The size of your bird, the oven temperature, and the starting temperature of the turkey all play a role. But as a general rule, you should tent your turkey during the last 45 to 60 minutes of roasting time.
For a standard 12 to 14-pound turkey roasting at 325°F, this usually means tenting around the three-hour mark. For smaller birds under 10 pounds, you might only need 30 minutes of tenting. Larger birds over 20 pounds could benefit from a full hour or more of tenting time.
Signs That It Is Time to Tent
How do you know when the moment has arrived? Watch for these clear signals:
- The skin has turned deep golden brown. If the turkey is already a rich, caramel color, it is time to cover it.
- The skin is browning too quickly. If you notice dark patches forming, the turkey needs protection from direct heat.
- The internal temperature of the breast is around 150°F to 155°F. The turkey still needs time to finish cooking, and tenting helps it do so gently.
- The thighs are close to done. Dark meat cooks faster than white meat. Tenting balances the cooking process.
Using a meat thermometer is essential here. Do not rely on time alone. Every oven runs differently, and every turkey has a unique shape and density. A reliable meat thermometer takes the guesswork out of the process entirely.
How to Properly Tent a Turkey in the Oven
Tenting sounds simple, but there is a right way and a wrong way to do it. The goal is to create a loose cover that allows hot air to circulate while still trapping enough moisture to protect the meat. Here is how to do it step by step.
Step 1: Choose the Right Foil
Use heavy-duty aluminum foil for the best results. Regular foil tears easily and does not hold its shape well. Heavy-duty foil creates a more stable tent that will not collapse onto the turkey during roasting. You can also use parchment paper if you prefer a non-reactive option, though foil works better for heat retention.
Step 2: Shape the Tent Correctly
Tear off a sheet of foil that is large enough to cover the entire turkey with some overhang. Crumple it loosely into a dome shape. Do not press the foil flat against the bird. There should be several inches of space between the foil and the turkey surface. This air gap is what creates the insulating effect.
Place the tent over the turkey, making sure the edges of the foil are tucked into the roasting pan. You do not want the foil to touch the sides of the oven or block the vents. A loose, tent-like shape allows steam to escape while still keeping the moisture close to the meat.
Step 3: Monitor the Turkey While Tented
Once the turkey is tented, continue roasting and checking the internal temperature regularly. The tenting process slows the cooking slightly, so the turkey will need extra time to reach the target temperature. Keep an eye on the thermometer and adjust your timing accordingly.
Here is a quick reference for tenting based on turkey size:
- 8 to 10 pounds: Tent for the final 30 to 40 minutes.
- 12 to 14 pounds: Tent for the final 45 to 60 minutes.
- 16 to 20 pounds: Tent for the final 60 to 75 minutes.
- Over 20 pounds: Tent for the final 75 to 90 minutes.
Turkey Tenting vs. No Tenting: What Is the Difference?
Some cooks prefer to roast their turkey without ever tenting it. This approach can work, but it requires more attention and experience. Let us compare the two methods side by side so you can decide which works best for you.
| Factor | With Tenting | Without Tenting |
|---|---|---|
| Moisture Retention | Excellent. The foil traps steam and keeps meat juicy. | Good, but requires careful monitoring to avoid dryness. |
| Skin Crispiness | Good, but slightly less crispy since foil blocks direct heat. | Excellent. The skin gets direct oven heat the entire time. |
| Risk of Over-Browning | Very low. The foil protects the skin. | Higher. The skin can burn if not watched closely. |
| Ease of Cooking | Easier. Less hands-on attention needed. | Harder. Requires frequent checking and basting. |
| Best For | Beginners, large birds, and holiday meals. | Experienced cooks who prioritize crispy skin. |
Most home cooks benefit from tenting. It is forgiving and reduces stress. If you are new to roasting turkey, tenting gives you a safety net. You can focus on getting the timing right without worrying about the skin burning.
Can You Tent Too Early?
Yes, and this is one of the most common mistakes people make. If you tent your turkey too early in the cooking process, the skin will not crisp up. Instead, it will stay pale and soft. The steam trapped under the foil prevents the skin from dehydrating, which is exactly what you need for a crispy finish.
To avoid this mistake, wait until at least the halfway point of cooking before tenting. By then, the skin has had enough exposure to oven heat to start developing color and texture. Trust the process and let the turkey brown first.
What Temperature Should You Roast a Turkey At?
Most experts recommend roasting a turkey at 325°F. This temperature cooks the bird evenly without burning the outside before the inside is done. Some cooks prefer a higher temperature of 350°F for a shorter cooking time, but 325°F gives you more control and reduces the risk of dry meat.
Here are some temperature guidelines based on turkey weight:
- 8 to 10 pounds: About 2.5 to 3 hours at 325°F.
- 12 to 14 pounds: About 3 to 3.5 hours at 325°F.
- 16 to 20 pounds: About 3.5 to 4 hours at 325°F.
- Over 20 pounds: About 4 to 5 hours at 325°F.
Remember that these times are approximate. The real indicator of doneness is the internal temperature. The USDA recommends cooking turkey to an internal temperature of 165°F in the thickest part of the breast and 175°F in the thigh. Always use a digital meat thermometer for the most accurate readings.
Should You Stuff Your Turkey?
Stuffing is a classic tradition, but it adds complexity to the cooking process. A stuffed turkey takes longer to cook, and the stuffing must reach 165°F to be safe. If you do stuff your turkey, you may need to extend the tenting time slightly to ensure the stuffing cooks through without overcooking the bird.
For beginners, cooking stuffing separately is often the safer choice. It gives you more control over cooking times and temperatures. You still get all the flavor without the added risk.
Common Mistakes to Avoid When Tenting a Turkey
Even experienced cooks make mistakes when tenting a turkey. Here are the most common errors and how to avoid them.
Mistake 1: Pressing the Foil Against the Turkey
The foil should always form a loose tent. If you press it directly against the turkey, you trap steam against the skin. This creates soggy, pale skin instead of crispy, golden skin. Keep that air gap between the foil and the bird. The space is what makes tenting effective.
Mistake 2: Tenting for the Entire Cooking Time
Some people cover their turkey with foil from the very beginning and leave it there the whole time. This is a big mistake. The turkey needs open oven time to develop flavor and color. Tenting for the entire cook results in a pale, steamed bird with no crispy skin. Always wait until the last phase of roasting before covering the turkey.
Mistake 3: Using Thin or Small Pieces of Foil
A flimsy piece of foil will tear and fall apart during roasting. Use a large sheet of heavy-duty foil to create a sturdy tent. If the foil collapses onto the turkey, it defeats the purpose entirely and can cause uneven cooking.
Mistake 4: Forgetting to Rest the Turkey
Tenting and resting are two different things. Tenting happens during oven roasting. Resting happens after you take the turkey out of the oven. Always let your turkey rest for at least 20 to 30 minutes before carving. This allows the juices to redistribute throughout the meat. If you skip this step, the turkey will lose moisture when you cut into it, no matter how perfectly you roasted it.
Expert Tips for the Perfect Oven-Roasted Turkey
Tenting is just one piece of the puzzle. Here are some additional tips from experienced cooks to help you achieve the best possible results every time.
Brine or Dry Brine Before Roasting
Brining is one of the best things you can do to ensure juicy turkey. A wet brine involves soaking the bird in a saltwater solution for 12 to 24 hours before cooking. A dry brine is simpler. You just rub salt and seasoning directly onto the turkey and let it rest uncovered in the refrigerator overnight. Both methods help the meat retain moisture during roasting.
Bring the Turkey to Room Temperature First
Take the turkey out of the refrigerator about one hour before roasting. A turkey that starts at room temperature cooks more evenly than one that goes straight from the fridge into a hot oven. This simple step reduces cooking time and helps prevent uneven doneness.
Baste Regularly
Basting the turkey every 45 minutes or so keeps the surface moist and adds flavor. Use the juices that collect in the bottom of the roasting pan. A basting brush or bulb syringe works well for this task. Just be careful not to open the oven door too often, as this can cause temperature fluctuations.
Use a Roasting Rack
A roasting rack elevates the turkey above the pan, allowing hot air to circulate underneath. This promotes even cooking and prevents the bottom from becoming soggy. If you do not have a rack, you can use chopped vegetables like onions and carrots as a stand for the turkey.
Add Aromatics Inside the Cavity
Stuffing the turkey cavity with aromatics like lemon halves, garlic cloves, fresh herbs, and onion quarters adds incredible flavor to the meat. The steam created by these ingredients during roasting infuses the turkey from the inside out. This is a simple trick that elevates the flavor of any roast turkey.
Key Takeaways for Turkey Tenting Success
Let us bring it all together. Here is what you need to remember about when to tent a turkey in the oven:
- Tent during the final 45 to 60 minutes of roasting for most standard-sized birds.
- Wait until the skin is deep golden brown before covering the turkey with foil.
- Create a loose tent shape with heavy-duty aluminum foil, leaving space between the foil and the bird.
- Use a meat thermometer to check that the breast reaches 165°F and the thigh reaches 175°F.
- Let the turkey rest for 20 to 30 minutes after removing it from the oven before carving.
- Avoid tenting too early to preserve crispy skin and even browning.
Once you master the art of tenting, roasting turkey becomes much less stressful. You will have more time to enjoy the holidays with your family instead of worrying about the bird in the oven. Practice this technique a few times, and it will become second nature.
Final Thoughts on Turkey Tenting
Roasting a turkey is one of those cooking skills that everyone should have in their kitchen. It brings people together. It creates memories. And when you get it right, the results are absolutely incredible. The tenting technique is the secret weapon that takes your turkey from good to extraordinary.
Start with a well-brined turkey. Season it generously. Roast it at 325°F. And tent it during the last phase of cooking. Follow these steps, and you will serve a juicy, flavorful, golden-brown turkey that your family and guests will talk about for weeks.
Remember, cooking is about learning and improving with each attempt. Even if your first turkey is not perfect, you will gain valuable experience. Every roast teaches you something new about your oven, your bird, and your technique. So go ahead. Tent that turkey with confidence. You have got this.
Frequently Asked Questions
When should I tent my turkey in the oven?
You should tent your turkey during the last 45 to 60 minutes of roasting time. This is usually when the skin has turned deep golden brown and the internal temperature of the breast is around 150°F to 155°F. Tenting at this stage protects the meat from drying out while the turkey finishes cooking through evenly.
Can you tent a turkey too early?
Yes, tenting too early is one of the most common mistakes. If you cover the turkey before the skin has had enough time to brown, the foil traps steam and prevents the skin from crisping up. Always wait until at least the halfway point of cooking, or until the skin is a rich golden color, before tenting.
What kind of foil is best for tenting a turkey?
Heavy-duty aluminum foil is the best choice for tenting a turkey. It is strong enough to hold its shape without tearing and creates a more effective seal for trapping moisture. Regular thin foil can rip easily and does not insulate as well. You can also use parchment paper as an alternative if you prefer.
How long should a turkey rest after roasting?
A turkey should rest for at least 20 to 30 minutes after being removed from the oven. During this resting period, the juices inside the meat redistribute and settle, making the turkey juicier when you carve it. Tent the turkey loosely with foil during resting to keep it warm, but do not seal it tightly.
Does tenting a turkey make the skin less crispy?
Tenting can result in slightly less crispy skin compared to leaving the turkey uncovered the entire time. However, the trade-off is worth it for most cooks because tenting keeps the meat moist and prevents over-browning. If you want extra crispy skin, remove the foil for the final 10 minutes of roasting.
What internal temperature should turkey reach?
The USDA recommends that turkey breast reach an internal temperature of 165°F and turkey thighs reach 175°F. Always insert the meat thermometer into the thickest part of the breast and the innermost part of the thigh, avoiding bone and gristle. Using a reliable digital thermometer is the best way to ensure your turkey is perfectly cooked.
=== CONCLUSION ===
Knowing when to tent a turkey in the oven is one of the simplest yet most impactful techniques you can learn. It protects your meat from drying out, prevents the skin from burning, and gives you peace of mind during what can be a stressful cooking process. The key is timing. Wait until the skin is golden brown, create a loose foil tent, and continue roasting until the internal temperature reaches 165°F in the breast and 175°F in the thigh.
Combine tenting with proper brining, room-temperature starting, and adequate resting time, and you will consistently roast a turkey that is juicy, flavorful, and visually stunning. Whether you are a beginner or a seasoned cook, these tips will help you serve a holiday roast that everyone will love. So the next time you pull out your roasting pan, remember these guidelines. Your perfectly tented turkey is just one oven cycle away.