How To Bake Bbq Ribs In Oven With Amazing Smoky Flavor
How To Bake Bbq Ribs In Oven is the easiest way to get tender, juicy ribs with deep smoky flavor right at home. This guide covers everything from choosing the best pork ribs to applying the perfect dry rub and baking them low and slow. You will learn simple techniques for wrapping, glazing, and resting ribs that guarantee fall-off-the-bone tenderness. Whether you are a beginner or experienced cook, these steps make BBQ ribs recipe success effortless.
There is something magical about BBQ ribs that makes everyone at the table go quiet with satisfaction. While many people think you need a smoker or outdoor grill to get great ribs, the truth is your oven can do wonders. Oven baked ribs give you consistent heat, easy temperature control, and the freedom to cook year-round regardless of the weather.
The key to perfect oven baked ribs is understanding a few simple principles. Low heat, patience, and the right seasoning transform tough cuts into fall-off-the-bone tenderness. This article gives you everything you need to know to bake ribs in your oven like a pro.
Key Takeaways
- Choose the right ribs: Baby back ribs cook faster and are great for beginners, while spare ribs offer more rich flavor for experienced cooks.
- Remove the rib membrane: This simple step dramatically improves texture and lets your dry rub penetrate the meat fully.
- Use the low and slow method: Baking at 275 degrees ensures tender, juicy ribs with a deep smoky flavor.
- Add smoke with wood chips: A small foil pouch of soaked wood chips in the oven adds authentic barbecue flavor without a grill.
- Wrap in foil partway through: This steams the ribs and keeps them moist during the long bake.
- Glaze at the end: Applying BBQ sauce during the final high-heat phase creates a beautiful, sticky glaze.
- Rest before serving: Letting ribs rest for 10 to 15 minutes locks in juices and makes every bite better.
📑 Table of Contents
How To Bake Bbq Ribs In Oven: Your Complete Guide
Baking ribs in the oven might sound simple, but there is a real art to getting them just right. The goal is to break down the connective tissue in the meat slowly so every bite melts in your mouth. A good BBQ ribs recipe balances heat, time, and flavor perfectly.
The most important thing to remember is the low and slow approach. You want your oven temperature to stay moderate so the fat renders out gently and the meat stays moist. Rushing this process with high heat will give you tough, dry ribs. Patience is your best friend when it comes to how to bake BBQ ribs in oven.
Most experienced cooks follow what is called the 3-2-1 method for smoking ribs, but you can adapt this for oven baking too. The idea is simple: three hours of cooking, two hours wrapped in foil, and one hour unwrapped with sauce. For the oven, you adjust the times slightly but keep the same general principle of low heat and gradual cooking.
Why Oven Baking Works So Well
Your oven provides even heat from all sides, which is something a grill or smoker cannot always do consistently. This means your ribs cook more uniformly, with no hot spots that burn one side. Oven baked ribs also allow you to control the environment inside the oven, adding smoke flavor through wood chips or liquid smoke if you want that authentic barbecue taste.
Another big advantage is convenience. You do not need to monitor charcoal or worry about wind affecting your fire. You set the temperature, prep your ribs, and let the oven do the work. This makes how to bake BBQ ribs in oven one of the most accessible methods for home cooks of all skill levels.
The 3-2-1 Method Adapted for Ovens
The 3-2-1 method was originally designed for smokers, but it works beautifully in the oven too. The first phase is three hours of uncovered cooking at low heat, where the ribs absorb smoke and develop a flavorful bark. The second phase is two hours wrapped in foil, where steam gently tenderizes the meat. The final phase is one hour unwrapped with sauce, where the glaze sets and the exterior becomes sticky and caramelized.
You can adjust these times based on your rib type and oven performance. Baby back ribs may only need a two-hour wrap phase, while thicker spare ribs might need closer to three hours. The key is to monitor internal temperature rather than relying solely on the clock.
Choosing the Best Ribs for Oven Baking
Not all ribs are created equal, and choosing the right cut makes a huge difference in your final result. There are a few common types of pork ribs you can buy, and each one behaves a little differently in the oven.
Types of Pork Ribs
Baby back ribs are the most popular choice for oven baking. They come from the top of the rib cage near the spine and are leaner and more tender than other cuts. They cook faster, usually in about 2.5 to 3 hours, and have a mild, slightly sweet flavor that pairs well with almost any BBQ sauce.
Spare ribs come from the lower part of the rib cage near the belly. They are fattier and meatier than baby backs, which means they need a longer cooking time, usually around 3.5 to 4 hours. The extra fat keeps them juicy during the long bake, and they have a richer, more robust flavor.
St. Louis-style ribs are actually spare ribs that have been trimmed to create a uniform rectangular shape. They cook evenly and are very popular among competition pitmasters. If you want the most consistent results, St. Louis-style ribs are an excellent choice for oven baking.
| Rib Type | Cooking Time | Meatiness | Best For |
|---|---|---|---|
| Baby Back Ribs | 2.5 – 3 hours | Lean and tender | Quick cooks, beginners |
| Spare Ribs | 3.5 – 4 hours | Rich and meaty | Flavor lovers |
| St. Louis-Style | 3 – 3.5 hours | Balanced | Even cooking, presentation |
No matter which type you choose, look for ribs with a good layer of fat and meat that is not too thin. The fat will baste the meat as it cooks, keeping your ribs moist and flavorful. Avoid ribs that look pale or dry, as they will not have much flavor after baking.
What to Look for When Buying
When you are shopping for pork ribs, look for meat that is pink and firm, not gray or slimy. The fat should be creamy white, not yellow. Yellow fat can indicate the animal was older, which may affect the texture and taste. Choose ribs with even spacing between the bones, as this ensures uniform cooking.
If you are buying from a butcher, ask them to trim the ribs for you if needed. Many butchers will remove the tip of the sternum bone and excess cartilage, making the ribs easier to handle and more uniform in shape. This small step saves you time and effort later.
Preparing Your Ribs for the Oven
Proper preparation is the foundation of great oven baked ribs. Taking the time to prep your ribs correctly ensures even cooking and maximum flavor. This step is where many beginners cut corners, but it really does make a difference.
Removing the Membrane
Every rack of ribs has a thin, papery membrane on the bone side. This membrane, also called the rib membrane, does not soften during cooking and can create a tough, chewy layer on your ribs. Removing it is one of the most important steps in any BBQ ribs recipe.
To remove the membrane, flip your ribs bone-side up and locate the thin layer at the back. Use a butter knife to gently lift one corner, then grab it with a paper towel for better grip. Pull it off slowly and steadily. It might take a little practice, but once you get the hang of it, it becomes second nature.
Some people skip this step because it seems fussy, but trust me, your taste buds will thank you. The membrane blocks seasoning from reaching the meat and traps steam that can make the surface soggy. Removing it is a small effort with a big payoff.
Applying the Dry Rub
A good dry rub is the soul of great ribs. You can buy pre-made rubs from the store, but making your own is simple and gives you full control over the flavor. A classic rib rub combines brown sugar, paprika, garlic powder, onion powder, salt, black pepper, and a touch of cayenne for heat.
Apply the rub generously to all sides of the ribs at least one hour before cooking, or even the night before in the fridge. The salt in the rub draws moisture to the surface, which then dissolves the seasonings and creates a beautiful bark on the outside of the ribs. This bark is what gives oven baked ribs that deep, complex flavor profile.
Do not be shy with your seasoning. The long cooking time can wash away flavors, so a generous coat of rub ensures your ribs stay well-seasoned from edge to center. Massage the rub into the meat with your hands, pressing it firmly so it adheres to the surface.
Creating Amazing Smoky Flavor
One of the biggest challenges of baking ribs in the oven is replicating that authentic smoky taste you get from a grill. But with a few clever tricks, you can add a rich smoky flavor to your BBQ ribs recipe without any special equipment.
Building Your Rub for Depth
The foundation of smoky flavor starts in your rub. Ingredients like smoked paprika, chipotle powder, and a touch of dark brown sugar all contribute to that deep, roasted taste. Brown sugar caramelizes in the oven, creating a sweet, slightly charred crust that complements the savory spices perfectly.
Apple cider vinegar is another secret weapon. You can mix a small amount into your BBQ sauce or spritz your ribs with a vinegar-based liquid during cooking. It adds brightness and helps balance the sweetness of the sugar, creating a more complex flavor profile that keeps people coming back for more.
Consider adding a teaspoon of instant coffee grounds or cocoa powder to your rub. These ingredients add a subtle depth that mimics the roasted, earthy notes you get from real wood smoke. They blend into the background and enhance the overall flavor without tasting like coffee or chocolate.
Using Wood Chips for Extra Smoke
If you want to go the extra mile, try adding soaked wood chips to a foil pouch in your oven. Soak chips in water for about 30 minutes, then place them in a small aluminum foil pouch with a few holes poked in the top. Put the pouch on the lowest oven rack beneath your baking sheet or rack where the ribs sit.
As the oven heats up, the wood chips will begin to smolder and release a light smoke that infuses your ribs with an authentic charcoal flavor. Hickory and applewood chips are popular choices. Hickory gives a strong, classic smoke flavor, while applewood adds a milder, slightly sweet aroma that pairs beautifully with pork.
You do not need a lot of smoke to make a difference. Just a small pouch of chips adds enough flavor to make your oven baked ribs taste like they were cooked over real coals. This is one of the best-kept secrets for achieving smoky flavor in a home kitchen. Replace the chips every 90 minutes for a continuous, subtle smoke throughout the bake.
Step-by-Step Baking Process
Now that your ribs are prepped and seasoned, it is time to put them in the oven. Following a clear process ensures consistent, delicious results every time. Here is exactly how to bake BBQ ribs in the oven for the best outcome.
Setting the Oven Temperature
Preheat your oven to 275 degrees Fahrenheit. This low temperature is the heart of the low and slow method. At 275 degrees, the fat renders slowly, the collagen in the meat breaks down, and the ribs become incredibly tender without drying out.
Place your oven rack in the center position. This ensures even heat circulation around the ribs. If you are using a baking sheet, line it with aluminum foil for easy cleanup, but do not cover the ribs themselves at this stage. You want the heat to circulate freely around the meat so the surface dries out slightly and forms that desirable bark.
Position the ribs vertically if your oven allows it, standing them on their narrow edge. This exposes more surface area to the heat and helps the ribs cook more evenly. If you bake them flat, make sure to rotate the pan halfway through for even browning.
Wrapping and Cooking
After about two hours of baking, your ribs will have developed a nice color and the meat will have pulled back from the bones slightly. This is the perfect time to wrap them in heavy-duty aluminum foil.
Lay out two large sheets of foil, place the ribs in the center, and add a splash of apple cider vinegar or a small amount of apple juice to the foil. Wrap the ribs tightly, sealing the edges to create a steam pocket. The steam keeps the meat moist and helps finish breaking down the tough connective tissue.
Return the wrapped ribs to the oven and continue baking for another one to two hours, depending on the type of ribs you are using. Baby back ribs usually need about one more hour, while spare ribs may need closer to two hours. The meat thermometer is your best guide here.
Glazing with BBQ Sauce
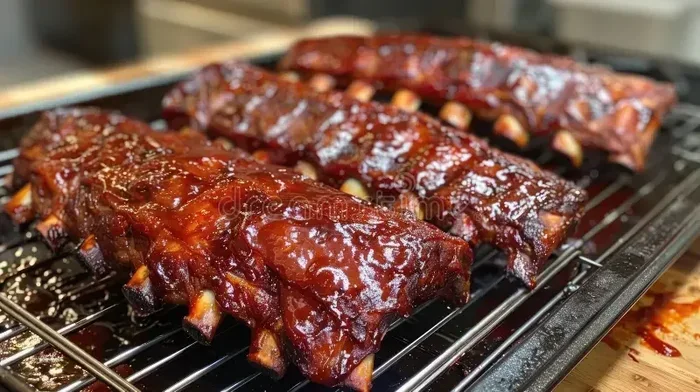
The final step is applying your BBQ sauce and giving the ribs a nice glaze. Unwrap the ribs carefully, discarding the juices in the foil. Place the ribs on a baking sheet or rack, bone-side up, and brush a thin layer of sauce over all sides.
Increase the oven temperature to 375 degrees Fahrenheit and return the ribs for 15 to 20 minutes. This higher heat caramelizes the sauce, creating a sticky, glossy finish. Watch them closely during this stage to prevent the sauce from burning, as sugar in the sauce can scorch quickly at higher temperatures.
You can repeat the sauce application once or twice for a thicker glaze. Each layer adds more flavor and creates that beautiful lacquered look that makes oven baked ribs look as good as they taste. Some cooks like to broil the ribs for the last two minutes to get extra caramelization, but this requires very close attention to prevent burning.
Using a Meat Thermometer
A meat thermometer is an essential tool for baking ribs. You want the internal temperature to reach at least 195 degrees Fahrenheit for tender, pull-apart ribs. The collagen in the meat needs this level of heat to fully break down into gelatin, which is what gives ribs that silky, melt-in-your-mouth texture.
Insert the thermometer into the thickest part of the meat, avoiding the bone, as bones conduct heat differently and can give false readings. If your ribs have not reached 195 degrees after the recommended time, simply continue baking in 30-minute increments until they are done. Do not rush this step, as undercooked ribs will be tough and chewy.
Serving, Storing, and Pro Tips
Getting your ribs out of the oven is just the beginning. How you serve, store, and troubleshoot your rib baking makes a big difference in the final experience.
How to Rest Ribs Properly
Resting your ribs for 10 to 15 minutes after pulling them from the oven is crucial. This allows the juices to redistribute throughout the meat, making every bite moist and flavorful. If you cut into them immediately, the juices will run out and your ribs will be drier.
Place the ribs on a cutting board and tent them loosely with foil. This keeps them warm without trapping too much steam, which could make the bark soggy. Use this resting time to prepare your sides and warm up any additional BBQ sauce for serving.
Storing Leftovers
Leftover ribs store beautifully in the refrigerator for up to four days. Place them in an airtight container or wrap them tightly in foil. When you are ready to eat them, reheat gently in the oven at 250 degrees Fahrenheit to keep the meat moist. Microwaving can make ribs tough and rubbery, so the oven is always the better choice for reheating.
You can also freeze cooked ribs for up to three months. Wrap them tightly in plastic wrap and foil, or place them in a freezer-safe bag. Thaw overnight in the refrigerator before reheating for the best results. Frozen ribs can taste almost as good as fresh, especially if you add a little extra sauce when reheating.
Common Mistakes to Avoid When Baking Ribs
Even experienced cooks can make mistakes that affect the final result. Being aware of these common pitfalls helps you avoid them and achieve better ribs every time.
Skipping the membrane removal is one of the most common errors. That thin membrane traps steam and prevents your rub from penetrating the meat. Take the extra few minutes to remove it, and your ribs will be noticeably better in both texture and flavor.
Using too high a temperature is another mistake many people make. It is tempting to crank up the heat to speed things along, but this dries out the meat and prevents the fat from rendering properly. Stick with 275 degrees and let the oven do the work patiently.
Not enough seasoning is a subtle but significant issue. Ribs need a generous amount of rub because the long cooking time can wash away flavors. Do not be shy with your seasoning, especially with salt and sugar, which form the foundation of a great bark on the outside.
Opening the oven door too often drops the temperature and extends cooking time. Every time you open the door, heat escapes and your ribs spend extra time in the temperature danger zone. Trust the process and check on your ribs only when necessary, about every 45 minutes to an hour.
Quick Tips for Perfect Oven Baked Ribs
- Use the 3-2-1 method as a guide, but adjust based on your rib type and oven performance.
- Soak wood chips for at least 30 minutes before using them for smoke flavor.
- Apply sauce in thin layers during the final bake for the best glaze without burning.
- Let ribs rest for at least 10 minutes before cutting to lock in juices.
- Invest in a good meat thermometer to ensure perfect doneness every time.
- Save the foil juices from wrapping and drizzle them over the ribs before saucing for extra flavor.
- Experiment with different wood chips like cherry, mesquite, or pecan to find your favorite smoke profile.
Expert Insights on Achieving Restaurant-Quality Ribs at Home
Professional pitmasters share a few insights that can elevate your home rib game to the next level. These tips come from years of experience and can make a noticeable difference in your results.
Start with room temperature ribs by taking them out of the refrigerator about 30 minutes before cooking. Cold ribs placed in a hot oven cook unevenly, with the outside overcooking before the inside is done. Bringing them to room temperature ensures more consistent results throughout the rack.
Double wrapping in foil during the steaming phase helps prevent leaks and keeps the ribs surrounded by moisture. Some cooks also add a small pat of butter or a drizzle of honey to the foil for extra richness and flavor. This simple addition creates a glossy, succulent interior that is hard to resist.
Use a spray bottle with apple cider vinegar to spritz your ribs every 45 minutes during the first few hours of baking. This keeps the surface moist and helps the rub form a beautiful bark. It is a simple technique that makes a real difference in texture and flavor.
Do not be afraid of the stall. When ribs reach an internal temperature of around 150 to 165 degrees, the cooking can seem to stall as the moisture evaporates and cools the meat. This is normal and part of the process. Wrapping the ribs at this stage helps push through the stall and continue cooking toward tenderness.
Conclusion
Learning how to bake BBQ ribs in oven is a rewarding skill that opens up a world of delicious possibilities. With the right ribs, a flavorful rub, and a little patience, you can create oven baked ribs that rival anything from a competition smoker or backyard grill. The low and slow method, combined with a few clever tricks like wood chips and foil wrapping, gives you that authentic smoky flavor and fall-off-the-bone tenderness right in your own kitchen.
Remember that practice makes perfect. Every batch of ribs you bake teaches you something new about your oven and your preferences. Do not be afraid to experiment with different rubs, sauces, and wood chip varieties to find your personal favorite style. The beauty of how to bake BBQ ribs in oven is that it is forgiving and adaptable to your taste.
So fire up your oven, grab a rack of pork ribs, and get ready to impress your family and friends with a rack of tender, flavorful, BBQ ribs that will have everyone asking for seconds. With this guide in hand, you have everything you need to succeed. Happy baking!
Frequently Asked Questions
Can I bake ribs at a higher temperature to save time?
You can, but it will affect the texture and flavor. Higher temperatures dry out the meat before the collagen has time to break down. If you are short on time, try 300 degrees instead of 275, but expect slightly less tender results. The low and slow method is truly the best approach for fall-off-the-bone ribs.
How do I know when ribs are done?
The best way to tell is by using a meat thermometer. Ribs are done when they reach an internal temperature of 195 degrees Fahrenheit. You can also check by bending the rack with tongs. If the surface cracks slightly, the ribs are ready. The meat should pull back from the bone edges by about a quarter inch.
Can I use frozen ribs for oven baking?
Yes, but you should thaw them first for the best results. Place frozen ribs in the refrigerator overnight to defrost. Cooking ribs from frozen leads to uneven cooking, with the outside overcooking before the inside is done. Thawed ribs give you much more consistent results for your BBQ ribs recipe.
What is the best BBQ sauce for oven baked ribs?
The best sauce is the one you enjoy most! For oven baking, choose a thicker sauce that will not run off during the high-heat glazing phase. Kansas City-style sauces with a tomato and molasses base work wonderfully. You can also brush on a thin layer during the last 15 minutes and repeat for a richer glaze on your oven baked ribs.
Do I need to flip the ribs during baking?
No, you do not need to flip them if you bake them bone-side down. The bones act as a natural rack and protect the meat from direct heat. If you bake them flat, rotate the pan halfway through for even browning. Many cooks find that keeping them bone-side down eliminates the need to flip entirely.
Can I reuse the leftover BBQ sauce?
Yes, you can reuse leftover sauce, but only if it has not been contaminated by raw meat juices. If you brushed sauce on the ribs before they were fully cooked, it is safest to discard it. However, if you used sauce only during the final glazing phase, it is safe to store and reuse. Always refrigerate leftover sauce within two hours of cooking.