How To Cook A Tenderloin Steak In The Oven Like A Pro
Want to How To Cook A Tenderloin Steak In The Oven like a pro? This guide shows you the simple reverse sear method for a perfectly juicy tenderloin steak every time. You’ll learn how to season, sear, and bake the steak to your exact doneness with just a meat thermometer and a hot pan.
There’s something truly special about a tenderloin steak that comes out of the oven. It’s one of the simplest yet most impressive things you can make at home. No grill required. No charcoal to light. Just a hot pan, a low oven, and a little patience. If you’ve ever wondered how to cook a tenderloin steak in the oven, you’re in the right place.
The oven method gives you complete control over the process. You set the temperature, you monitor the time, and you walk away while the steak does its thing. There are no flare-ups to manage and no guesswork about when to flip. The result is a steak that’s evenly cooked from edge to edge, with a deep, caramelized crust and a juicy, pink center that practically melts on your tongue.
In this guide, I’ll take you through every single step. You’ll learn how to pick the right cut, how to season it simply but effectively, and how to use the reverse sear technique to get restaurant-quality results every time. I’ll also share common mistakes to avoid and tips for slicing and serving. By the end, you’ll have the confidence to cook a tenderloin steak that will make any dinner feel special.
Key Takeaways
- Use the reverse sear method: Start in a low oven, then finish with a hard sear for an even, restaurant-quality crust.
- Bring the steak to room temperature: Take it out 30 minutes before cooking for even doneness.
- Invest in a meat thermometer: Pull the steak at 120°F for medium-rare and let it rest to reach 130°F.
- Rest your steak for 8 minutes: This keeps the juices locked in and prevents a dry cut.
- Season simply but generously: Kosher salt and cracked black pepper are all you need for a perfect tenderloin steak.
- Slice against the grain: Cut thin strips across the muscle fibers for maximum tenderness.
📑 Table of Contents
- How To Cook A Tenderloin Steak In The Oven: The Reverse Sear Method
- Choosing the Perfect Tenderloin Steak
- The Essential Prep: Seasoning and Tools
- Step-by-Step Oven Steak Recipe
- Resting and Slicing Your Steak
- Common Mistakes to Avoid
- Flavor Variations for Oven Steak
- Serving Suggestions and Pairings
- Conclusion
How To Cook A Tenderloin Steak In The Oven: The Reverse Sear Method
The reverse sear is the gold standard for oven steak, and once you try it, you’ll never go back. The idea is simple: you start the steak in a low oven, letting it heat up gently and evenly. Then you finish it with a blazing-hot sear on the stovetop. This two-step process gives you the most even doneness possible, with no gray band of overcooked meat. It’s the secret behind every perfect oven-baked steak.
Why the Reverse Sear Works So Well
When you cook a steak only on the stovetop, the heat has to travel from the outside in. That often leaves a gray band of overcooked meat just beneath the crust. The reverse sear flips this around. A low oven gently raises the internal temperature, and then a 60-second sear on each side creates that beautiful brown crust without overcooking the middle. How To Cook A Tenderloin Steak In The Oven using this method means you can hit 1-inch thick steaks to medium-rare every single time.
The low oven also gives you a huge window of time to prepare sides, set the table, or just relax. Because the oven temperature is so low, the steak can’t overcook quickly. You can pull it out when it’s a few degrees below your target, and the final sear will bring it right up. This makes the reverse sear incredibly forgiving, which is perfect for beginners and busy weeknights alike.
What You Need to Get Started
You don’t need fancy equipment, but a few tools make a big difference. A wire rack set inside a sheet pan is essential because it lets hot air circulate all around the steak. Without a rack, the bottom of the steak steams and turns pale instead of getting a nice sear. A cast iron skillet or oven-safe stainless steel pan is perfect for the final sear. These pans hold heat incredibly well and create a deep, flavorful crust.
And a reliable meat thermometer is non-negotiable. You’ll use it to check the internal temperature before the final sear. Other essentials include kosher salt, freshly cracked black pepper, and a high smoke-point oil like avocado or grapeseed. Some cooks like to add garlic cloves and fresh rosemary to the pan during the sear for extra aroma, but the basic method requires nothing more than salt, pepper, and a hot pan.
Setting the Oven Temperature
Preheat your oven to 250°F. This low temperature slowly brings the steak up to about 10 to 15 degrees below your target doneness. For a medium-rare tenderloin steak, you’ll pull it out of the oven when the internal temperature hits 115°F to 120°F. The oven will take about 10 minutes to preheat, and the steak will bake for 20 to 30 minutes depending on thickness.
Quick Tip: If your steak is thicker than 2 inches, you may need to increase the bake time slightly. Use the thermometer to check early and often. The oven does most of the work, so you can prep your sides or set the table while you wait. I usually set a timer for 20 minutes and then check every 5 minutes after that. This way, you never accidentally overcook the steak.
Choosing the Perfect Tenderloin Steak
The cut you buy matters more than you might think. Not all tenderloins are created equal, and picking the right one sets you up for success before you even turn on the oven. A great tenderloin steak starts at the butcher counter, so let’s talk about what to look for.
Thickness Is Everything
Look for a steak that is at least 1.5 inches thick, and ideally 2 inches. A thicker steak gives you a bigger margin for error. Thin steaks overcook in seconds, while a thick cut lets you nail the perfect internal temperature without drying out the edges. If you see a beautiful 2-inch beef tenderloin at the butcher counter, grab it. You can always trim it later, but you can’t make a thin steak thicker.
When buying a tenderloin steak, ask your butcher to cut it to your preferred thickness. Most supermarkets offer 1-inch and 1.5-inch cuts, but a good butcher will give you exactly what you need. A 2-inch steak might take a few extra minutes in the oven, but the results are worth it. The extra thickness allows you to build a deep crust without overcooking the center.
Understanding Marbling and USDA Grades
Marbling is the thin white streaks of fat running through the meat. More marbling means more flavor and juiciness. USDA Prime has the most marbling, followed by Choice and Select. For oven steak, USDA Choice is a great balance of quality and price. Avoid Select if you can, because it tends to be leaner and can dry out faster in the oven. When you’re learning how to cook a tenderloin steak in the oven, a well-marbled Choice cut will give you juicy results every time.
Beyond grades, look at the color of the meat. It should be a bright cherry-red with creamy white fat. Avoid any steak that looks brown or gray, as that indicates it’s been sitting too long. The fat should be firm and white, not yellowish. Yellow fat can indicate the cow was older, which might give a stronger flavor that not everyone enjoys.
Filet Mignon vs. Whole Tenderloin
Filet mignon is the tenderloin cut into individual steaks. A whole beef tenderloin is a long cylinder that you can slice yourself. Both work beautifully. Filet mignon is convenient and already trimmed, while a whole tenderloin gives you more control over thickness and can be more cost-effective for feeding a crowd. Either way, you’ll follow the same oven method. A whole tenderloin also lets you choose your exact preferred thickness, which is a huge advantage when you’re aiming for that perfect 2-inch cut.
The Essential Prep: Seasoning and Tools
Great steak starts long before it hits the heat. Proper prep is the secret to a steak that tastes amazing and looks stunning. Taking a few extra minutes here will pay off big time when you bite into that juicy, flavorful steak.
Simple Salt and Pepper Seasoning
Don’t overcomplicate it. Kosher salt and freshly cracked black pepper are all you need for a classic oven-baked steak. Apply the salt at least 40 minutes before cooking, or right before. The salt draws out moisture, dissolves, and then gets reabsorbed, seasoning the meat deeply from the inside out. Just before cooking, pat the steak dry with paper towels. Dry surfaces sear better and create that crave-worthy crust.
Some cooks like to add garlic powder, onion powder, or smoked paprika for extra depth. I prefer to keep it simple and let the quality of the beef speak for itself. A little salt and pepper on a great cut of tenderloin steak is all you need. If you want to experiment, try a sprinkle of smoked salt for a subtle barbecue-like flavor that pairs beautifully with the natural richness of the beef.
Must-Have Kitchen Tools
- Wire rack and sheet pan: This combo lets air flow underneath the steak, so it cooks evenly. No more pale, steamed bottoms.
- Cast iron skillet: Holds heat incredibly well and gives you a fantastic, even sear. A well-seasoned cast iron pan is a steak lover’s best friend.
- Instant-read meat thermometer: Pull the steak at the right moment. No guessing, no cutting into the meat and losing juices.
- Tongs: For flipping the steak without piercing it and losing those precious juices.
- Butter and garlic: Optional, but a garlic butter baste takes your steak to the next level. Just a few cloves of smashed garlic and a knob of butter in the pan during the final sear adds incredible richness.
Expert Insight: Many home cooks skip the wire rack and sear the steak directly on a sheet pan. This traps steam underneath and prevents a proper crust. The rack is a small investment that makes a huge difference in your oven-baked steak results. A simple wire rack costs just a few dollars and will last for years. I keep one in my oven at all times.
Step-by-Step Oven Steak Recipe
Now for the fun part. Follow these steps exactly, and you’ll have a steak that tastes like it came from a high-end restaurant. I’ll walk you through the entire process, from pulling the steak out of the fridge to slicing it at the table.
Preheating and Pan-Searing
First, remove the steak from the refrigerator 30 minutes before cooking. Let it come to room temperature. This is a crucial step that ensures even cooking. Meanwhile, preheat your oven to 250°F and place a wire rack inside a sheet pan. Season the steak generously with kosher salt and pepper. When you’re ready, heat your cast iron skillet over high heat until it’s smoking hot. Add a thin layer of avocado oil, then lay the steak in the pan. Sear for 60 seconds on each side, pressing gently with a spatula. You’re not cooking the steak through here; you’re just building color and flavor.
After searing both sides, transfer the rack and pan directly into the preheated oven. The steak will continue to cook gently in the low heat. This is where the magic happens. The oven slowly brings the internal temperature up while the crust sets and deepens. You’ll notice the steak’s color deepen slightly and the edges will become more defined. This gentle baking is what gives oven-baked steak its incredible evenness.
Oven Time and Temperature Guide
Bake the steak for about 20 to 30 minutes for a 1.5-inch thick steak. The exact time depends on your oven and the starting temperature of the meat. Start checking the internal temperature after 15 minutes. For medium-rare, you want the steak to reach 115°F to 120°F in the oven. For medium, pull it at 125°F to 130°F. Remember, the temperature will rise 5 to 10 degrees during resting, so you want to pull it a little early.
| Steak Thickness | Oven Temp | Approx. Bake Time | Target Internal Temp (Before Rest) |
|---|---|---|---|
| 1.5 inches | 250°F | 20–25 minutes | 115°F–120°F (medium-rare) |
| 2 inches | 250°F | 25–30 minutes | 115°F–120°F (medium-rare) |
| 1.5 inches | 250°F | 22–28 minutes | 125°F–130°F (medium) |
Use this as a guide, but always trust your thermometer. Every oven runs slightly different, and the starting temperature of the steak matters. A steak straight from the fridge will take longer than one that’s been sitting at room temperature for 30 minutes. That’s why the 30-minute rest before cooking is so important.
Checking Doneness with a Thermometer
Poke the thermometer into the thickest part of the steak, avoiding any bone or fat. The reading you see is the temperature it will reach after resting. For a juicy, pink center, pull the steak at 115°F to 120°F for medium-rare. If you prefer medium, pull at 125°F to 130°F. How To Cook A Tenderloin Steak In The Oven becomes effortless once you rely on numbers instead of timers or color. The thermometer removes all the stress and gives you perfect results every time.
Common Mistakes: Don’t rely on the touch test. Squeezing a steak tells you nothing about its internal temperature. And never skip the thermometer if you want consistent results. This is the single biggest upgrade you can make to your steak game. I keep my instant-read thermometer right next to the oven so it’s always within reach.
Resting and Slicing Your Steak
The work isn’t done when you pull the steak from the oven. What happens next determines whether you get a juicy, tender bite or a dry one. Resting and slicing are the final steps that make or break your steak experience.
The Importance of Resting
Transfer the steak to a warm cutting board and let it rest for at least 8 minutes. During cooking, the heat pushes the juices toward the center. Resting allows those juices to redistribute evenly throughout the meat. If you cut too soon, they’ll flood onto the plate instead of staying in the steak. This resting step is what separates a good home cook from a great one. Rest your steak patiently, and you’ll be rewarded with every bite.
I like to tent the steak loosely with a piece of aluminum foil during resting. This keeps it warm without trapping too much steam, which could soften the crust. Some cooks skip the foil entirely, and that’s fine too. The key is to give the steak at least 8 minutes of peace. If you’re serving multiple steaks, you can rest them one at a time on a warm plate. A warm plate prevents the steak from cooling down too quickly.
How to Slice Against the Grain
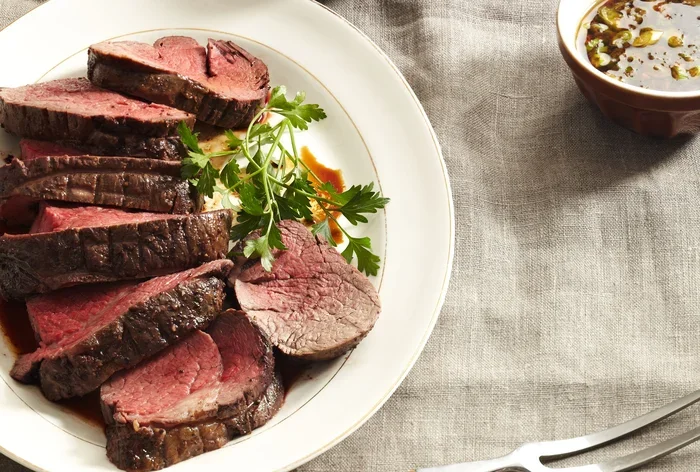
Identify the direction of the muscle fibers, then cut perpendicular to them. This shortens the muscle fibers, making the steak much easier to chew. Slice the tenderloin into strips about 1/2 inch thick. Use a sharp knife and a gentle sawing motion. A dull knife will shred the meat instead of slicing it cleanly. Serve immediately with a drizzle of the resting juices from the cutting board.
Quick Tip: If you’re serving with a garlic butter baste, spoon a little melted herb butter over the sliced steak just before serving. It adds a rich, aromatic finish that will have everyone asking for seconds. A sprinkle of flaky sea salt on top of the slices also adds a beautiful crunch and bursts of flavor that complement the tender beef perfectly.
How to Store Leftover Steak
If you have any leftovers, proper storage ensures you can enjoy them the next day without sacrificing quality. Tenderloin steak reheats well if you do it right. Let the steak cool to room temperature, then wrap it tightly in plastic wrap or store it in an airtight container. Refrigerate for up to 3 days. Avoid storing it in the pan it was cooked in, as the retained juices can make the steak soggy.
The best way to reheat oven steak is in a low oven. Preheat to 275°F, place the steak on a wire rack over a sheet pan, and warm it for 10 to 15 minutes until it reaches 110°F internally. This gentle reheating prevents the meat from drying out. You can also reheat in a cast iron skillet on low heat for 2 to 3 minutes per side, adding a little butter to keep it moist. Avoid microwaving, as it tends to make the steak tough and rubbery.
Common Mistakes to Avoid
Even experienced cooks make slip-ups with oven steak. Here are the most common pitfalls and how to avoid them. Learning from these mistakes will save you from a dry, overcooked steak and help you master how to cook a tenderloin steak in the oven with confidence.
Overcooking the Edge
A thick steak can have a gray band if the oven temperature is too high. Keep it at 250°F. If you crank the heat to 300°F or higher, the outside will cook too fast before the center reaches your target temperature. Low and slow is the name of the game for oven-baked steak. The low temperature gently brings the entire steak up to the desired doneness without overcooking the edges.
Skipping the Room Temperature Rest
Putting a cold steak straight into the oven creates uneven cooking. The outside can overcook while the inside stays cold. Always take the steak out 30 minutes before cooking. This small habit makes a massive difference in doneness. It’s the simplest step in the whole process, yet so many people skip it. Just pull the steak out when you start preheating the oven, and it’ll be ready to go when the oven reaches temperature.
Not Drying the Surface
Moisture is the enemy of a good sear. If the steak is wet, it will steam instead of sear. Pat it thoroughly with paper towels right before it hits the pan. Dry surface equals deep, flavorful crust. This is especially important after the 30-minute room temperature rest, because the steak may have released some moisture. A quick pat with a paper towel solves this completely.
Cutting Into the Steak to Check Doneness
Every time you cut into the steak, you release precious juices. Trust the thermometer and leave the steak intact until it’s rested and ready to slice. If you’re curious about the color, you can peek at the edge where you seared it, but resist the urge to cut a big hole in the middle. The juices that escape are flavor and moisture you’ll never get back.
Key Takeaways: Bring the steak to room temperature, dry the surface, use a low oven, and rely on a thermometer. Avoid these four mistakes, and your tenderloin steak will be perfect every time. These simple habits will transform your cooking and give you consistent, restaurant-quality results.
Flavor Variations for Oven Steak
Once you’ve mastered the basic reverse sear, you can experiment with different flavors. The base method is so versatile that it pairs beautifully with a wide range of seasonings and accompaniments.
Herb Butter Finish
While the steak rests, prepare a simple compound butter. Mix softened butter with minced rosemary, thyme, a squeeze of lemon juice, and a pinch of garlic powder. Place a dollop of this herb butter on top of the hot steak just before serving. As it melts, it creates a rich, aromatic sauce that elevates the natural flavor of the tenderloin steak. This is a classic steakhouse move that’s incredibly easy to replicate at home.
Asian-Inspired Marinade
For something different, marinate the steak for 2 hours before cooking in a mixture of soy sauce, sesame oil, rice vinegar, a touch of honey, and minced ginger. Pat it dry before searing, and follow the same reverse sear method. The result is a steak with a savory, slightly sweet glaze that’s full of umami. Serve it with steamed rice and stir-fried vegetables for a complete meal.
Spicy Coffee Rub
This might sound unusual, but a rub made from finely ground coffee, cocoa powder, chili powder, brown sugar, and smoked salt creates an incredibly deep, complex crust. Apply the rub 40 minutes before cooking. The coffee and cocoa deepen the beefy flavor, while the chili adds a gentle warmth. This variation pairs wonderfully with a bold red wine like a Cabernet Sauvignon.
Serving Suggestions and Pairings
A great oven-baked steak deserves the right sides and drinks to complete the meal. Here are some classic and creative pairings that work beautifully with tenderloin.
- Crispy roasted potatoes: Toss baby potatoes with olive oil, rosemary, and garlic, then roast on a separate sheet pan while the steak rests.
- Garlic butter asparagus: Quick-sear asparagus in the same cast iron skillet after removing the steak. A squeeze of lemon and a sprinkle of parmesan finishes it perfectly.
- Simple green salad: Mixed greens with a light vinaigrette cut through the richness of the steak and add a refreshing crunch.
- Creamy mashed potatoes: The ultimate comfort pairing. The smooth, buttery potatoes soak up the steak juices beautifully.
- Red wine reduction: Deglaze the steak pan with a splash of red wine, add a bit of beef broth, and simmer until syrupy. Drizzle over sliced steak for an instant restaurant-quality sauce.
Quick Tip: For a weeknight dinner, keep it simple with a baked potato and a handful of arugula. The steak is the star, and it doesn’t need a lot of fuss to shine. Even a simple side of buttered bread can make the meal feel complete.
Conclusion
How To Cook A Tenderloin Steak In The Oven is one of the most satisfying skills you can learn in the kitchen. With the reverse sear method, a simple seasoning, and a reliable thermometer, you can serve a steak that tastes just as good as the best steakhouses. The oven does the heavy lifting, giving you perfectly even doneness and a stunning crust with minimal effort.
Remember to bring your steak to room temperature, sear it hard in a cast iron pan, and bake it low and slow. Let it rest for a full 8 minutes, then slice against the grain. Each step is easy, and together they create a steak that will wow your family and friends. Practice this method a few times, and it will become second nature. You’ll wonder how you ever cooked steak any other way. Now go fire up that oven and enjoy every bite.
Frequently Asked Questions
What is the best oven temperature for cooking a tenderloin steak?
Preheat your oven to 250°F for the reverse sear method. This low temperature gently brings the steak up to the perfect internal temperature without overcooking the edges. The final sear on the stovetop then adds a beautiful crust.
How long should I rest a steak after cooking?
Let your steak rest for at least 8 minutes on a warm cutting board. This allows the juices to redistribute evenly throughout the meat, ensuring every bite is juicy and tender. Cutting too soon causes those flavorful juices to run out onto the plate.
Can I use a convection oven for steak?
Yes, you can use a convection oven, but reduce the temperature by about 25°F to account for the fan. Convection ovens circulate hot air more efficiently, which can slightly shorten cooking time. Always use a meat thermometer to check doneness accurately.
What is the reverse sear method?
The reverse sear is a technique where you slowly cook the steak in a low oven until it reaches a few degrees below your target internal temperature, then finish it with a quick, hard sear in a blazing-hot cast iron skillet. This method produces an even pink center with a deeply caramelized crust.
How do I know when my steak is done without cutting into it?
The only reliable way is to use an instant-read meat thermometer inserted into the thickest part of the steak. Pull the steak at 115°F to 120°F for medium-rare and 125°F to 130°F for medium. The temperature will rise a few degrees during resting, so pull it slightly early.
Can I cook a frozen tenderloin steak in the oven?
It’s not recommended because a frozen steak will cook unevenly, with the outside overcooking before the inside thaws. For the best results, always thaw your steak in the refrigerator for 24 hours before cooking. If you must cook from frozen, increase the oven time significantly and use a thermometer to check for doneness.