How To Make Riblets In The Oven With This Simple Recipe
Discover how to make riblets in the oven with this simple, foolproof recipe that delivers tender, sticky, and flavorful ribs every single time. This guide walks you through everything from choosing the right cut to nailing the perfect glaze. Whether you are a beginner or a seasoned cook, you will find clear steps and pro tips that make oven-baked ribs easy and delicious.
There is nothing quite like biting into a rack of tender, sticky, perfectly baked riblets straight from your own oven. Learning how to make riblets in the oven is one of the most rewarding skills you can pick up in the kitchen. With just a few simple ingredients and a little patience, you can create ribs that rival your favorite barbecue restaurant. This recipe breaks down every step in a way that is easy to follow and hard to mess up. By the end of this guide, you will know exactly how to make riblets in the oven that your whole family will love.
If you love ribs but do not own a smoker, you are not out of luck. Making riblets in the oven is a fantastic way to get that same smoky, tender flavor right in your own kitchen. Oven-baked ribs have become a go-to method for home cooks who want great results without the hassle of managing a fire or dealing with unpredictable weather.
The beauty of this approach is how simple it really is. You season the meat, set the temperature, and let the oven do all the work. This guide will show you exactly how to make riblets in the oven with a recipe that is easy to follow and full of flavor. Whether you are cooking for a weeknight dinner or a weekend gathering, these oven-baked riblets will always impress.
Key Takeaways
- Simple Recipe: Making riblets in the oven requires minimal effort but delivers maximum flavor every time.
- Perfect Temperature: Baking at 275°F ensures tender, fall-off-the-bone results that everyone will love.
- Dry Rub Matters: A well-balanced rib rub with brown sugar and paprika creates a beautiful, flavorful crust.
- Wrap for Moisture: Wrapping riblets in foil during cooking keeps them juicy, tender, and full of flavor.
- Glaze at the End: Applying a sweet glaze in the last 30 minutes adds sticky, caramelized perfection.
- Rest Before Serving: Letting riblets rest for 10 minutes helps the juices redistribute for the best bite.
- Oven-Baked Is Easy: You do not need a smoker or grill to get restaurant-quality ribs right at home.
📑 Table of Contents
What Are Riblets and Why Make Them in the Oven
What Sets Riblets Apart from Full Ribs
Riblets are small, bite-sized pieces cut from full racks of pork ribs. They are not a separate cut of meat but rather a clever way to portion standard ribs into smaller, more manageable pieces. When you buy full ribs and cut them into riblets, you get uniform pieces that cook evenly and are perfect for snacking or serving at parties.
Many people prefer riblets over full racks because they are easier to handle and eat. You do not need to wrestle with a big bone or worry about uneven cooking. Instead, every piece gets the same amount of heat and seasoning. This makes oven-baked ribs a great choice for beginners who are still learning the ropes of cooking meat at home.
Riblets also cook faster than full racks. Because the pieces are smaller, the heat penetrates more quickly and evenly. This means shorter cook times and less waiting around. If you have ever tried to cook a full rack in the oven and ended up with uneven results, switching to riblets might be the solution you have been looking for.
Why the Oven Is the Best Way to Cook Riblets
The oven offers consistent, even heat that is hard to replicate on a grill or smoker. When you learn how to make riblets in the oven, you gain full control over the temperature and cooking environment. This means fewer surprises and more predictable results every time you cook. Your kitchen becomes your own personal barbecue joint.
Oven baking also allows you to use the low-and-slow method without worrying about flare-ups or wind. You can set your oven to 275°F and let the riblets cook undisturbed for a few hours. This gentle heat breaks down the connective tissue in the pork, turning tough cuts into tender, juicy bites. The collagen in the meat melts slowly, creating that melt-in-your-mouth texture everyone craves.
Plus, cleanup is much easier when you cook in the oven compared to managing a grill. There is no charcoal to dispose of, no grease fires to worry about, and no messy grates to scrub. Just a simple baking sheet or dish, and you are done. For busy weeknights or casual gatherings, oven-baked riblets are the most convenient option available.
Ingredients You Need for Perfect Oven Riblets
The Best Pork Ribs to Use
Not all ribs are created equal, and choosing the right cut makes a big difference in your final dish. For oven-baked riblets, pork back ribs and baby back ribs are the top choices. They are leaner, more tender, and cook faster than beef or thicker pork cuts. The flavor is mild and slightly sweet, which pairs beautifully with most rubs and glazes.
Here is a quick look at the best options for making riblets in the oven:
- Pork Back Riblets: These come from the top of the rib cage and are lean and tender. They are the most popular choice for oven baking and are widely available at most grocery stores.
- Baby Back Ribs: Slightly larger than riblets but cut down to size. They have a mild, sweet flavor that absorbs rubs and glazes wonderfully. They cook in a shorter time than larger cuts.
- St. Louis Style Riblets: Trimmed from spare ribs, these are meatier and have a richer flavor. They take a bit longer to cook but reward you with deep, robust taste.
When choosing your pork, look for ribs with a good amount of meat on the bone. Avoid ribs that look dry or have very little meat between the bones. A thin layer of fat on the outside is fine and actually helps keep the riblets moist during cooking.
Essential Seasonings and Sauces
The flavor of your riblets comes down to two things: the dry rub and the glaze. A good dry rub builds a deep, savory crust on the outside, while a glaze adds sweetness and shine. Both are essential for achieving the perfect balance of flavors in your oven-baked ribs.
For the dry rub, you will need these pantry staples:
- Brown sugar for sweetness and caramelization on the surface
- Paprika for color and a mild, warm smoky flavor
- Garlic powder for savory depth that complements the pork
- Onion powder for a subtle, natural sweetness
- Cayenne pepper for a touch of gentle heat
- Salt and black pepper as the essential base
- Smoked paprika if you want to boost the smoky flavor even more
For the glaze, a simple mix of ketchup, brown sugar, apple cider vinegar, and a splash of Worcestershire sauce works beautifully. You can also use store-bought BBQ sauce if you are short on time. The glaze goes on during the last 30 minutes of cooking and creates that sticky, glossy finish that makes oven-baked riblets so irresistible.
Quick Tip: Make a double batch of your dry rub and store it in an airtight jar. It keeps for months and is ready to go whenever you feel like making riblets in the oven on a whim.
How to Prepare Riblets for the Oven
Trimming and Cutting Tips
Before you start cooking, you need to prep your riblets properly. If you bought a full rack, lay it out on a cutting board and use a sharp knife to cut between each bone. This gives you individual riblets that are easy to season and cook evenly. Aim for pieces that are about one to two inches long for the best results.
Next, trim off any excess fat from the surface. A thin layer of fat is fine because it adds flavor during cooking. But thick, heavy fat caps can become greasy and prevent your rub from sticking to the meat. Use a sharp knife to carefully trim away the thickest parts of the fat cap.
Remove the membrane on the back of the ribs as well. This thin, papery layer can be tough and chewy after cooking. Use a butter knife to loosen one corner of the membrane, then grab it with a paper towel for grip and pull it off in one piece. This small step makes a big difference in the texture of your finished riblets.
The Perfect Dry Rub
Applying the dry rub is one of the most important steps when you learn how to make riblets in the oven. The rub creates a flavorful crust and helps the meat stay moist during the long cooking process. It also forms the bark, that delicious crispy exterior that makes oven-baked ribs so satisfying.
Start by patting the riblets dry with paper towels. This helps the rub stick better to the surface of the meat. Then, mix all your dry ingredients together in a small bowl. Generously coat every piece of riblet on all sides. Use your hands to press the rub into the meat so it adheres well.
For the best results, rub the mixture into the meat and let it sit in the fridge for at least one hour. If you have time, prepare the riblets the night before and let them marinate in the fridge overnight. The longer the rub sits, the deeper and more complex the flavor becomes. This is a simple step that separates good riblets from great ones.
Expert Insight: Many professional pitmasters recommend salting the riblets first and letting them sit uncovered in the fridge for a few hours before applying the rub. This dries the surface even further, which helps create a thicker, crunchier bark during baking.
Step-by-Step Oven Baking Process
Low and Slow Method
The secret to tender, fall-off-the-bone riblets is cooking them low and slow. Set your oven to 275°F and let it preheat while you prep the riblets. This lower temperature allows the collagen in the pork to break down slowly, resulting in meat that is incredibly tender and juicy.
Place the seasoned riblets on a lined baking sheet or in a deep baking dish. You want them in a single layer with some space between each piece. This allows the hot air to circulate evenly around every riblet. If you are using a baking dish, you can stack them in two layers, but a single layer is always better for even cooking.
Cover the dish tightly with aluminum foil to trap moisture inside. This creates a steaming effect that keeps the riblets from drying out during the long cook time. Bake for about 2.5 to 3 hours. The low heat slowly renders the fat and softens the connective tissue. Resist the urge to open the foil too often, as this lets steam escape and can dry out the meat.
Wrapping and Glazing
After the first two hours, it is time to check on your riblets. The meat should be tender and pulling away from the bone slightly. At this point, you can remove the foil for the final stage of cooking. This is when the magic really starts to happen.
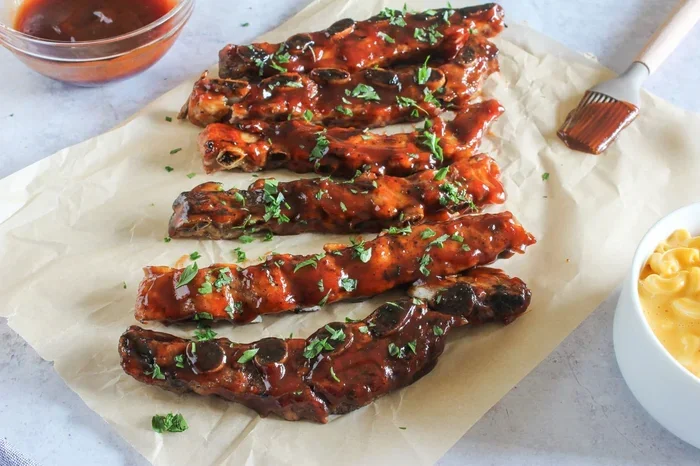
Brush a generous layer of your glaze over each riblet. A homemade glaze made from ketchup, brown sugar, apple cider vinegar, and a little honey works beautifully. The sugars in the glaze will caramelize in the oven, creating a sticky, glossy finish that is absolutely delicious. Make sure to cover every piece evenly for the best results.
Return the riblets to the oven uncovered for the final 30 minutes. This open baking allows the glaze to set and the tops to become slightly crispy. Keep an eye on them during this stage to prevent burning. The difference between a good rack of riblets and a great one often comes down to this final glazing step.
The Final Bake for Crispy Texture
The last 30 minutes are all about texture. With the foil removed and the glaze applied, the oven’s dry heat starts to firm up the outer layer of the riblets. This creates a beautiful contrast between the crispy exterior and the juicy, tender interior. It is this contrast that makes oven-baked riblets so satisfying to eat.
When the riblets are done, they should have a deep reddish-brown color and a slightly sticky surface. The internal temperature should reach 195°F for the most tender results. Use a meat thermometer to check, and if they are not quite there yet, give them an extra 10 to 15 minutes. The temperature is the most reliable way to know when your riblets are perfectly cooked.
Common Mistakes to Avoid: Many home cooks pull their riblets off too early because they look done on the outside. But the meat needs time for the internal collagen to break down fully. Trust the process and the thermometer, and your riblets will be perfectly tender every time.
Tips for Crispy, Tender Riblets Every Time
Temperature and Timing Guide
Getting the timing right is key when you learn how to make riblets in the oven. Every oven is different, so use these general guidelines as a starting point and adjust based on your own appliance. The type of riblet you are using also affects the cook time, so keep that in mind.
- 275°F for 2.5 to 3 hours: This is the sweet spot for tender, juicy riblets. The low heat cooks the meat gently without drying it out. This method gives you the best flavor and texture.
- 300°F for 2 to 2.5 hours: A slightly higher temperature speeds things up but still delivers great results. Watch the glaze closely to prevent burning during the shorter cook time.
- 325°F for 1.5 to 2 hours: This is the fastest method. It works well for thinner riblets but may not produce the same level of tenderness as the lower temperatures.
| Oven Temperature | Cooking Time | Best For | Tenderness Level |
|---|---|---|---|
| 275°F | 2.5 to 3 hours | Maximum tenderness and flavor | Fall-off-the-bone |
| 300°F | 2 to 2.5 hours | Balanced speed and flavor | Very tender |
| 325°F | 1.5 to 2 hours | Quicker weeknight meals | Tender with firmer bite |
Quick Tips for Better Results:
- Use a wire rack: Placing riblets on a wire rack over a baking sheet allows air to circulate underneath, giving you more even browning on all sides.
- Add liquid smoke: If you want a deeper smoky flavor without a smoker, add a few drops of liquid smoke to your glaze. It mimics the flavor of wood-fired cooking beautifully.
- Double glaze: Apply a first layer of glaze, let it set for 10 minutes, then add a second layer for extra stickiness and shine. This creates a professional-looking finish.
- Sprinkle with finishing salt: A light sprinkle of flaky sea salt right before serving adds a nice crunch and flavor boost that elevates the whole dish.
- Let them come to room temperature: Taking the riblets out of the fridge 30 minutes before baking helps them cook more evenly throughout.
Common Mistakes to Avoid
Even with a great recipe, small mistakes can affect your results. Here are some common pitfalls to watch out for when making riblets in the oven:
- Skipping the trim: Leaving too much fat or the membrane on can make your riblets greasy and tough. Always trim and remove the membrane before seasoning the meat.
- Opening the foil too often: Every time you lift the foil, you release steam and heat. This can significantly increase cooking time and dry out the meat. Trust the process and keep that foil on.
- Using too much glaze too early: Applying the glaze at the beginning of cooking will cause it to burn and turn bitter. Wait until the last 30 minutes to add the glaze for the best flavor.
- Not letting the meat rest: Cutting into riblets right out of the oven causes the juices to run out, leaving the meat dry and less flavorful. Always let them rest for at least 10 minutes before serving.
- Overcrowding the pan: Placing riblets too close together blocks airflow and leads to uneven cooking. Give each piece some space so the heat can reach every surface.
Serving Suggestions and Pairing Ideas
Best Sides to Serve with Oven Riblets
Riblets are a crowd-pleaser on their own, but the right sides can turn a good meal into a great one. The key is to balance the rich, savory flavor of the pork with bright, fresh, or starchy accompaniments. Here are some easy pairing ideas that work beautifully with oven-baked riblets.
- Coleslaw: The cool, crunchy contrast of coleslaw balances the rich, savory flavor of riblets perfectly. A tangy vinegar-based slaw is especially good alongside sticky, glazed riblets.
- Baked Beans: This classic BBQ side complements the smoky, sweet glaze on the riblets. Make them from scratch or use a good-quality canned version for convenience.
- Cornbread: A warm piece of cornbread is perfect for soaking up any leftover glaze and juices. It adds a comforting, homestyle element to the meal.
- Grilled Corn: Charred corn on the cob adds a summery, smoky element that pairs wonderfully with pork riblets. A little butter and chili powder go a long way.
- Mac and Cheese: Creamy, cheesy mac and cheese is a comfort food pairing that never disappoints. It is always a hit with kids and adults alike.
Sauce and Dip Options
While the glaze on oven-baked riblets is delicious on its own, offering extra sauces on the side gives your guests more options and makes the meal feel more interactive. A tangy vinegar-based sauce, a spicy chipotle mayo, or a classic Carolina-style mustard sauce all pair wonderfully with pork riblets.
You can also set out a bowl of extra BBQ sauce for dipping. This is especially popular at parties and gatherings where people like to customize their plate. Having a variety of sauces turns a simple meal into a fun, social dining experience that everyone will enjoy.
How to Store and Reheat Leftover Riblets
Storing Cooked Riblets
If you have leftovers, storing them properly keeps them fresh and safe to eat. Let the riblets cool to room temperature first, then place them in an airtight container. They will keep in the refrigerator for up to 4 days. The glaze may soften slightly in the fridge, but a quick reheat will restore the texture.
For longer storage, you can freeze cooked riblets. Wrap them tightly in plastic wrap and foil, or place them in a freezer-safe bag. Frozen riblets will keep for up to 3 months. When you are ready to eat them, simply thaw overnight in the fridge and reheat using the method below.
Reheating Without Drying Them Out
Reheating is the trickiest part of leftover riblets. The goal is to warm them without turning them dry and tough. The best method is to place the riblets in a baking dish, add a splash of apple juice or broth, and cover with foil. Heat at 250°F for about 15 to 20 minutes. This gentle reheating method keeps the moisture locked in and preserves the tender texture.
You can also reheat riblets in the microwave, but be careful not to overdo it. Place a damp paper towel over the riblets and heat in short 30-second intervals. This prevents drying and helps the meat warm evenly. The microwave is a quick fix, but the oven method always produces better results.
Conclusion
Learning how to make riblets in the oven is easier than most people think. With the right cut of pork, a simple dry rub, and a little patience, you can create ribs that are tender, sticky, and full of flavor. The low-and-slow method transforms even budget-friendly cuts into something truly special. You do not need expensive equipment or years of experience to get amazing results.
The beauty of this recipe is its flexibility. You can adjust the seasoning, swap in your favorite glaze, or experiment with different rib cuts until you find your perfect combination. Once you master the basics, you can make oven-baked riblets anytime without needing a grill or smoker. They become a reliable go-to recipe for any occasion.
So fire up your oven, gather your ingredients, and give this recipe a try. Your family and guests will be asking for seconds before you know it. The satisfaction of pulling a tray of perfectly baked, glossy riblets out of your own oven is something every home cook should experience. Happy cooking, and enjoy every bite!
Frequently Asked Questions
What are riblets compared to regular ribs?
Riblets are small, bite-sized pieces cut from full racks of pork ribs. They are not a separate cut but rather a way to portion standard ribs into smaller, more uniform pieces. This makes them easier to season, cook evenly, and eat without dealing with large bones.
What is the best temperature to bake riblets in the oven?
The best temperature for baking riblets in the oven is 275°F. This low-and-slow approach allows the collagen in the pork to break down gradually, resulting in tender, fall-off-the-bone riblets. You can bake at 300°F for a slightly shorter cook time if you are in a hurry.
How long does it take to make riblets in the oven?
Most oven-baked riblets take between 2.5 and 3 hours at 275°F. Thinner cuts like baby back riblets may be done in 2 hours, while thicker St. Louis style riblets may need closer to 3.5 hours. Always use a meat thermometer to check for doneness.
Can I use frozen riblets for this recipe?
Yes, you can use frozen riblets, but it is best to thaw them completely in the refrigerator before cooking. Cooking from frozen can lead to uneven results, with the outside overcooking before the inside is done. Thawing ensures more consistent and better-tasting riblets.
Do I need to wrap riblets in foil while baking?
Wrapping riblets in foil during the first part of cooking is highly recommended. The foil traps steam and moisture, keeping the meat tender and juicy. You remove the foil for the final 30 minutes to allow the glaze to set and the tops to become slightly crispy.
What is the best glaze for oven-baked riblets?
A simple homemade glaze made from ketchup, brown sugar, apple cider vinegar, and a splash of Worcestershire sauce works wonderfully. You can also use store-bought BBQ sauce for convenience. Apply the glaze during the last 30 minutes of baking for the best sticky, caramelized finish.