How To Cook Boneless Skinless Chicken Breasts In Oven
Cooking boneless skinless chicken breasts in the oven is one of the easiest and most reliable ways to prepare a healthy, delicious meal. This guide walks you through everything you need to know, from prep and seasoning to perfect baking times and temperatures. You will learn how to get juicy, tender chicken breast results every single time, whether you are a beginner or a seasoned home cook. Follow these simple steps and turn a basic oven-baked chicken breast into a family favorite dish.
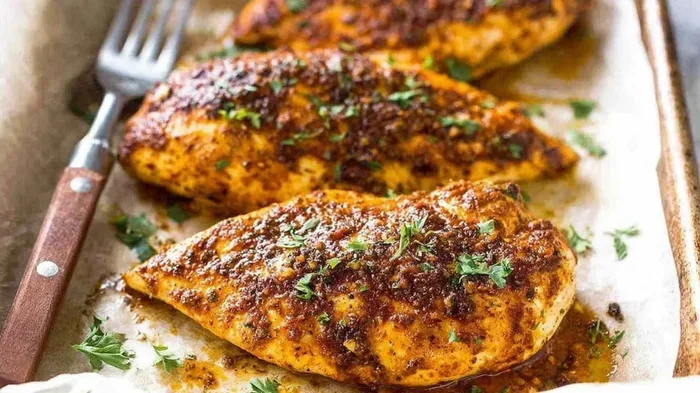
There is something truly satisfying about pulling a tray of baked chicken breasts out of the oven. The kitchen fills with a warm, savory aroma, and you know you have just made something wholesome and delicious. Cooking boneless skinless chicken breasts in oven is a skill every home cook should master. It is simple, fast, and incredibly versatile.
Whether you are meal prepping for the week, feeding a family on a busy weeknight, or just looking for a healthy protein option, oven-baked chicken breast checks every box. It is lean, high in protein, and easy to customize with different flavors. The best part? You do not need any fancy equipment or advanced cooking skills. A basic oven, a baking dish, and a few simple ingredients are all you need.
In this guide, we will walk you through everything step by step. You will learn the best oven temperature for chicken, how long to bake chicken breast, and the secrets to keeping it moist and flavorful. We will also share easy seasoning ideas, common mistakes to avoid, and tips for meal prep. By the end, you will feel confident enough to make perfect baked chicken breasts every single time.
Key Takeaways
- Right Temperature Matters: Baking at 400°F gives you the best balance of crispy edges and juicy meat.
- Resting Is Essential: Letting the chicken rest for 5-10 minutes keeps it moist and tender.
- Brining or Marinating Helps: Even a quick 30-minute soak adds flavor and juiciness.
- Internal Temp Is Key: Always cook to 165°F internal temperature for food safety.
- Meal Prep Friendly: Baked chicken breasts store well and work great for quick meals all week.
- Avoid Overcooking: Using a meat thermometer prevents dry, tough chicken every time.
- Seasoning Flexibility: Simple salt and pepper works, but herbs and spices elevate the flavor.
📑 Table of Contents
Why Oven-Baked Chicken Breasts Are a Great Choice
Health Benefits of Baked Chicken Breast
Boneless skinless chicken breast is one of the leanest protein sources available. When you bake it in the oven, you do not need any added oil or fat. This makes it a fantastic choice for anyone watching their calorie intake or trying to eat cleaner. A single serving of roasted chicken breast provides about 30 grams of protein with very little fat.
Baking is also one of the healthiest cooking methods overall. Unlike frying, which adds excess grease and calories, oven cooking allows the chicken to cook in its own juices. This means you get a tender chicken breast without any unnecessary extras. It is a great option for heart-healthy diets, weight management plans, and everyday family meals.
Convenience and Ease of Cooking
One of the biggest reasons people love oven-baked chicken is how easy it is. You season the chicken, pop it in the oven, and wait. There is no flipping, no monitoring on the stove, and no risk of burning. You can prep the chicken, set a chicken breast timer, and use that time to prepare sides or tidy up the kitchen.
Baked chicken breasts also scale incredibly well. You can cook one breast for yourself or a whole tray for a family of six using the same method. This makes easy chicken dinner planning a breeze. Plus, leftovers reheat beautifully, making meal prep chicken a huge time-saver during busy weeks.
What You Need Before You Start
Essential Tools and Equipment
Getting ready to cook boneless skinless chicken breasts in oven is straightforward. You do not need much equipment. Here is what you will want to have on hand:
- A standard baking dish or oven-safe skillet
- A meat thermometer (this is a game-changer for chicken cooking temperature accuracy)
- Parchment paper or aluminum foil for easy cleanup
- A small bowl for mixing seasoning
- Tongs for handling the chicken
- A sharp knife for trimming any excess fat
A meat thermometer is probably the single most important tool for this recipe. It takes the guesswork out of cooking and ensures your chicken breast internal temp reaches the safe 165°F every time. Even experienced cooks rely on thermometers because they take away all the uncertainty.
Ingredients You Will Need
The beauty of oven-baked chicken breast is that you need very few ingredients. Here is a basic list to get you started:
- Boneless skinless chicken breasts (one per person, about 6 ounces each)
- Olive oil or a light coating of cooking spray
- Salt and black pepper
- Garlic powder
- Your choice of herbs (paprika, thyme, or rosemary work great)
That is it. You do not need a long grocery list to make delicious baked chicken breast. Of course, you can always add more flavors, which we will cover in a later section. But even with just salt, pepper, and garlic powder, you can create something truly satisfying.
Step-by-Step Guide to Cook Boneless Skinless Chicken Breasts In Oven
Step 1: Prep the Chicken
Start by removing the chicken breasts from the refrigerator about 15 to 20 minutes before cooking. Letting them come closer to room temperature helps them cook more evenly. While you wait, preheat your oven to 400°F. This is the sweet spot for baked chicken breasts because it cooks them quickly enough to stay juicy while still developing a light golden crust.
Next, pat the chicken dry with paper towels. This step is crucial. Moisture on the surface of the chicken creates steam in the oven, which can lead to soggy skin and uneven browning. A dry surface means better texture and more even crispy chicken breast edges.
Step 2: Season Generously
Now comes the fun part. Drizzle a small amount of olive oil over the chicken and rub it in with your hands. This helps the seasoning stick and adds a little moisture. Then sprinkle your salt, pepper, garlic powder, and any other spices you like. Be generous with the seasoning. Chicken breast seasoning should be noticeable on the surface because that is where the flavor lives.
For a more intense flavor, you can marinate the chicken ahead of time. A simple chicken breast marinade with olive oil, lemon juice, garlic, and herbs works wonders. Even 30 minutes of marinating makes a noticeable difference. But if you are short on time, a quick seasoning right before baking still delivers great results.
Step 3: Arrange and Bake
Place the chicken breasts in a single layer in your baking dish. Leave space between each piece so hot air can circulate freely. Crowding the pan leads to uneven cooking and steamed rather than roasted chicken.
Put the dish in the preheated oven and set your chicken breast timer. For standard-sized breasts at 400°F, you will typically bake for about 20 to 25 minutes. The exact time depends on the thickness of the chicken, which brings us to the next important section.
Temperature and Timing Guide
Getting the chicken cooking temperature and timing right is the key to perfect results. Too low and the chicken takes forever. Too high and the outside burns before the inside is cooked. Here is a simple guide to help you nail it every time.
| Oven Temperature | Breast Thickness | Cooking Time | Result |
|---|---|---|---|
| 375°F | Thin (less than 1/2 inch) | 18-22 minutes | Mildly golden, very tender |
| 400°F | Medium (1/2 to 3/4 inch) | 20-25 minutes | Golden edges, juicy center |
| 425°F | Thick (3/4 inch or more) | 22-28 minutes | Crispy exterior, well-done |
| 350°F | Any thickness | 25-30 minutes | Evenly cooked, softer texture |
The most reliable way to check doneness is with a meat thermometer. Insert it into the thickest part of the breast. When the chicken breast internal temp reads 165°F, it is done. Remove it from the oven immediately. Remember that the temperature will rise a few degrees as the chicken rests, a process called carryover cooking.
Common Mistakes to Avoid
Even experienced cooks make mistakes when preparing baked chicken breasts. Here are the most common ones and how to avoid them:
- Skipping the rest time: Cutting into the chicken right out of the oven lets all the juices escape. Always let it rest for at least 5 minutes before slicing.
- Cooking from frozen: Frozen chicken cooks unevenly and takes much longer. Always thaw it in the fridge overnight for the best results.
- Over-seasoning with salt: Too much salt can make the chicken taste harsh. Start with less and adjust to taste.
- Using a pan that is too small: Crowded chicken steams instead of roasting. Give each piece room to breathe.
- Guessing doneness: Without a thermometer, it is easy to overcook or undercook. A meat thermometer is non-negotiable for perfect oven-baked chicken breast.
Quick Tips for Better Results
- Butterfly thick breasts to create even thickness for uniform cooking.
- Add a splash of chicken broth to the bottom of the pan for extra moisture.
- Let the chicken rest on a cutting board, not the hot pan, to prevent overcooking from residual heat.
- For extra crispy chicken breast edges, broil on high for the last 1-2 minutes (watch closely so it does not burn).
- Always use fresh herbs when possible. Dried herbs work in a pinch but have a more concentrated flavor, so use less.
Tips for the Juiciest Chicken Breast Every Time
Why Your Chicken Might Be Dry
The number one complaint about baked chicken breast is that it turns out dry. This almost always happens because of overcooking. Chicken breast has very little fat compared to thighs or drumsticks, so it dries out quickly once it passes the chicken breast internal temp of 165°F.
The solution is simple: pull the chicken out of the oven when it is just a few degrees below 165°F. The carryover cooking will bring it up to the safe temperature while it rests. This small change makes a huge difference in moisture and tenderness.
Brining for Extra Juiciness
If you want to take your oven-baked chicken breast to the next level, try brining. A quick brine of salt water (about 1/4 cup salt per 4 cups of water) for 30 minutes to 2 hours helps the chicken retain moisture during cooking. The salt changes the protein structure, allowing the meat to hold onto more water.
You do not need to brine every time. But for special occasions or when you really want juicy chicken breast results, a quick brine is worth the extra 30 minutes of prep. Just remember to pat the chicken dry before seasoning and baking.
Expert Insight: The Flattening Technique
Many professional cooks recommend flattening the chicken breasts before baking. Place the breast between two sheets of plastic wrap and gently pound it to an even thickness of about 3/4 inch. This ensures the chicken cooks evenly from edge to center. No more dry edges with a raw center. It is a simple trick that transforms baked chicken breasts from good to great.
Flavor Variations and Marinades
One of the best things about cook boneless skinless chicken breasts in oven is how customizable the flavor is. Here are some easy variations to keep things interesting all week long:
- Italian Style: Add dried oregano, basil, parmesan, and a drizzle of olive oil. Perfect with pasta.
- Lemon Herb: Mix lemon zest, fresh rosemary, thyme, and garlic. Bright and refreshing.
- Smoky BBQ: Rub with smoked paprika, cumin, brown sugar, and a touch of chili powder.
- Asian Inspired: Use soy sauce, sesame oil, ginger, and a splash of honey for a sweet-savory glaze.
- Simple and Classic: Just salt, pepper, garlic powder, and a little olive oil. Sometimes simple is best.
Each of these chicken breast recipe variations takes under 5 minutes to prep and delivers completely different flavor profiles. You can mix and match herbs and spices to create your own signature healthy chicken recipe. The possibilities are truly endless.
Meal Prep and Storage Tips
Meal prep chicken is one of the biggest time-savers for busy people. Baked chicken breasts store beautifully in the refrigerator and freezer, making them perfect for batch cooking.
To store, let the chicken cool completely, then place it in an airtight container. Refrigerated roasted chicken breast stays fresh for up to 4 days. For longer storage, wrap individual portions in freezer-safe bags and freeze for up to 3 months.
When you are ready to eat, reheat in the oven at 350°F for about 10-15 minutes. Avoid microwaving if possible, as it can make the chicken rubbery. A quick reheat in the oven keeps the tender chicken breast texture intact and tastes almost as good as fresh.
Boneless chicken breast also works wonderfully in salads, wraps, sandwiches, stir-fries, and pasta dishes. Having pre-cooked chicken on hand makes assembling quick meals during the week effortless. It is one of the best investments you can make for your weekly routine.
Conclusion
Cooking boneless skinless chicken breasts in oven is one of the most useful skills you can build in the kitchen. It is healthy, easy, and endlessly adaptable to your taste preferences. With the right oven temperature for chicken, a little seasoning, and attention to timing, you can produce juicy chicken breast that rivals anything from a restaurant.
Remember the key principles: dry the chicken before seasoning, bake at 400°F for even results, use a meat thermometer to avoid overcooking, and always let the chicken rest before slicing. These simple habits will transform your baked chicken breasts from average to outstanding every time.
Now that you have all the tools and knowledge, it is time to put them into practice. Grab some boneless skinless chicken breasts, preheat your oven, and give it a try. You will be amazed at how something so simple can taste so good. Happy cooking.
Frequently Asked Questions
Can I cook frozen boneless skinless chicken breasts in the oven?
Yes, you can cook frozen chicken breasts in the oven, but you will need to increase the cooking time by about 50%. It is best to use a meat thermometer to ensure the chicken breast internal temp reaches 165°F in the thickest part. For the best results, thaw the chicken in the refrigerator overnight before baking.
How long should I let chicken breast rest after baking?
Let your baked chicken breasts rest for at least 5 to 10 minutes before cutting into them. This resting period allows the juices to redistribute throughout the meat, resulting in a more juicy chicken breast and tender texture. Skipping this step causes the juices to run out immediately when you slice.
What is the best oven temperature for boneless skinless chicken breasts?
400°F is widely considered the best oven temperature for chicken breasts. It cooks them quickly enough to retain moisture while still creating a nice light golden color on the outside. If you prefer a slower, more gentle cook, 375°F also works well.
Can I use chicken breast marinade instead of dry seasoning?
Absolutely. A chicken breast marinade can add incredible flavor and extra moisture. Marinate the chicken for at least 30 minutes or up to 8 hours in the refrigerator. Just remember to pat the chicken dry before baking to get the best crispy chicken breast texture.
How do I know when the chicken is done without a thermometer?
While a meat thermometer is the most reliable method, you can also check by cutting into the thickest part of the breast. The meat should be white all the way through with no pink remaining. The juices should run clear, not pink or red. However, a thermometer is the safest and most accurate approach.
Can I meal prep baked chicken breasts for the whole week?
Yes, meal prep chicken is one of the best uses for oven-baked chicken breast. Cook a batch at the beginning of the week, store in airtight containers, and enjoy for up to 4 days in the refrigerator or 3 months in the freezer. Reheat in the oven for the best texture and flavor.