How To Make Crispy Chickpeas In Oven The Perfect Way
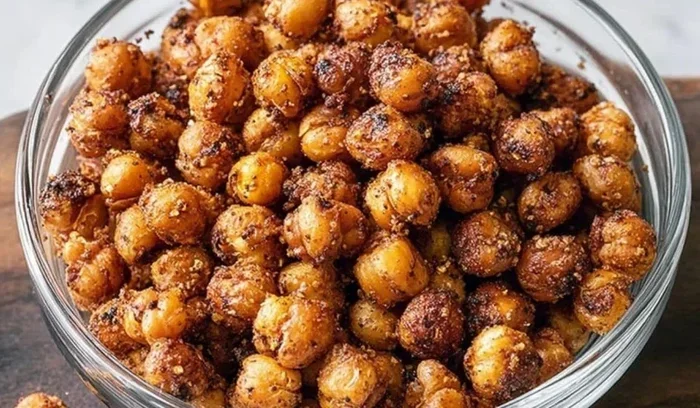
Discover the easiest way to make crispy chickpeas in oven at home. This simple recipe turns humble chickpeas into a crunchy, healthy snack that everyone loves. You only need a few basic ingredients, an oven, and about 30 minutes. Whether you want a protein-packed nibble or a crunchy topping for salads, these oven-roasted chickpeas deliver every time. Follow our step-by-step guide for perfectly crispy results with zero guesswork.
There is something deeply satisfying about a snack that is crunchy, flavorful, and good for you. Crispy chickpeas check every box. They are crunchy, they are packed with nutrition, and they come together in less than an hour. If you have been wondering how to make crispy chickpeas in oven at home, you are in the right place.
This guide walks you through everything from start to finish. We cover the ingredients, the technique, the best seasonings, and even common mistakes to avoid. By the end, you will feel confident enough to make a batch any day of the week. No fancy equipment needed. Just a simple oven and a little patience.
Oven-roasted chickpeas have become one of the most popular healthy snacks out there. They replace chips, they replace popcorn, and they even work as a protein-packed salad topper. People love them because they are easy to customize. You can go savory, spicy, or even sweet. The possibilities are truly endless. Once you start making them, you will wonder why you ever bought store-bought versions.
Key Takeaways
- Easy Preparation: Making crispy chickpeas in oven requires just three simple steps — drain, dry, and season.
- Perfect Crunch: The secret lies in thoroughly drying your chickpeas before baking for maximum crispiness.
- Healthy Snacking: These baked chickpeas are packed with protein and fiber, making them a guilt-free snack.
- Endless Flavors: You can customize seasonings to match any craving, from savory to sweet.
- Budget-Friendly: A can of chickpeas costs less than a dollar and makes a large batch.
- Meal Prep Friendly: Store them properly and enjoy crunchy chickpeas for up to a week.
- Versatile Use: Eat them as a snack, salad topper, soup garnish, or trail mix ingredient.
📑 Table of Contents
- Why Crispy Oven Chickpeas Are Everyone’s Favorite Snack
- What You Need To Get Started
- Step-by-Step: How To Make Crispy Chickpeas In Oven
- Best Seasoning Combinations For Flavor
- Common Mistakes And How To Avoid Them
- Creative Ways To Enjoy Your Crispy Chickpeas
- Nutritional Benefits Of Oven-Roasted Chickpeas
- Tips For Perfect Results Every Time
- Frequently Asked Questions
- Conclusion
Why Crispy Oven Chickpeas Are Everyone’s Favorite Snack
Before we dive into the recipe, let us talk about why these little legumes have earned such a big following. Understanding what makes them special helps you appreciate the process even more.
First, they are incredibly easy to make. Unlike deep-fried snacks, oven-baked chickpeas require almost no hands-on time. You toss them with oil and seasoning, spread them on a tray, and let the oven do the work. Second, they are genuinely healthy. Each serving delivers a solid dose of plant-based protein and dietary fiber. They also contain iron, folate, and phosphorus. Third, they are naturally gluten-free and vegan. Almost anyone can enjoy them regardless of dietary preferences.
Another big reason people love baked chickpeas is the texture. When done right, they have a satisfying crunch that rivals any potato chip. That crunch is what keeps people coming back for more. And unlike chips, you do not feel guilty afterward. They are whole food, minimally processed, and full of natural goodness.
The Science Behind Getting Them Crispy
Here is a fun fact. The crunch in roasted chickpeas comes from moisture leaving the oven. As the chickpeas bake, water evaporates from their surface. This leaves behind a dry, firm outer layer that cracks when you bite in. The key is removing as much moisture as possible before they go in the oven. That is why drying them thoroughly after rinsing is so important. If you skip this step, you will get soft or chewy chickpeas instead of crispy ones.
What You Need To Get Started
One of the best things about this recipe is how few ingredients you need. You probably already have most of them in your kitchen right now.
Ingredients List
- One can of chickpeas (15 oz or 400g) — or about one cup of dried chickpeas if you prefer to cook from scratch
- One tablespoon of olive oil — or any neutral oil like avocado oil
- Half a teaspoon of salt — adjust to taste
- Your choice of seasoning — see our flavor ideas below
Equipment You Will Need
- A baking sheet or sheet pan
- Parchment paper or a silicone baking mat
- A large mixing bowl
- A clean kitchen towel or paper towels
- An oven that can hold a steady temperature
That is it. No special tools. No expensive gadgets. Just simple kitchen basics and a little time. If you have a toaster oven, you can use that too. It may just take a few extra minutes since the space is smaller.
Step-by-Step: How To Make Crispy Chickpeas In Oven
This is the heart of the article. Follow these steps closely, and you will get amazing results every single time.
Step One: Drain and Rinse the Chickpeas
Open your can of chickpeas and pour them into a colander. Rinse them thoroughly under cold running water. This removes the liquid they came in and washes away excess sodium. If you are using dried chickpeas, cook them according to package directions first and let them drain completely.
Once rinsed, give the chickpeas a gentle shake in the colander. You want them as dry as possible at this stage. Any extra water will steam in the oven instead of helping them crisp up.
Step Two: Dry Them Thoroughly
This is the step most people skip, and it is the most important one. Spread your rinsed chickpeas out on a clean kitchen towel or several layers of paper towels. Pat them gently to remove surface moisture. Then let them air-dry for about 10 to 15 minutes.
For even better results, you can roll the chickpeas around gently on the towel. This helps rub off the thin outer skin that sometimes comes loose during rinsing. Those skins can burn in the oven and affect the texture. Removing them is optional, but it does help achieve a more uniform crunch.
Pro tip: Some people put the dried chickpeas in the oven for a quick five-minute toast at a low temperature. This drives off any remaining moisture before the main bake. It is a small step that makes a big difference in the final crunch.
Step Three: Season and Toss
Place your dried chickpeas into a large mixing bowl. Drizzle one tablespoon of olive oil over them. Add half a teaspoon of salt and any seasonings you like. Toss everything together with your hands until the chickpeas are evenly coated.
Make sure every single chickpea gets some oil on it. The oil helps the seasoning stick and promotes even browning. If you find clumps, just break them apart with your fingers. Even distribution is the key to consistent crispiness.
Step Four: Spread on the Baking Sheet
Line your baking sheet with parchment paper or a silicone mat. Spread the seasoned chickpeas out in a single layer. Do not crowd them. Leave space between each chickpea so hot air can circulate freely around every piece.
If you have to use two baking sheets, that is perfectly fine. Overcrowding is one of the top reasons chickpeas come out soft instead of crunchy. Give them room to breathe.
Step Five: Bake at the Right Temperature
Preheat your oven to 400 degrees Fahrenheit (about 200 degrees Celsius). Place the baking sheet on the middle rack. Set a timer for 25 to 30 minutes.
Here is what happens during baking. The chickpeas slowly lose their remaining moisture. The outside turns golden and hard while the inside stays soft and creamy. This contrast between crunchy outside and tender inside is what makes oven-baked chickpeas so irresistible.
At the 15-minute mark, give the pan a gentle shake or use a spatula to flip a few chickpeas. This helps them bake evenly on all sides. Check them again at 25 minutes. They should look golden brown and feel dry to the touch.
Step Six: Cool Completely
This is another step people often rush. Once the timer goes off, take the chickpeas out of the oven. Spread them on a plate and let them cool for at least 10 to 15 minutes. They will continue to crisp up as they cool. If you eat them right out of the oven, they may seem slightly soft. Give them time and they will reach maximum crunch.
Some people let them cool completely on the baking sheet. Others transfer them to a bowl right away. Either method works. Just do not skip the cooling step entirely.
Best Seasoning Combinations For Flavor
The beauty of homemade baked chickpeas is that you control the flavor. Store-bought snacks are limited to whatever the manufacturer chose. With your own batch, the possibilities are wide open. Here are some of our favorite combinations.
| Flavor Profile | Seasoning Mix | Best For |
|---|---|---|
| Classic Savory | Salt, garlic powder, smoked paprika | Everyday snacking |
| Spicy Southwest | Cumin, chili powder, cayenne pepper, lime zest | Bold flavor lovers |
| Ranch Style | Dried dill, onion powder, garlic powder, parsley | Cool and herby crunch |
| Sweet Cinnamon | Cinnamon, coconut sugar, vanilla extract | Dessert-like snack |
| Mediterranean | Oregano, lemon zest, olive oil, sea salt | Light and fresh taste |
| Everything Bagel | Sesame seeds, poppy seeds, garlic flakes, onion flakes, salt | Umami-packed crunch |
For sweet cinnamon chickpeas, toss them with a tiny bit of melted coconut oil and your spice mix after baking. This gives them a light coating that sticks well and adds a touch of sweetness.
When using spices, start with less than you think you need. You can always add more, but you cannot take it away. A light hand with strong spices like cayenne or cumin goes a long way. Taste a few chickpeas after cooling and adjust if needed.
Quick Tips For Seasoning Success
- Always season after drying the chickpeas. Dry surfaces help the spices cling better.
- Use fine-ground spices rather than coarse ones. They distribute more evenly.
- Add a tiny splash of water to your seasoning mix if it seems too dry. This helps it stick.
- For extra flavor, toss the warm chickpeas with seasoning right out of the oven while they are still slightly oily.
Common Mistakes And How To Avoid Them
Even simple recipes have pitfalls. Knowing what can go wrong helps you avoid frustration and get great results from the start.
Mistake One: Skipping the Drying Step
This is the number one reason chickpeas come out chewy instead of crispy. If your chickpeas carry too much water into the oven, that moisture turns to steam. Steam softens the outside and prevents crunch. Always pat them dry and let them air-dry before seasoning.
Mistake Two: Overcrowding the Pan
When chickpeas are piled on top of each other, hot air cannot reach every surface. The result is uneven baking. Some pieces burn while others stay soft. Give each chickpea its own space on the pan. Use two sheets if you need to.
Mistake Three: Opening the Oven Too Often
Every time you open the oven door, heat escapes. This changes the baking environment and can slow down the crisping process. Resist the urge to peek too frequently. Check once at the halfway point and trust the process.
Mistake Four: Not Letting Them Cool
Hot chickpeas from the oven feel softer than they actually are. The real crunch reveals itself only after cooling. Patience here pays off. Give them at least 10 minutes on a wire rack or plate before digging in.
Mistake Five: Storing Them While Still Warm
Trapping warm chickpeas in a container creates condensation. That moisture turns your crispy snack soft within hours. Always make sure they are completely cool before storing them in an airtight container.
Creative Ways To Enjoy Your Crispy Chickpeas
Once you master the basic recipe, you will want to get creative. These crunchy little gems work in more ways than you might think.
As a Standalone Snack: This is the most obvious and popular way. Keep a bowl of seasoned chickpeas on your counter for a grab-and-go crunch. They satisfy the same craving as chips but with far more nutrition.
On Top of Salads: Crush a handful of crispy chickpeas and sprinkle them over your favorite greens. They add a wonderful textural contrast to soft vegetables and leafy greens. It turns an ordinary salad into something much more satisfying.
In Soups and Stews: Drop a few whole crispy chickpeas into a hot bowl of soup right before serving. They soak up some broth while still maintaining a pleasant crunch. This works especially well with creamy soups like tomato bisque or roasted cauliflower soup.
Mixed Into Trail Mix: Combine your flavored chickpeas with nuts, dried fruit, and dark chocolate chips for a custom trail mix. The sweet and savory combination is surprisingly addictive.
As a Topping for Bowls: Whether it is a grain bowl, a Buddha bowl, or a rice bowl, crispy chickpeas make an excellent finishing element. They add protein, crunch, and visual appeal all at once.
In Wraps and Sandwiches: Use them like you would use croutons. Toss them into a wrap or sandwich for an unexpected crunch. They work especially well with hummus, fresh vegetables, and a drizzle of tahini.
How Long Do They Stay Crispy?
Properly stored in an airtight container at room temperature, oven-baked chickpeas stay crunchy for up to five days. They do not last as long as chips because they are a natural product with no preservatives. However, most people find they disappear within two or three days anyway. If you notice them softening, a quick trip back to a 350-degree oven for five minutes brings the crunch right back.
Nutritional Benefits Of Oven-Roasted Chickpeas
Beyond their amazing taste and texture, crispy baked chickpeas bring real nutritional value to your snack routine.
A single serving of about one-third cup provides roughly 130 to 150 calories. It also delivers around six grams of protein and five grams of fiber. That combination of protein and fiber is incredibly filling. It keeps you satisfied long after you finish snacking. This makes them a much better choice than processed chips or pretzels.
Chickpeas are also a great source of plant-based iron and folate. Iron carries oxygen through your blood, and folate supports cell growth and repair. For people following a plant-based or vegan diet, chickpeas are one of the most accessible ways to get these nutrients. They are also naturally low in fat when baked with just a light coating of oil.
The fiber content supports healthy digestion and helps maintain steady blood sugar levels. This means you get sustained energy without the crash that often follows sugary snacks. Athletes, students, office workers, and busy parents all benefit from this kind of steady fuel.
Tips For Perfect Results Every Time
A few extra tricks can take your crispy chickpeas from good to absolutely perfect.
- Use chilled chickpeas. After rinsing, pop them in the fridge for 30 minutes before baking. The cold helps them dry faster and promotes better crunch.
- Shake the pan halfway through. This simple move ensures even browning on all sides.
- Do not be afraid of high heat. A hot oven is your best friend. 400°F is the sweet spot for most ovens.
- Experiment with flavors. Try new combinations every week to keep things interesting.
- Make them a family activity. Let kids choose their own seasonings. They are much more likely to eat snacks they helped create.
Frequently Asked Questions
Can I use dried chickpeas instead of canned ones?
Yes, absolutely. Dried chickpeas work wonderfully for this recipe. Just cook them according to package directions until they are tender but not mushy. Drain them very well and follow the same drying and baking steps. The results are just as crispy and delicious.
What oven temperature is best for crispy chickpeas?
400 degrees Fahrenheit (200 degrees Celsius) is the ideal temperature. It provides enough heat to drive out moisture quickly while browning the chickpeas evenly. Some people go as high as 425 degrees for even faster results, but keep a close eye on them to prevent burning.
How long does it take to make crispy chickpeas in the oven?
The total time is about 35 to 45 minutes. This includes 10 to 15 minutes for drying, 25 to 30 minutes of baking, and 10 to 15 minutes of cooling. Active hands-on time is only about 10 minutes, making this one of the easiest snacks you can prepare.
Can I make crispy chickpeas without oil?
Yes, you can bake chickpeas without oil, but the results will be different. Without oil, the chickpeas tend to be drier and less evenly browned. They may still be crunchy but will lack the rich, slightly crispy coating that oil provides. If you want to avoid oil, try using a small amount of water or broth to help the seasoning stick.
How do I store leftover crispy chickpeas?
Let them cool completely, then store them in an airtight container at room temperature. They will stay crunchy for up to five days. Avoid refrigerating them, as the moisture in the fridge can soften them. If they lose their crunch, a few minutes back in a 350-degree oven will restore it.
Are crispy oven chickpeas good for meal prep?
They are excellent for meal prep. You can make a large batch at the start of the week and portion them into snack bags. They travel well and stay crunchy in airtight containers. This makes them a perfect grab-and-go snack for work, school, or travel.
Conclusion
Making crispy chickpeas in oven is one of the simplest and most rewarding things you can do in the kitchen. It is a recipe that rewards minimal effort with maximum flavor and nutrition. Whether you are looking for a healthy snack, a salad topper, or a crunchy addition to your meals, these baked chickpeas deliver every time.
The process is straightforward. Drain, dry, season, bake, and cool. That is all it takes. No special skills, no expensive ingredients, no complicated equipment. Just real food that tastes amazing and makes you feel good.
Once you start making crispy chickpeas in oven regularly, you will wonder how you ever lived without them. They are crunchy, they are satisfying, and they are endlessly customizable. Pick your favorite seasoning, make a batch today, and discover just how easy it is to turn a simple can of chickpeas into your new favorite snack. Your taste buds and your body will thank you.